
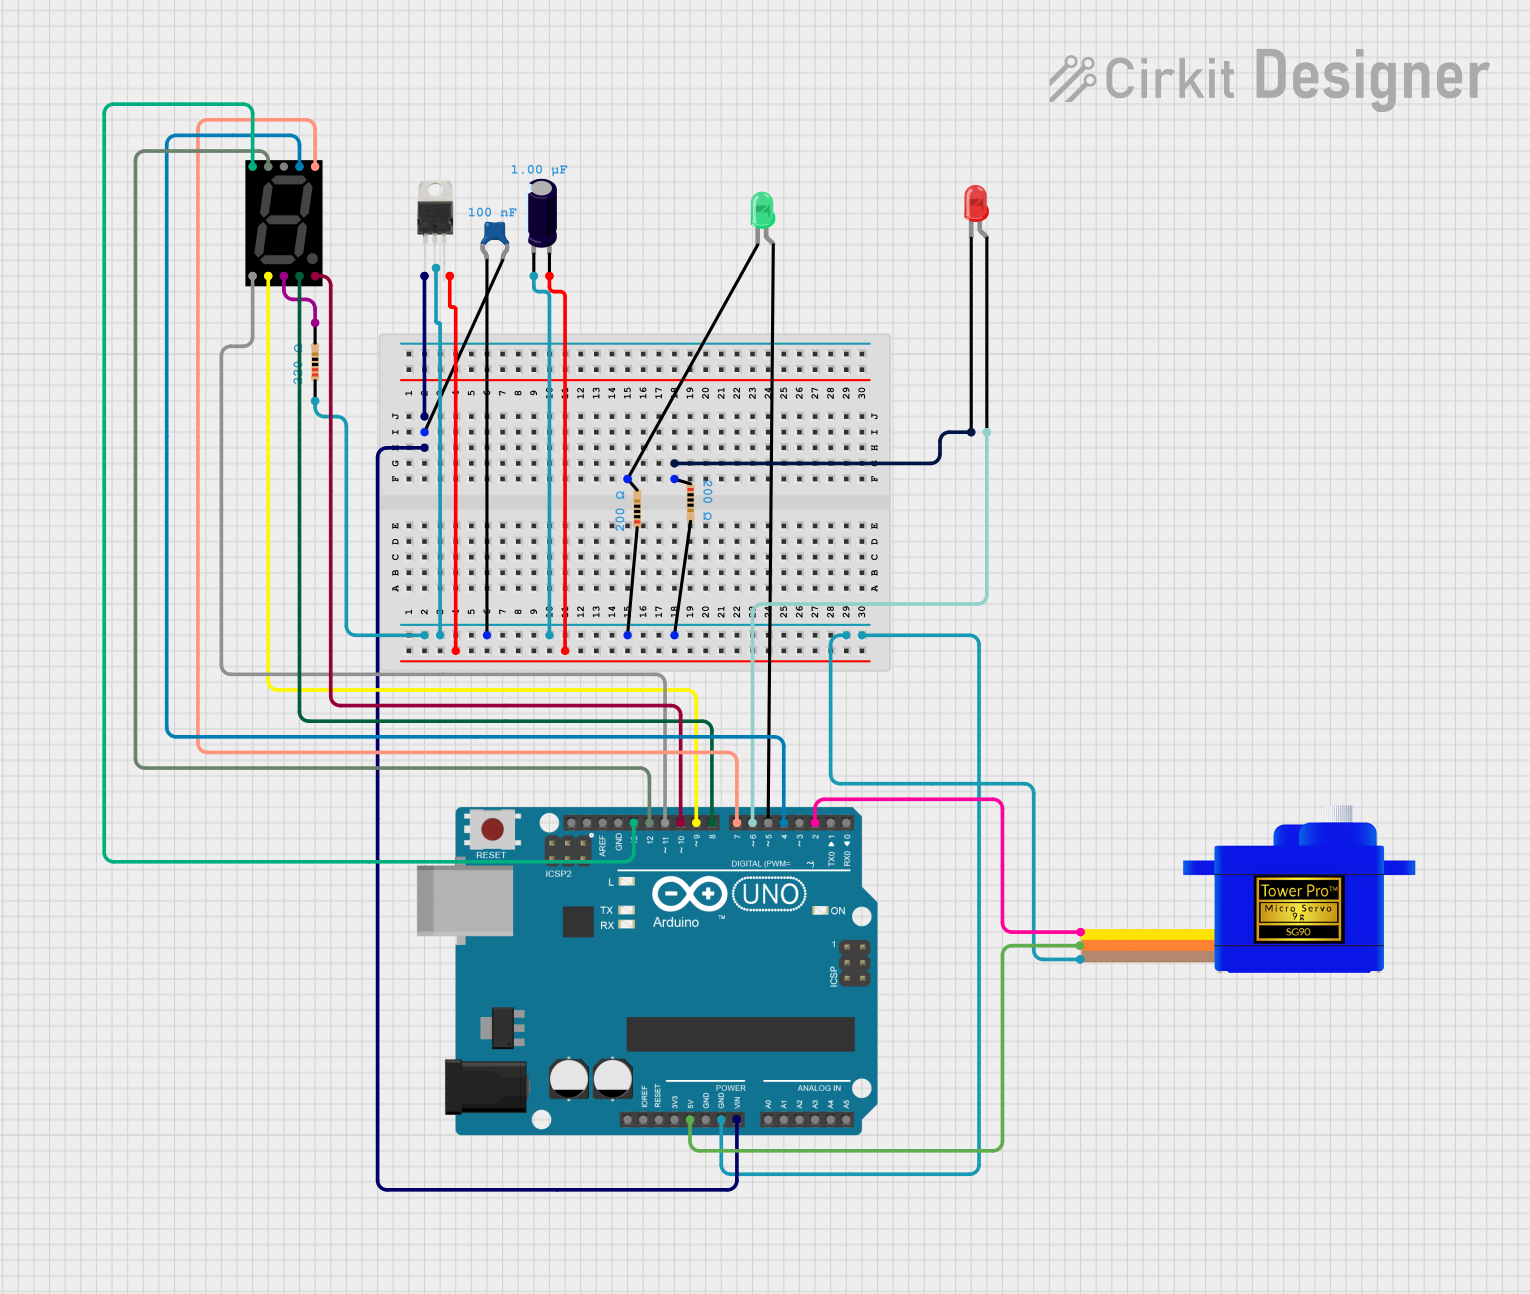
Circuit Documentation
Summary
This circuit is designed around an Arduino UNO microcontroller and includes various components such as resistors, capacitors, a voltage regulator (LM7805), LEDs, a seven-segment display, and a servomotor. The circuit appears to be a basic embedded system setup that could be used for displaying information on the seven-segment display and controlling an LED and a servomotor based on the logic programmed into the Arduino UNO.
Component List
Arduino UNO
- Microcontroller board based on the ATmega328P
- Provides digital and analog I/O pins that can be interfaced with various sensors and actuators
Resistor (220 Ohms)
- Limits current flow and divides voltage in the circuit
Resistor (200 Ohms)
- Two instances of this resistor are used for current limiting purposes
Electrolytic Capacitor (1 µF)
- Provides decoupling and can filter out voltage spikes
LM7805 Voltage Regulator
- Regulates input voltage to a steady 5V output
Seven Segment Display (Wokwi Compatible)
- Displays numerical information, controlled by the Arduino UNO
Ceramic Capacitor (100 nF)
- Typically used for noise filtering or decoupling applications
LED: Two Pin (red)
- Emits red light when forward-biased
LED: Two Pin (green)
- Emits green light when forward-biased
Servomotor SG90
- A small and lightweight servo used for precise control of motion
Wiring Details
Arduino UNO
Vinconnected to the input pin of the LM7805 and the ceramic capacitorGNDconnected to the ground pins of various components and the negative side of the electrolytic capacitor5Vconnected to the VCC of the servomotor- Digital pins
D2toD13connected to the servomotor and the seven-segment display
Resistor (220 Ohms)
- One side connected to the common pin of the seven-segment display
Resistor (200 Ohms)
- One instance connected to the cathode of the red LED
- Another instance connected to the cathode of the green LED
Electrolytic Capacitor (1 µF)
- Positive side connected to the output pin of the LM7805
- Negative side connected to the ground network
LM7805 Voltage Regulator
IN PINconnected to the ceramic capacitor andVinof the Arduino UNOGNDconnected to the ground networkOUT PINconnected to the positive side of the electrolytic capacitor
Seven Segment Display (Wokwi Compatible)
- Pins
AtoGandDPconnected to digital pinsD4toD13of the Arduino UNO - Common pins connected through a 220-ohm resistor to the ground network
Ceramic Capacitor (100 nF)
- Connected between the input pin of the LM7805 and ground
LED: Two Pin (red)
anodeconnected to digital pinD6of the Arduino UNOcathodeconnected through a 200-ohm resistor to the ground network
LED: Two Pin (green)
cathodeconnected through a 200-ohm resistor to the ground network
Servomotor SG90
SIGconnected to digital pinD2of the Arduino UNOVCCconnected to the5Vpin of the Arduino UNOGNDconnected to the ground network
Documented Code
Arduino UNO Code (sketch.ino)
void setup() {
  // put your setup code here, to run once:

}

void loop() {
  // put your main code here, to run repeatedly:

}
The provided code is a template with empty setup() and loop() functions, which are the entry points for Arduino sketches. The setup() function is called once when the sketch starts, and the loop() function runs repeatedly, allowing the microcontroller to perform operations based on the programmed logic. The actual behavior of the circuit will be determined by the code that is written and uploaded to the Arduino UNO.