
Arduino UNO-Based Battery-Powered Real-Time Clock with LCD Display and Pushbutton Interface
View and Edit Project In Cirkit Designer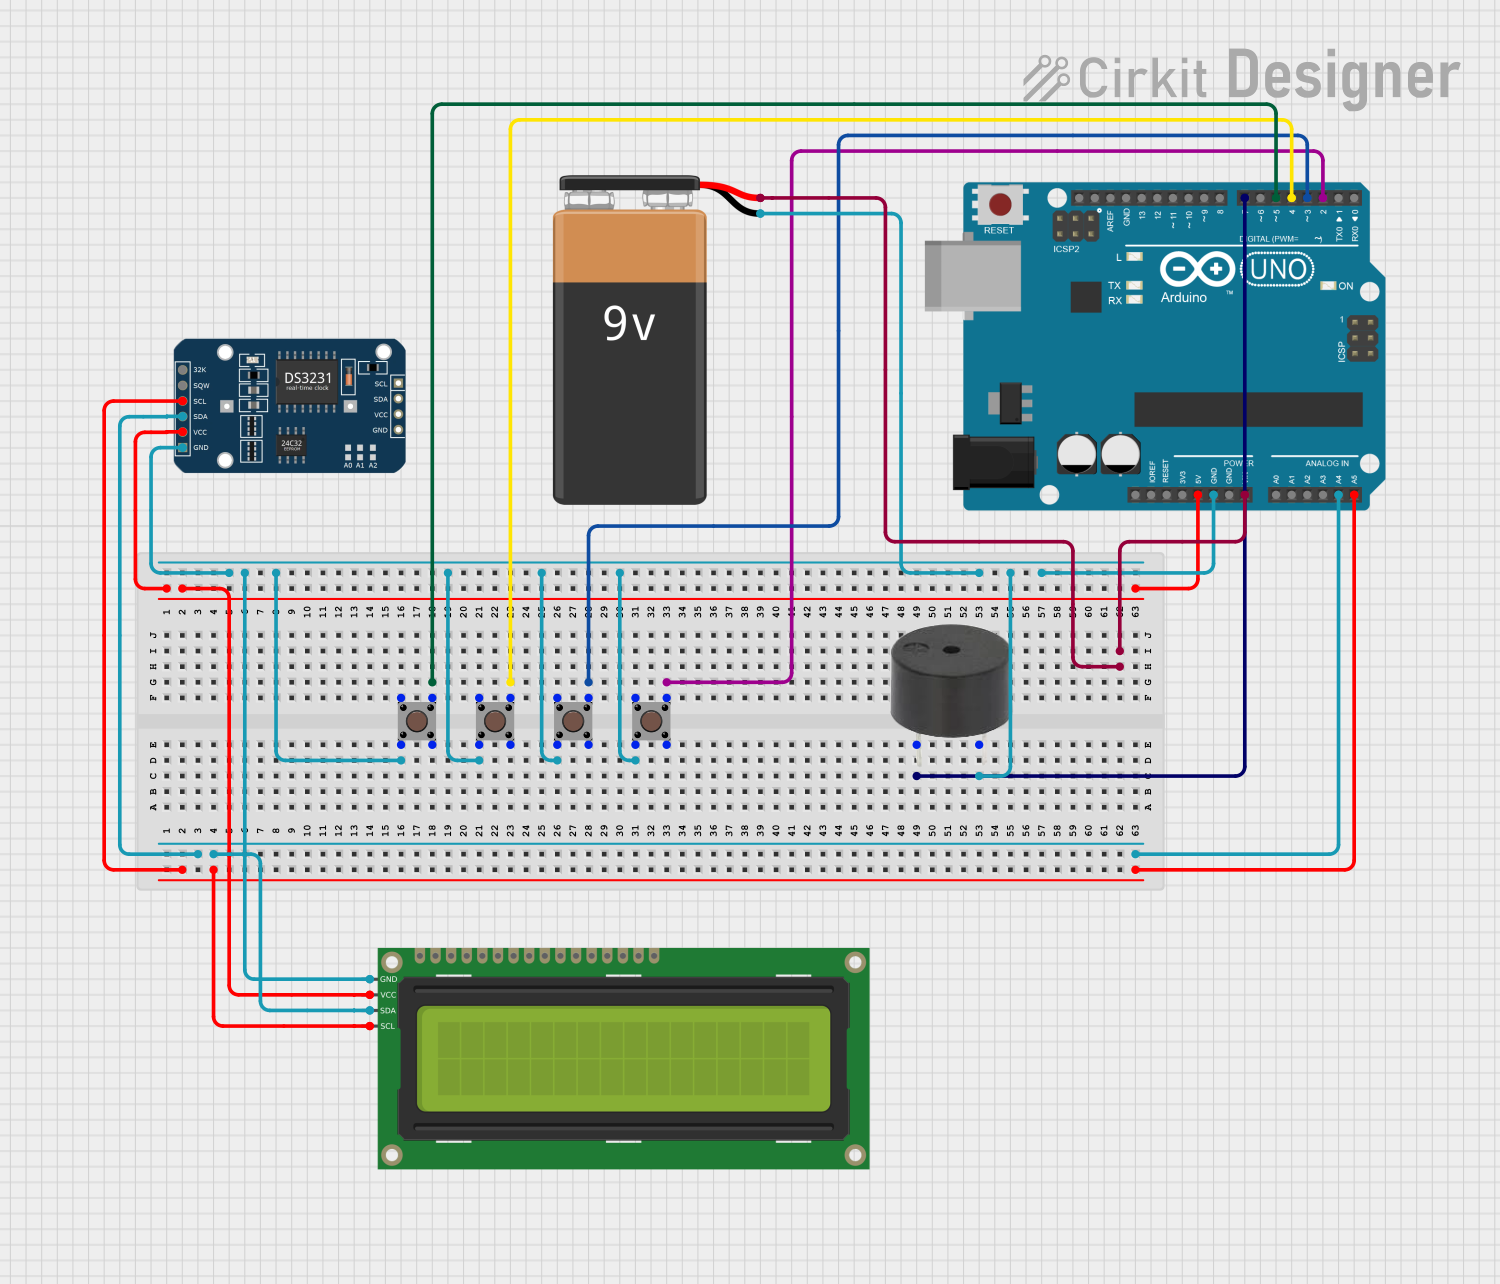
Circuit Documentation
Summary
This circuit consists of an Arduino UNO microcontroller, a 9V battery, multiple pushbuttons, a 16x2 I2C LCD, a DS3231 RTC module, and a buzzer. The Arduino UNO serves as the central controller, interfacing with the LCD and RTC via I2C communication, and interacting with the pushbuttons and buzzer through digital I/O pins. The 9V battery powers the entire circuit.
Component List
9V Battery
- Description: Provides power to the circuit.
- Pins:
+,-
Arduino UNO
- Description: Microcontroller board based on the ATmega328P.
- Pins:
UNUSED,IOREF,Reset,3.3V,5V,GND,Vin,A0,A1,A2,A3,A4,A5,SCL,SDA,AREF,D13,D12,D11,D10,D9,D8,D7,D6,D5,D4,D3,D2,D1,D0
Pushbutton
- Description: Simple pushbutton switch.
- Pins:
Pin 3 (out),Pin 4 (out),Pin 1 (in),Pin 2 (in)
16x2 I2C LCD
- Description: 16x2 character LCD with I2C interface.
- Pins:
GND,VCC,SDA,SCL
DS3231 RTC
- Description: Real-time clock module with I2C interface.
- Pins:
32K,SQW,SCL,SDA,VCC,GND
Buzzer
- Description: Simple piezoelectric buzzer.
- Pins:
PIN,GND
Wiring Details
9V Battery
+connected toVinof Arduino UNO-connected toGNDof Arduino UNO
Arduino UNO
5Vconnected toVCCof DS3231 RTC and 16x2 I2C LCDGNDconnected toGNDof DS3231 RTC, 16x2 I2C LCD, all pushbuttons (Pin 2 (in)), and buzzerA4connected toSDAof DS3231 RTC and 16x2 I2C LCDA5connected toSCLof DS3231 RTC and 16x2 I2C LCDD2connected toPin 3 (out)of Pushbutton 1D3connected toPin 3 (out)of Pushbutton 2D4connected toPin 3 (out)of Pushbutton 3D5connected toPin 3 (out)of Pushbutton 4D7connected toPINof Buzzer
Pushbutton 1
Pin 2 (in)connected toGNDPin 3 (out)connected toD2of Arduino UNO
Pushbutton 2
Pin 2 (in)connected toGNDPin 3 (out)connected toD3of Arduino UNO
Pushbutton 3
Pin 2 (in)connected toGNDPin 3 (out)connected toD4of Arduino UNO
Pushbutton 4
Pin 2 (in)connected toGNDPin 3 (out)connected toD5of Arduino UNO
16x2 I2C LCD
GNDconnected toGNDof Arduino UNOVCCconnected to5Vof Arduino UNOSDAconnected toA4of Arduino UNOSCLconnected toA5of Arduino UNO
DS3231 RTC
GNDconnected toGNDof Arduino UNOVCCconnected to5Vof Arduino UNOSDAconnected toA4of Arduino UNOSCLconnected toA5of Arduino UNO
Buzzer
GNDconnected toGNDof Arduino UNOPINconnected toD7of Arduino UNO
Code Documentation
Arduino UNO Code
void setup() {
  // put your setup code here, to run once:

}

void loop() {
  // put your main code here, to run repeatedly:

}
This code is a basic template for the Arduino UNO. The setup() function is where you initialize your components and settings, and it runs once when the microcontroller is powered on or reset. The loop() function contains the main logic of your program and runs repeatedly.