
ESP32-Based Smart Electricity Monitoring System with Wi-Fi and Telegram Alerts
View and Edit Project In Cirkit Designer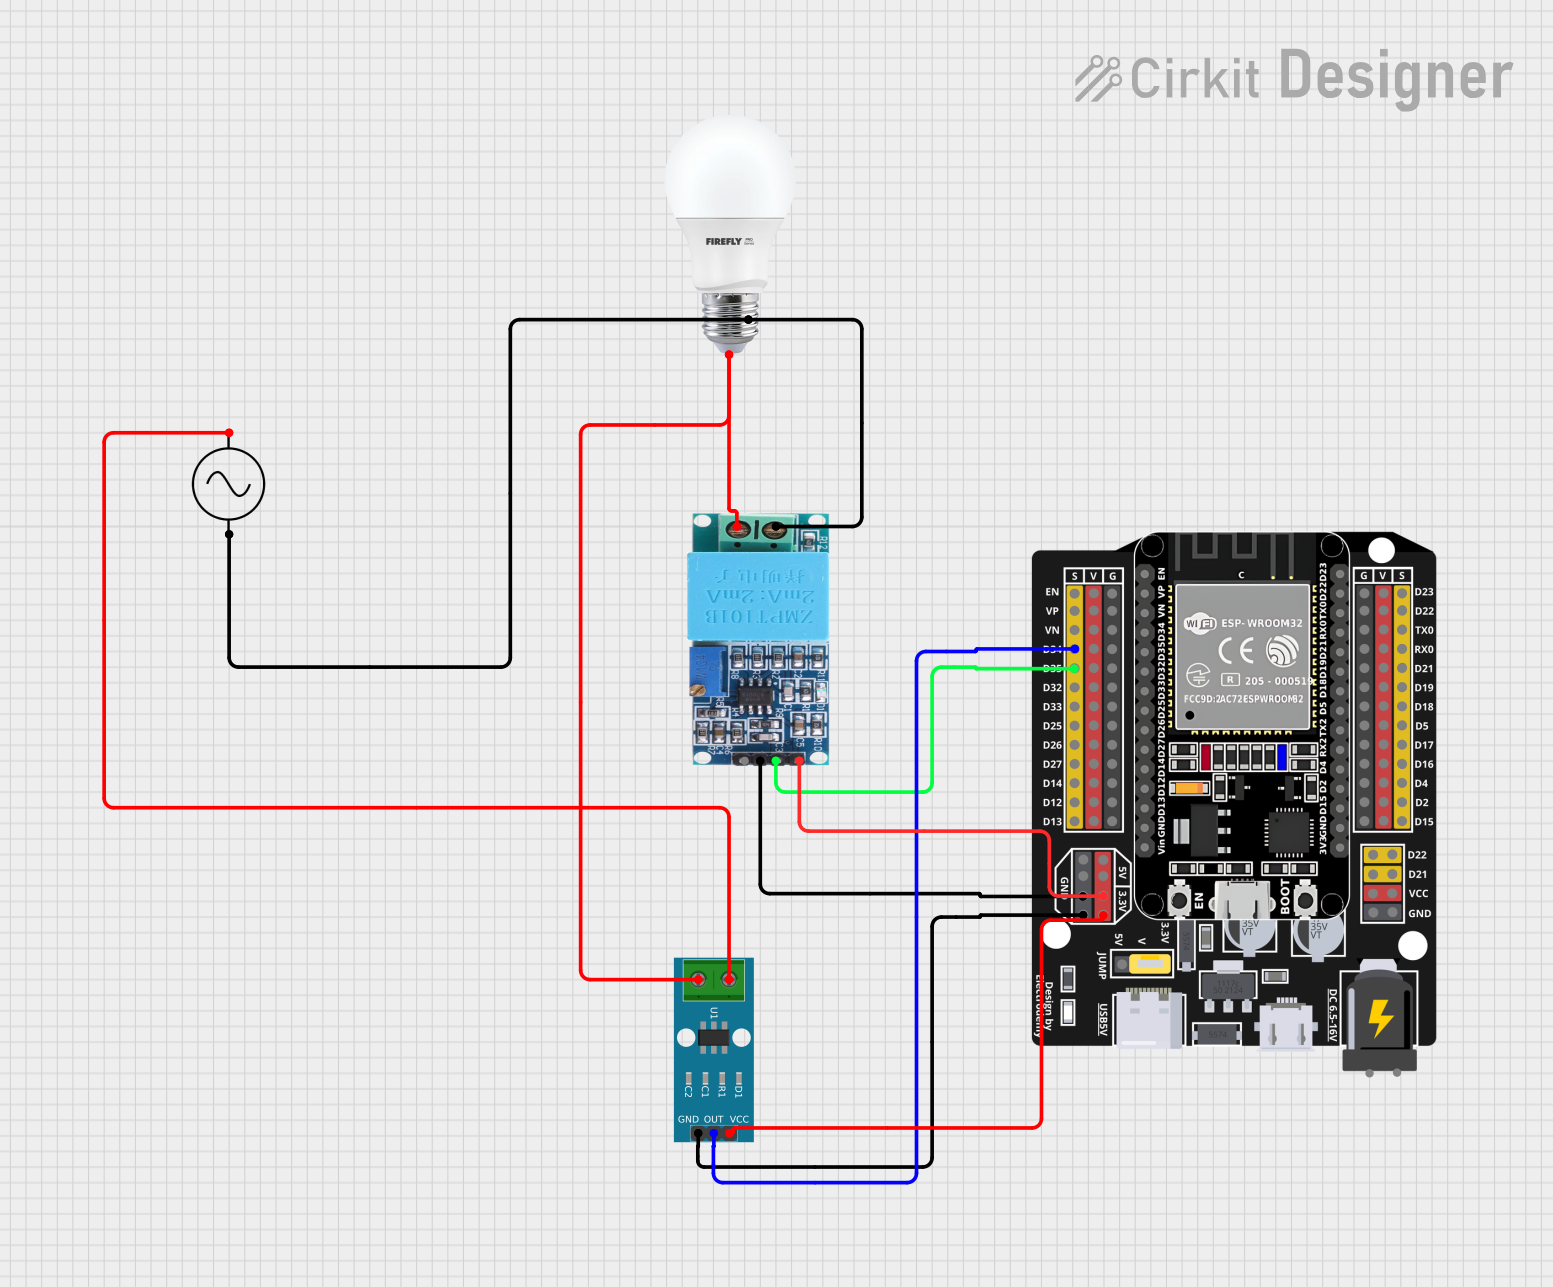
Circuit Documentation
Summary
This circuit is designed to monitor and display electricity consumption and cost using an ESP32 microcontroller. It includes sensors for measuring voltage and current, an LCD for displaying data, and connectivity to send data to Blynk and Telegram. The circuit also stores energy consumption data in EEPROM for persistence.
Component List
ESP32 - Expansion Board
- Description: A microcontroller board with WiFi and Bluetooth capabilities.
- Pins: +, -, EN, VP, VN, D34, D32, D33, D25, D26, D27, D14, D12, D13, D23, D22, TX0, RX0, D21, D19, D18, D5, D17, D16, D4, D2, D15, VCC, G, 5V, 3.3V, V
BULB
- Description: A standard light bulb used to demonstrate load.
- Pins: +, -
ZMPT101B
- Description: A voltage sensor module for measuring AC voltage.
- Pins: OUT, GND, VCC, NEUTRO, FASE
ACS712 Current Sensor 5A 20A 30A
- Description: A current sensor module for measuring AC or DC current.
- Pins: 1, 2, GND, OUT, VCC
Ac Supply
- Description: An AC power supply.
- Pins: +ve, -ve
Wiring Details
ESP32 - Expansion Board
- D34 connected to OUT of ACS712 Current Sensor 5A 20A 30A
- D32 connected to OUT of ZMPT101B
- 3.3V connected to VCC of ZMPT101B
- 3.3V connected to VCC of ACS712 Current Sensor 5A 20A 30A
- G connected to GND of ZMPT101B
- G connected to GND of ACS712 Current Sensor 5A 20A 30A
BULB
- + connected to FASE of ZMPT101B
- - connected to NEUTRO of ZMPT101B
ZMPT101B
- OUT connected to D32 of ESP32 - Expansion Board
- GND connected to G of ESP32 - Expansion Board
- VCC connected to 3.3V of ESP32 - Expansion Board
- NEUTRO connected to - of BULB
- NEUTRO connected to -ve of Ac Supply
- FASE connected to + of BULB
- FASE connected to 2 of ACS712 Current Sensor 5A 20A 30A
ACS712 Current Sensor 5A 20A 30A
- OUT connected to D34 of ESP32 - Expansion Board
- GND connected to G of ESP32 - Expansion Board
- VCC connected to 3.3V of ESP32 - Expansion Board
- 1 connected to +ve of Ac Supply
- 2 connected to FASE of ZMPT101B
Ac Supply
- +ve connected to 1 of ACS712 Current Sensor 5A 20A 30A
- -ve connected to NEUTRO of ZMPT101B
Code Documentation
Code for ESP32 - Expansion Board
#define BLYNK_TEMPLATE_ID "TMPL6F4zQGYLt"  // Define Blynk template ID
#define BLYNK_TEMPLATE_NAME "Electricity Bills Display"  // Define Blynk template name
#define BLYNK_PRINT Serial // Enable Serial printing for Blynk debug information

#include "EmonLib.h"  // Include EmonLib for energy monitoring
#include <EEPROM.h>  // Include EEPROM library for storing data
#include <WiFi.h>  // Include WiFi library for network connectivity
#include <BlynkSimpleEsp32.h>  // Include Blynk library for ESP32
#include <Wire.h>  // Include Wire library for I2C communication
#include <LiquidCrystal_I2C.h>  // Include LiquidCrystal_I2C library for LCD display
#include <HTTPClient.h>  // Include HTTPClient library for HTTP requests
#include <ArduinoJson.h>  // Include ArduinoJson library for JSON handling

// Initialize LCD with I2C address (use the correct address from I2C scanner, default is 0x27)
LiquidCrystal_I2C lcd(0x27, 16, 2);

// Define your Telegram bot token and chat ID (replace with your actual values)
const char* telegramBotToken = "*********";
const char* telegramChatID = "*********";

// Constants for calibration
const float vCalibration = 42.5;  // Voltage calibration factor
const float currCalibration = 1.80;  // Current calibration factor

// Blynk and WiFi credentials
const char auth[] = "NHNOVlDQvjXOTieUqxFdUeMmPkrMWq5y";  // Blynk authentication token
const char ssid[] = "Ali";  // WiFi SSID
const char pass[] = "mendekau";  // WiFi password

// EnergyMonitor instance
EnergyMonitor emon;  // Create an instance of EnergyMonitor

// Timer for regular updates
BlynkTimer timer;  // Create a Blynk timer instance

// Variables for energy calculation
float kWh = 0.0;  // Variable to store energy consumed in kWh
float cost = 0.0;  // Variable to store cost of energy consumed
const float ratePerkWh = 6.5;  // Cost rate per kWh
unsigned long lastMillis = millis();  // Variable to store last time in milliseconds

// EEPROM addresses for each variable
const int addrKWh = 12;  // EEPROM address for kWh
const int addrCost = 16;  // EEPROM address for cost

// Display page variable
int displayPage = 0;  // Variable to track current LCD display page

// Reset button pin
const int resetButtonPin = 4;  // Pin for reset button (change to your button pin)

// Function prototypes
void sendEnergyDataToBlynk();  // Prototype for sending energy data to Blynk
void readEnergyDataFromEEPROM();  // Prototype for reading energy data from EEPROM
void saveEnergyDataToEEPROM();  // Prototype for saving energy data to EEPROM
void updateLCD();  // Prototype for updating LCD display
void changeDisplayPage();  // Prototype for changing LCD display page
void sendBillToTelegram();  // Prototype for sending bill to Telegram
void resetEEPROM();  // Prototype for resetting EEPROM data

void setup() {
  Serial.begin(115200);  // Initialize serial communication

  // Start WiFi connection
  WiFi.begin(ssid, pass);
  while (WiFi.status() != WL_CONNECTED) {
    delay(500);  // Wait for WiFi connection
    Serial.print(".");
  }
  Serial.println("Connected to WiFi");

  // Initialize Blynk connection
  Blynk.begin(auth, ssid, pass);

  // Initialize the LCD
  lcd.init();  // Initialize the LCD
  lcd.backlight();  // Turn on LCD backlight

  // Initialize EEPROM
  EEPROM.begin(32);  // Initialize EEPROM with 32 bytes of storage

  // Initialize the reset button pin
  pinMode(resetButtonPin, INPUT_PULLUP);  // Set reset button pin as input with pull-up resistor

  // Read stored data from EEPROM
  readEnergyDataFromEEPROM();  // Read energy data from EEPROM

  // Setup voltage and current inputs
  emon.voltage(35, vCalibration, 1.7);  // Configure voltage measurement: input pin, calibration, phase shift
  emon.current(34, currCalibration);  // Configure current measurement: input pin, calibration

  // Setup timers
  timer.setInterval(2000L, sendEnergyDataToBlynk);  // Set timer to send energy data to Blynk every 2 seconds
  timer.setInterval(2000L, changeDisplayPage);  // Set timer to change display page every 2 seconds
  timer.setInterval(60000L, sendBillToTelegram);  // Set timer to send bill to Telegram every 60 seconds
}

void loop() {
  Blynk.run();  // Run Blynk
  timer.run();  // Run timers

  // Check if the reset button is pressed
  if (digitalRead(resetButtonPin) == LOW) {
    delay(200);  // Debounce delay
    resetEEPROM();  // Reset EEPROM data
  }
}

void sendEnergyDataToBlynk() {