
Arduino UNO Based Water Level Indicator with Multicolor LED Feedback
View and Edit Project In Cirkit Designer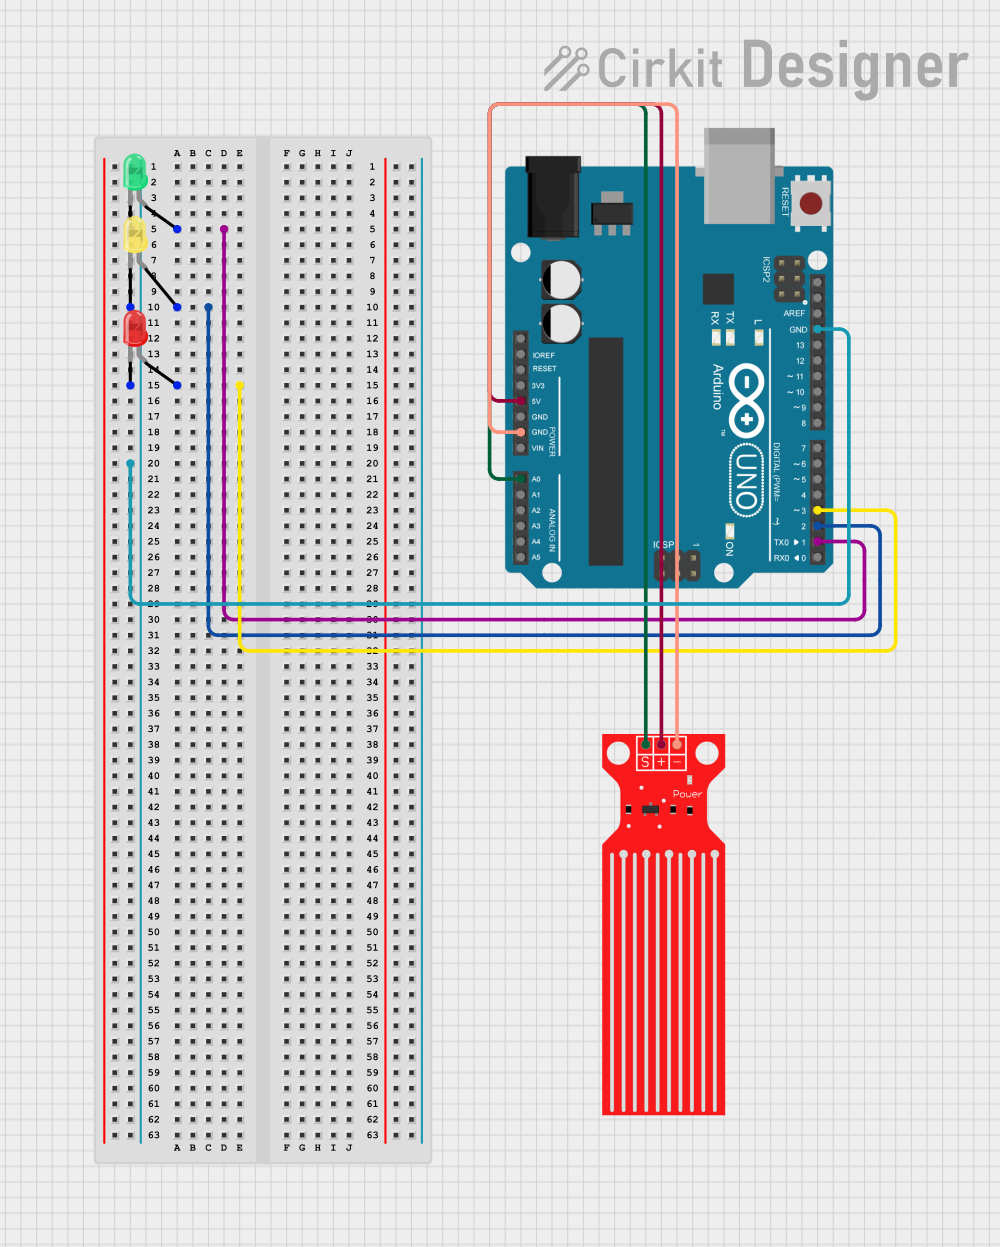
Circuit Documentation
Summary
This circuit integrates an Arduino UNO microcontroller with a water level sensor and three LEDs of different colors (green, yellow, and red). The Arduino UNO is responsible for controlling the LEDs based on the input from the water level sensor. The sensor's signal pin is connected to an analog input on the Arduino to monitor water levels, while the LEDs are connected to digital outputs and share a common ground with the Arduino.
Component List
Arduino UNO
- Description: A microcontroller board based on the ATmega328P.
- Purpose: Acts as the central processing unit of the circuit, reading sensor data and controlling the LEDs.
LED: Two Pin (green)
- Description: A basic green LED.
- Purpose: Indicates a specific state as determined by the Arduino UNO.
LED: Two Pin (yellow)
- Description: A basic yellow LED.
- Purpose: Indicates a specific state as determined by the Arduino UNO.
LED: Two Pin (red)
- Description: A basic red LED.
- Purpose: Indicates a specific state as determined by the Arduino UNO.
Water Level Sensor
- Description: A sensor that detects the level of water.
- Purpose: Provides water level data to the Arduino UNO.
Wiring Details
Arduino UNO
- 5V connected to Water Level Sensor VCC
- GND connected to Water Level Sensor GND, and cathodes of all LEDs (green, yellow, red)
- A0 connected to Water Level Sensor SIG
- D1 connected to anode of LED: Two Pin (green)
- D2 connected to anode of LED: Two Pin (yellow)
- D3 connected to anode of LED: Two Pin (red)
LED: Two Pin (green)
- Cathode connected to Arduino UNO GND
- Anode connected to Arduino UNO D1
LED: Two Pin (yellow)
- Cathode connected to Arduino UNO GND
- Anode connected to Arduino UNO D2
LED: Two Pin (red)
- Cathode connected to Arduino UNO GND
- Anode connected to Arduino UNO D3
Water Level Sensor
- SIG connected to Arduino UNO A0
- VCC connected to Arduino UNO 5V
- GND connected to Arduino UNO GND
Documented Code
Arduino UNO Code (sketch.ino)
void setup() {
  // put your setup code here, to run once:

}

void loop() {
  // put your main code here, to run repeatedly:

}
Note: The provided code is a template and does not contain any functional logic. It needs to be implemented to read the water level sensor data and control the LEDs accordingly.