Cirkit Designer
Your all-in-one circuit design IDE
Home /
Project Documentation
Arduino UNO Controlled Robotic Arm with Bluetooth Connectivity and Environmental Interaction
Circuit Documentation
Summary
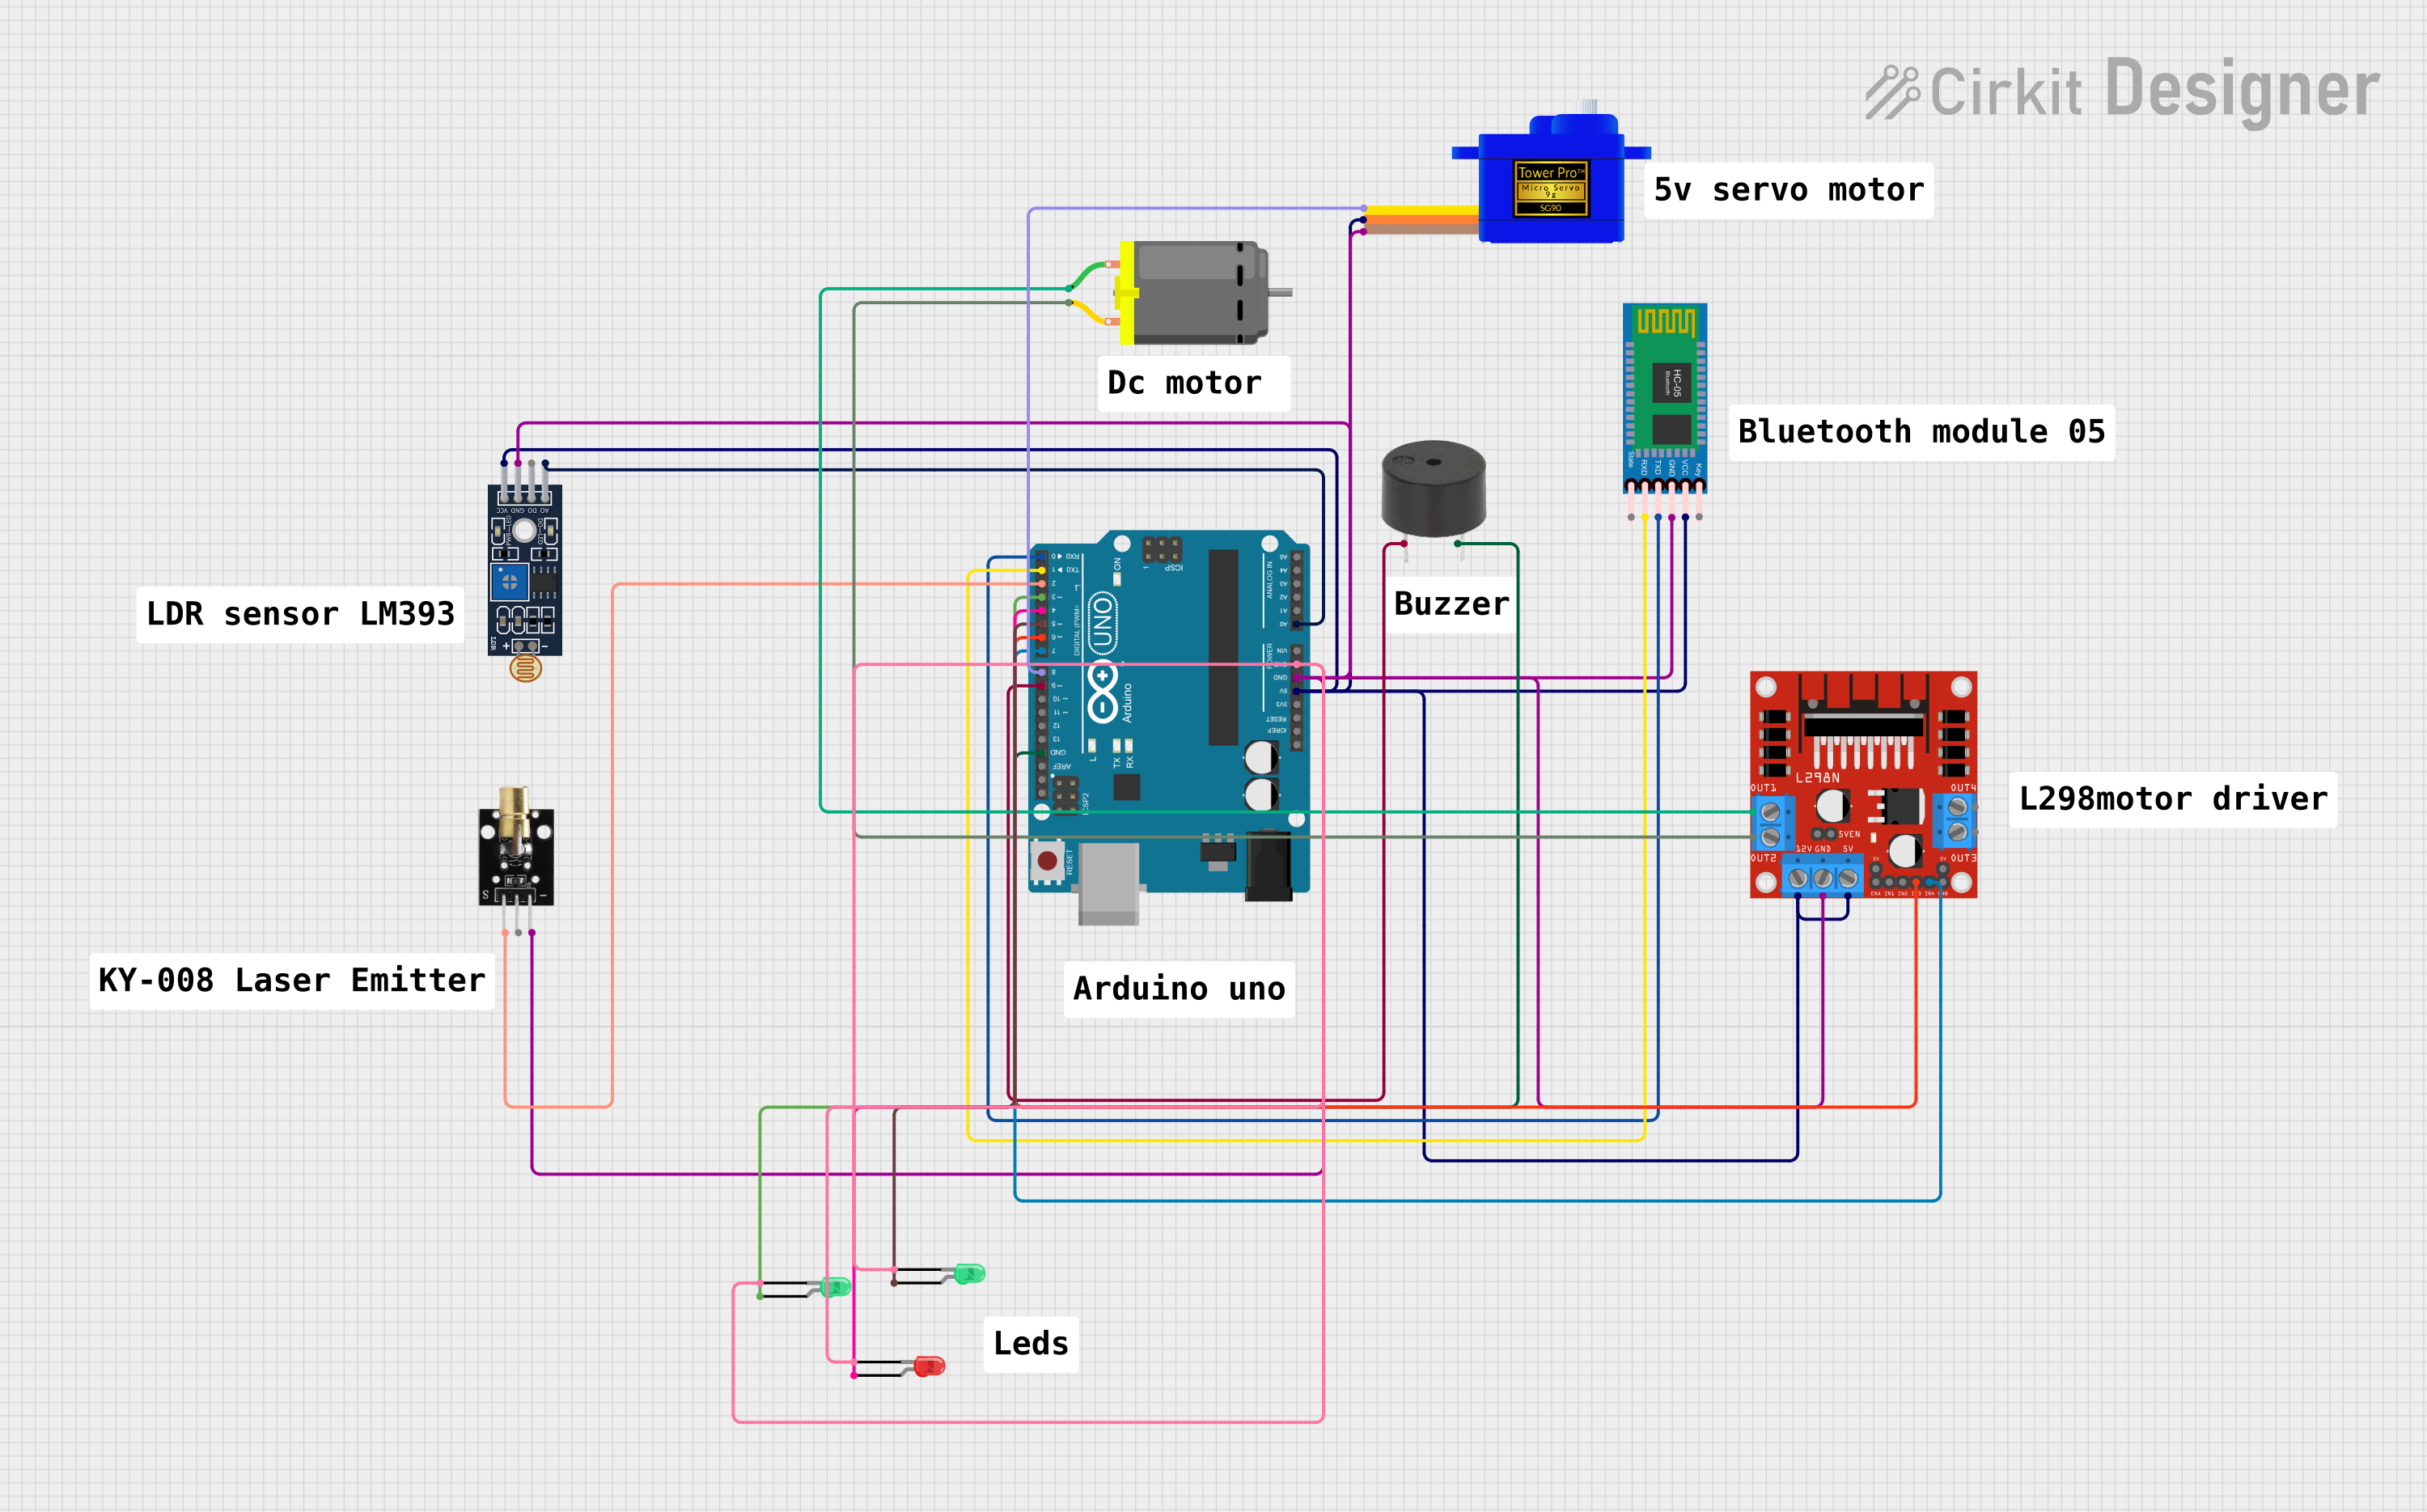
This circuit integrates various components controlled by an Arduino UNO microcontroller. It includes a servomotor, a Bluetooth module, a laser emitter, a buzzer, light-dependent resistors (LDRs), LEDs, a DC motor, and a motor driver. The circuit is designed to perform multiple functions, such as wireless communication, light sensing, motion control, and visual signaling.
Component List
Servomotor SG90
- Pins: SIG, VCC, GND
- Description: A small and lightweight servo used for motion control.
Arduino UNO
- Pins: UNUSED, IOREF, Reset, 3.3V, 5V, GND, Vin, A0-A5, SCL, SDA, AREF, D0-D13
- Description: A microcontroller board based on the ATmega328P, used as the main controller for the circuit.
HC-05 Bluetooth Module
- Pins: Key, VCC, TXD, RXD, State, GND
- Description: A wireless communication module that allows Bluetooth connectivity.
KY-008 Laser Emitter
- Pins: SIG, 5V, GND
- Description: A module that emits a laser beam, used for signaling or optical communication.
Buzzer
- Pins: PIN, GND
- Description: An audible signaling device.
Sensor LDR LM393
- Pins: A0, D0, GND, VCC
- Description: A light sensor module that detects the intensity of light.
DC Motor
- Pins: pin 1, pin 2
- Description: An electric motor that converts electrical energy into mechanical motion.
LED: Two Pin (red)
- Pins: cathode, anode
- Description: A red light-emitting diode used for visual signaling.
LED: Two Pin (green)
- Pins: cathode, anode
- Description: A green light-emitting diode used for visual signaling.
L298N DC Motor Driver
- Pins: OUT1, OUT2, 12V, GND, 5V, OUT3, OUT4, 5V-ENA-JMP-I, 5V-ENA-JMP-O, +5V-J1, +5V-J2, ENA, IN1, IN2, IN3, IN4, ENB
- Description: A motor driver module that controls the direction and speed of DC motors.
Wiring Details
Servomotor SG90
- SIG: Connected to Arduino UNO D8
- VCC: Connected to Arduino UNO 5V
- GND: Connected to Arduino UNO GND
HC-05 Bluetooth Module
- VCC: Connected to Arduino UNO 5V
- TXD: Connected to Arduino UNO D0
- RXD: Connected to Arduino UNO D1
- GND: Connected to Arduino UNO GND
KY-008 Laser Emitter
- SIG: Connected to Arduino UNO D2
- 5V: Connected to Arduino UNO 5V
- GND: Connected to Arduino UNO GND
Buzzer
- PIN: Connected to Arduino UNO D9
- GND: Connected to Arduino UNO GND
Sensor LDR LM393
- A0: Connected to Arduino UNO A0
- VCC: Connected to Arduino UNO 5V
- GND: Connected to Arduino UNO GND
DC Motor
- pin 1: Connected to L298N DC Motor Driver OUT1
- pin 2: Connected to L298N DC Motor Driver OUT2
LED: Two Pin (red)
- anode: Connected to Arduino UNO D4
- cathode: Connected to Arduino UNO GND
LED: Two Pin (green)
- anode (1st instance): Connected to Arduino UNO D5
- anode (2nd instance): Connected to Arduino UNO D3
- cathode: Connected to Arduino UNO GND (shared by both instances)
L298N DC Motor Driver
- IN3: Connected to Arduino UNO D6
- IN4: Connected to Arduino UNO D7
- 12V: Connected to Arduino UNO 5V
- 5V: Connected to Arduino UNO 5V
- GND: Connected to Arduino UNO GND
Documented Code
Arduino UNO Code (sketch.ino)
void setup() {
  // put your setup code here, to run once:

}

void loop() {
  // put your main code here, to run repeatedly:

}
Additional Notes
- The provided code is a template and does not contain any functional implementation. It needs to be populated with the logic to control the components based on the circuit's requirements.
- The code for the Arduino UNO is written in the Arduino programming language, which is based on C/C++.
- The
setup()function is called once when the microcontroller is powered on or reset. It is used to initialize the pins and set the initial state of the components. - The
loop()function is called repeatedly and contains the main logic that controls the circuit's behavior.