
Arduino UNO-Based Ultrasonic Distance Sensor with Servo Motor Control
View and Edit Project In Cirkit Designer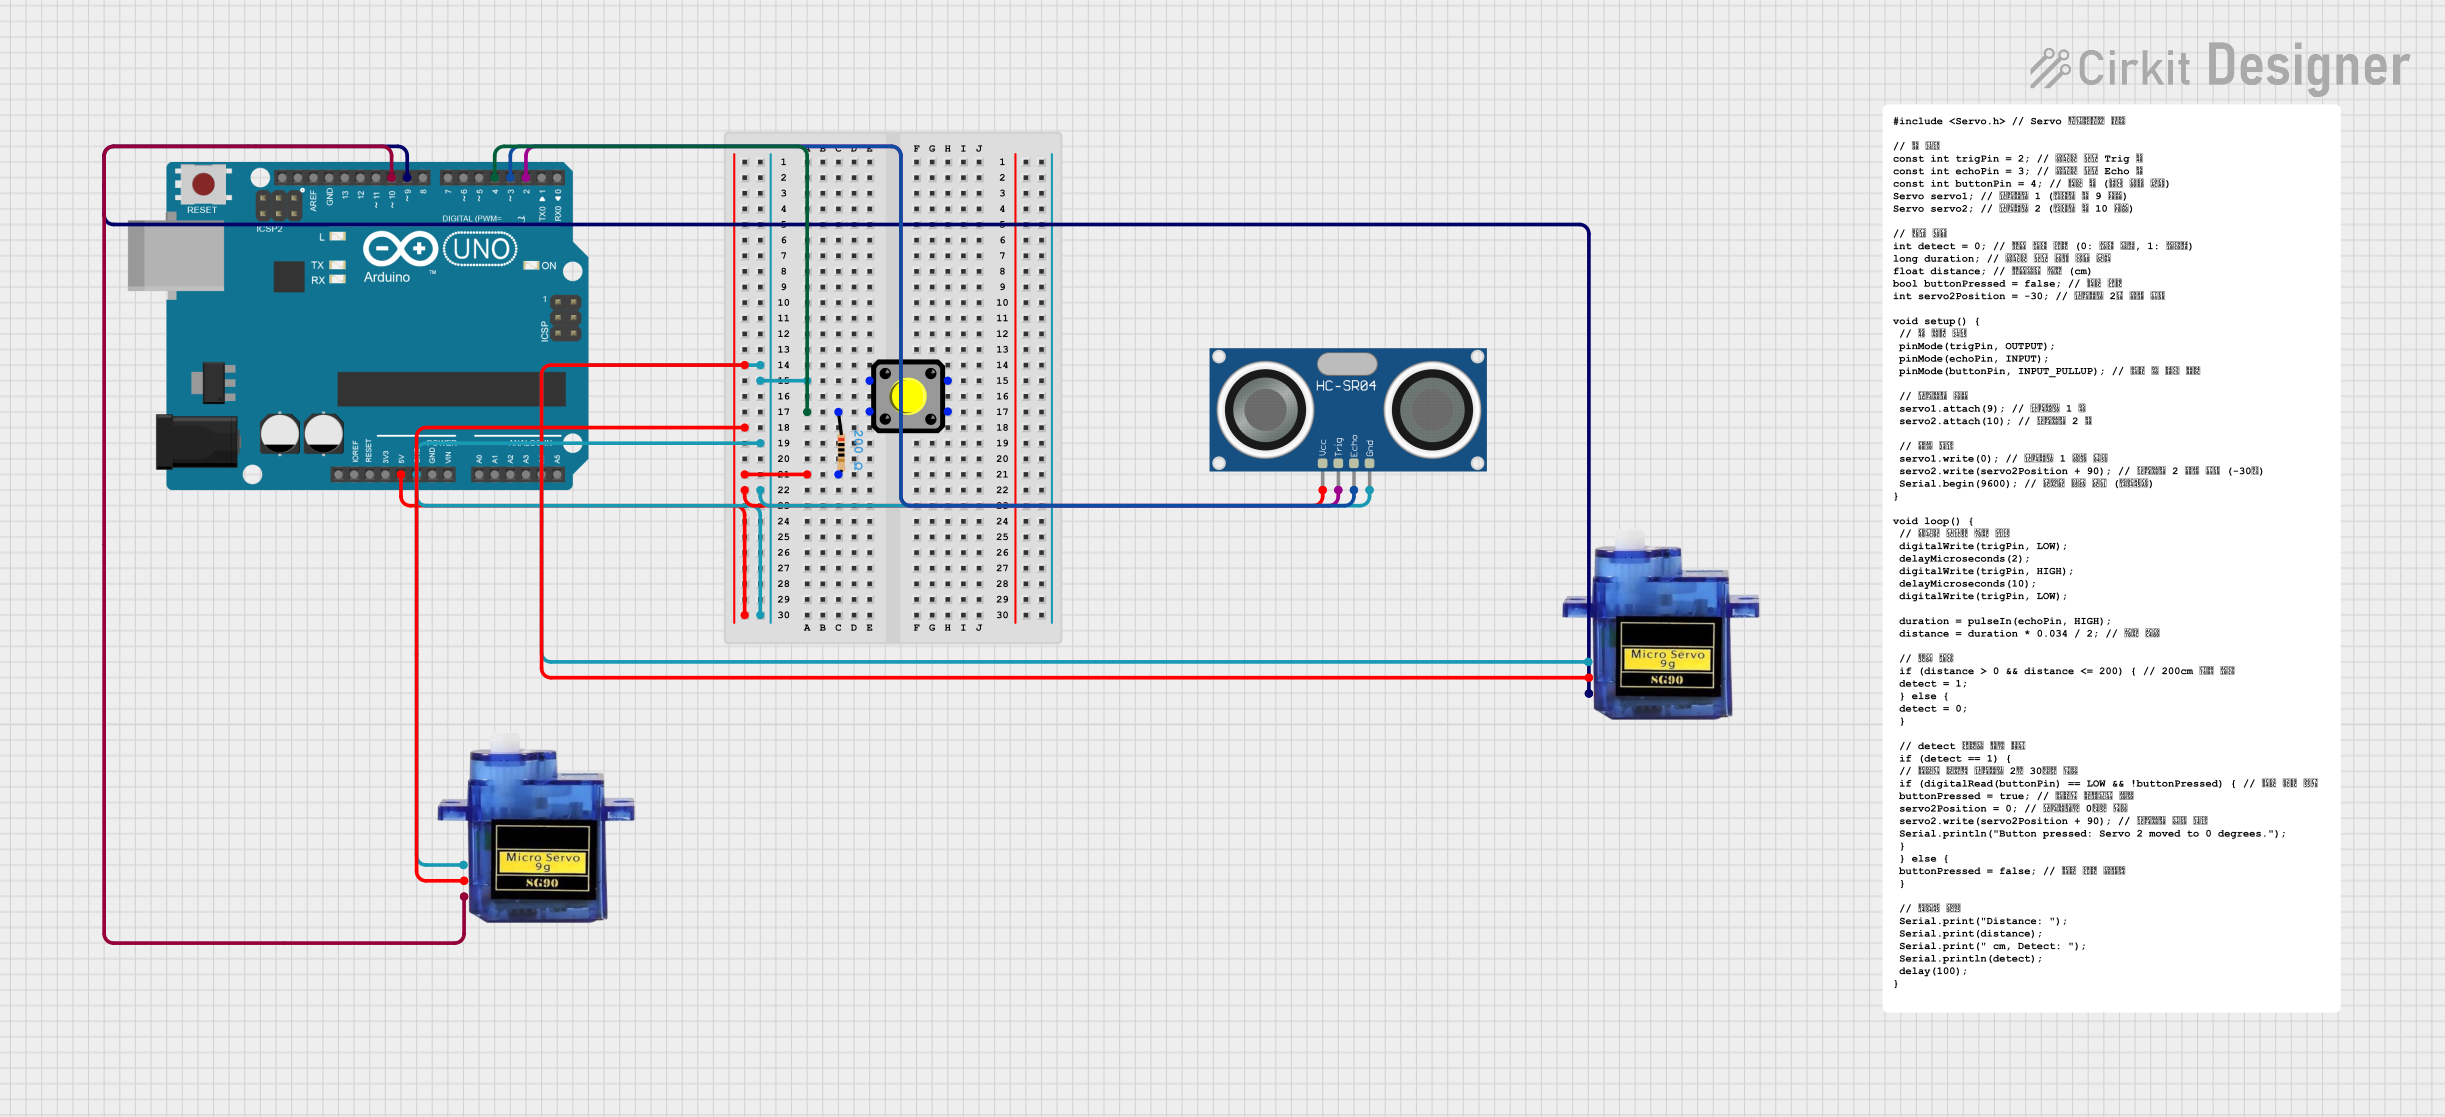
Circuit Documentation
Summary
This circuit involves an Arduino UNO microcontroller, an HC-SR04 ultrasonic sensor, two Micro servo 9G motors, a pushbutton, and a resistor. The circuit is designed to detect objects within a certain range using the ultrasonic sensor and control the servo motors based on the detection and button press.
Component List
Arduino UNO
- Description: A microcontroller board based on the ATmega328P.
- Pins: UNUSED, IOREF, Reset, 3.3V, 5V, GND, Vin, A0, A1, A2, A3, A4, A5, SCL, SDA, AREF, D13, D12, D11, D10, D9, D8, D7, D6, D5, D4, D3, D2, D1, D0
HC-SR04 Ultrasonic Sensor
- Description: A sensor used to measure distance by using ultrasonic waves.
- Pins: VCC, TRIG, ECHO, GND
Micro servo 9G (Servo 1)
- Description: A small servo motor used for precise control of angular position.
- Pins: GND, +5V, PWM
Micro servo 9G (Servo 2)
- Description: A small servo motor used for precise control of angular position.
- Pins: GND, +5V, PWM
Pushbutton
- Description: A simple pushbutton used to provide user input.
- Pins: Pin 2, Pin 1, Pin 3, Pin 4
Resistor
- Description: A 200 Ohms resistor used to limit current.
- Pins: pin1, pin2
- Properties: Resistance: 200 Ohms
Wiring Details
Arduino UNO
- 5V: Connected to +5V of both Micro servo 9G motors, pin2 of the Resistor, and VCC of the HC-SR04 Ultrasonic Sensor.
- GND: Connected to GND of both Micro servo 9G motors, Pin 2 of the Pushbutton, and GND of the HC-SR04 Ultrasonic Sensor.
- D10: Connected to PWM of Micro servo 9G (Servo 2).
- D9: Connected to PWM of Micro servo 9G (Servo 1).
- D4: Connected to pin1 of the Resistor and Pin 3 of the Pushbutton.
- D3: Connected to ECHO of the HC-SR04 Ultrasonic Sensor.
- D2: Connected to TRIG of the HC-SR04 Ultrasonic Sensor.
HC-SR04 Ultrasonic Sensor
- VCC: Connected to 5V of the Arduino UNO.
- TRIG: Connected to D2 of the Arduino UNO.
- ECHO: Connected to D3 of the Arduino UNO.
- GND: Connected to GND of the Arduino UNO.
Micro servo 9G (Servo 1)
- GND: Connected to GND of the Arduino UNO.
- +5V: Connected to 5V of the Arduino UNO.
- PWM: Connected to D9 of the Arduino UNO.
Micro servo 9G (Servo 2)
- GND: Connected to GND of the Arduino UNO.
- +5V: Connected to 5V of the Arduino UNO.
- PWM: Connected to D10 of the Arduino UNO.
Pushbutton
- Pin 2: Connected to GND of the Arduino UNO.
- Pin 3: Connected to pin1 of the Resistor and D4 of the Arduino UNO.
Resistor
- pin1: Connected to Pin 3 of the Pushbutton and D4 of the Arduino UNO.
- pin2: Connected to 5V of the Arduino UNO.
Code Documentation
#include <Servo.h> // Include Servo library

// Pin configuration
const int trigPin = 2;    // Ultrasonic sensor Trig pin
const int echoPin = 3;    // Ultrasonic sensor Echo pin
const int buttonPin = 4;  // Button pin (using pull-up resistor)
Servo servo1;             // Servo motor 1 (connected to digital pin 9)
Servo servo2;             // Servo motor 2 (connected to digital pin 10)

// Variable declarations
int detect = 0;           // Object detection status (0: not detected, 1: detected)
long duration;            // Ultrasonic sensor signal duration
float distance;           // Distance to object (cm)
bool buttonPressed = false; // Button status
int servo2Position = -30; // Initial position of servo motor 2

void setup() {
  // Pin mode configuration
  pinMode(trigPin, OUTPUT);
  pinMode(echoPin, INPUT);
  pinMode(buttonPin, INPUT_PULLUP); // Button pin in pull-up mode

  // Attach servos
  servo1.attach(9);   // Attach servo motor 1 to pin 9
  servo2.attach(10);  // Attach servo motor 2 to pin 10

  // Initial settings
  servo1.write(0);       // Initial position of servo motor 1
  servo2.write(servo2Position + 90); // Initial position of servo motor 2 (-30 degrees)
  Serial.begin(9600);    // Start serial communication (for debugging)
}

void loop() {
  // Measure distance using ultrasonic sensor
  digitalWrite(trigPin, LOW);
  delayMicroseconds(2);
  digitalWrite(trigPin, HIGH);
  delayMicroseconds(10);
  digitalWrite(trigPin, LOW);

  duration = pulseIn(echoPin, HIGH);
  distance = duration * 0.034 / 2; // Calculate distance

  // Object detection
  if (distance > 0 && distance <= 200) { // Detect within 200cm
    detect = 1;
  } else {
    detect = 0;
  }

  // Actions based on detection status
  if (detect == 1) {
    // Move servo motor 2 to 30 degrees when button is pressed
    if (digitalRead(buttonPin) == LOW && !buttonPressed) { // Check if button is pressed
      buttonPressed = true; // Record button press
      servo2Position = 0;   // Move servo motor to 0 degrees
      servo2.write(servo2Position + 90); // Set servo motor position
      Serial.println("Button pressed: Servo 2 moved to 0 degrees.");
    }
  } else {
    buttonPressed = false; // Reset button status
  }

  // Debugging output
  Serial.print("Distance: ");
  Serial.print(distance);
  Serial.print(" cm, Detect: ");
  Serial.println(detect);
  delay(100);
}
This code initializes the pins and servos, measures the distance using the ultrasonic sensor, and controls the servo motors based on the distance and button press. The serial output is used for debugging purposes.