
Arduino UNO-Based Smart Irrigation System with OLED Display and Soil Moisture Sensor
View and Edit Project In Cirkit Designer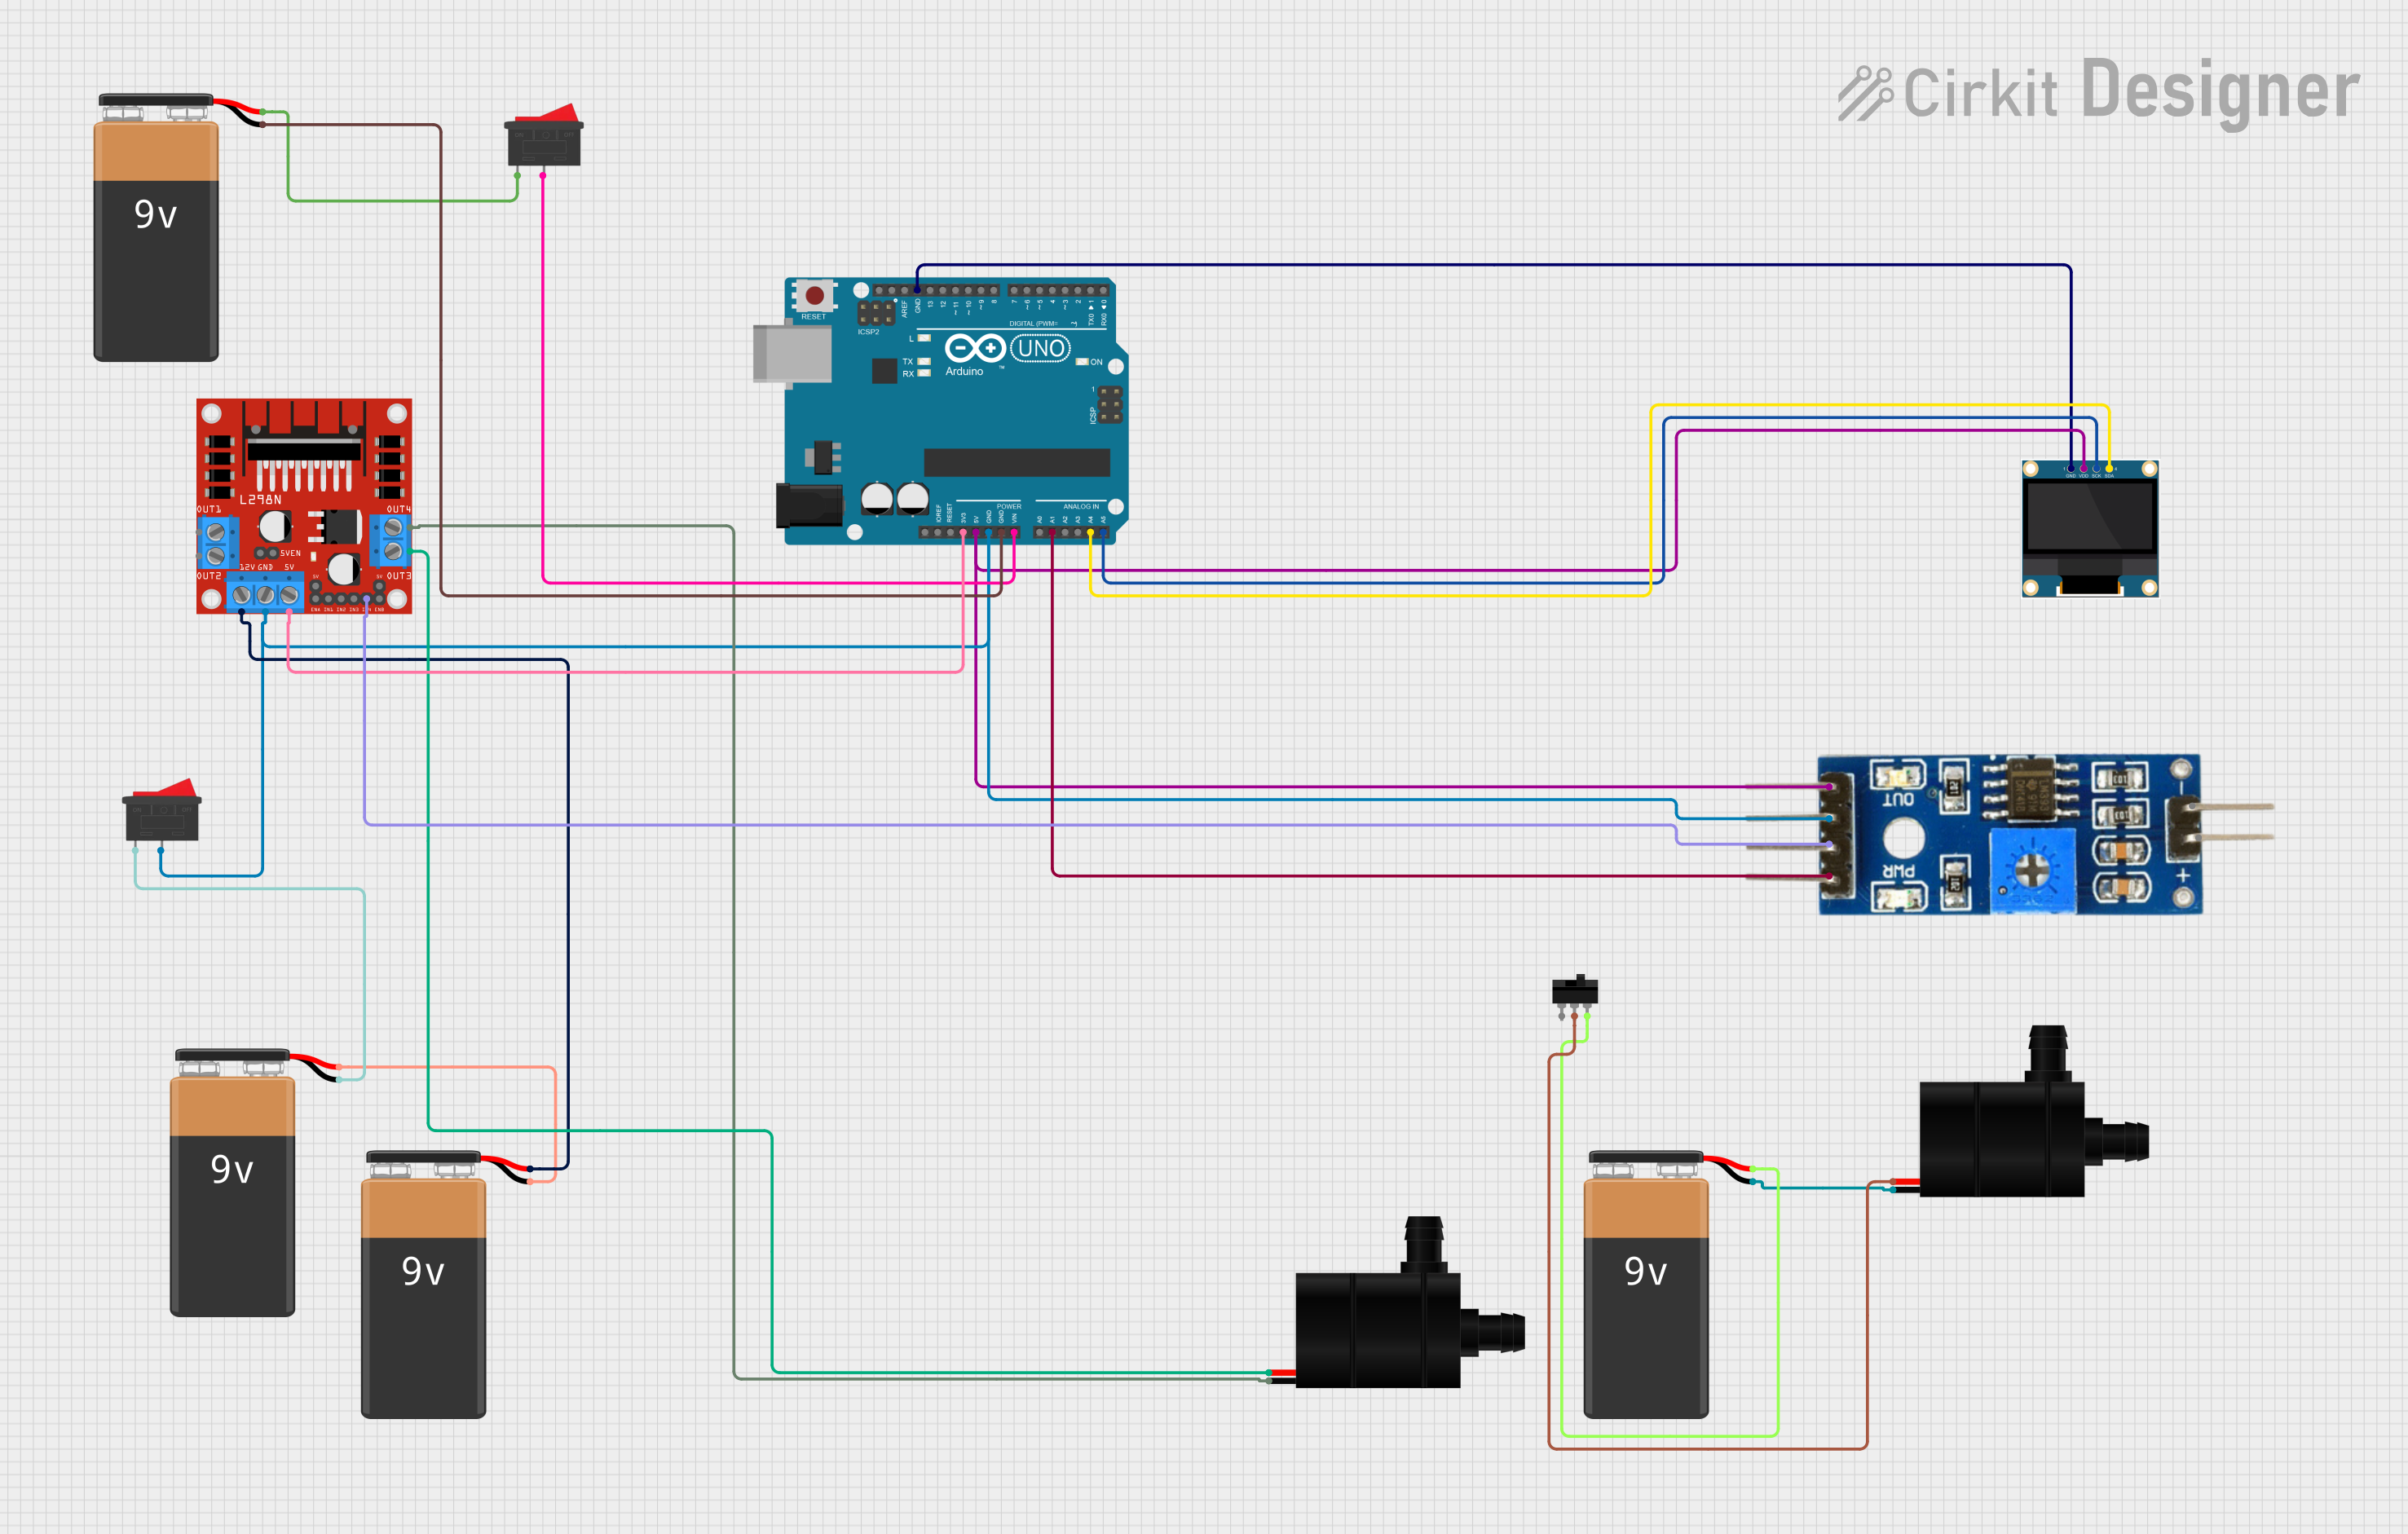
Circuit Documentation
Summary
This circuit is designed to monitor soil moisture levels and display the readings on a 0.96" OLED display. It also controls a water pump based on the moisture levels. The circuit uses an Arduino UNO as the main microcontroller, interfacing with a soil moisture sensor, an OLED display, a motor driver, and a water pump. The circuit is powered by multiple 9V batteries and includes switches for controlling the power and the water pump.
Component List
0.96" OLED Display
- Pins: GND, VDD, SCK, SDA
- Description: A small OLED display used to show the soil moisture levels.
- Purpose: Display soil moisture readings.
Water Pump
- Pins: VCC, GND
- Description: A small water pump used to water plants.
- Purpose: Water plants based on soil moisture levels.
9V Battery
- Pins: -, +
- Description: A 9V battery used to power various components in the circuit.
- Purpose: Provide power to the circuit.
Rocker Switch
- Pins: 1, 2
- Description: A switch used to control the power to the Arduino UNO.
- Purpose: Turn the Arduino UNO on and off.
L298N DC Motor Driver
- Pins: OUT1, OUT2, 12V, GND, 5V, OUT3, OUT4, 5V-ENA-JMP-I, 5V-ENA-JMP-O, +5V-J1, +5V-J2, ENA, IN1, IN2, IN3, IN4, ENB
- Description: A motor driver used to control the water pump.
- Purpose: Control the water pump based on signals from the Arduino UNO.
Soil Moisture Module
- Pins: positive, negative, Analog, Digital, Ground, VCC
- Description: A sensor used to measure soil moisture levels.
- Purpose: Provide soil moisture readings to the Arduino UNO.
Toggle Switch
- Pins: L1, COM, L2
- Description: A switch used to control the water pump.
- Purpose: Manually control the water pump.
Arduino UNO
- Pins: UNUSED, IOREF, Reset, 3.3V, 5V, GND, Vin, A0, A1, A2, A3, A4, A5, SCL, SDA, AREF, D13, D12, D11, D10, D9, D8, D7, D6, D5, D4, D3, D2, D1, D0
- Description: A microcontroller used to read sensor data and control the display and water pump.
- Purpose: Main control unit of the circuit.
Wiring Details
0.96" OLED Display
- VDD connected to 5V on Arduino UNO
- GND connected to GND on Arduino UNO
- SCK connected to A5 on Arduino UNO
- SDA connected to A4 on Arduino UNO
Water Pump (Instance 1)
- VCC connected to OUT3 on L298N DC Motor Driver
- GND connected to OUT4 on L298N DC Motor Driver
Water Pump (Instance 2)
- VCC connected to COM on Toggle Switch
- GND connected to - on 9V Battery
9V Battery (Instance 1)
- + connected to 12V on L298N DC Motor Driver
- - connected to + on another 9V Battery
9V Battery (Instance 2)
- + connected to L2 on Toggle Switch
- - connected to GND on Arduino UNO
9V Battery (Instance 3)
- + connected to 1 on Rocker Switch
- - connected to 1 on another Rocker Switch
Rocker Switch (Instance 1)
- 1 connected to + on 9V Battery
- 2 connected to Vin on Arduino UNO
Rocker Switch (Instance 2)
- 1 connected to - on 9V Battery
- 2 connected to GND on Arduino UNO
L298N DC Motor Driver
- 5V connected to 3.3V on Arduino UNO
- GND connected to GND on Arduino UNO
- IN4 connected to Digital on Soil Moisture Module
Soil Moisture Module
- VCC connected to 5V on Arduino UNO
- Ground connected to GND on Arduino UNO
- Analog connected to A1 on Arduino UNO
Toggle Switch
- COM connected to VCC on Water Pump
- L2 connected to + on 9V Battery
Code Documentation
Arduino UNO Code
#include <SPI.h>
#include <Wire.h>
#include <Adafruit_GFX.h>
#include <Adafruit_SSD1306.h>

#define OLED_RESET 4
#define sensor A1

Adafruit_SSD1306 display(OLED_RESET);

void setup()
{
  display.begin(SSD1306_SWITCHCAPVCC, 0x3C); // change the address (0x3C) as per need
  display.clearDisplay();
}

void loop()
{
  int value = analogRead(sensor);
  int percent = map(value, 1024, 0, 0, 100);
  display.setTextSize(2);
  display.setTextColor(WHITE);
  display.setCursor(0,0);
  display.println("MOISTURE");
  display.print(percent);
  display.print("%");
  display.display();
  display.clearDisplay();
}
This code initializes the OLED display and reads the soil moisture level from the sensor connected to pin A1. The moisture level is then displayed on the OLED screen as a percentage. The display is updated continuously in the loop function.