
Arduino UNO Controlled Joystick Interface with LCD Feedback and Audio Alert
View and Edit Project In Cirkit Designer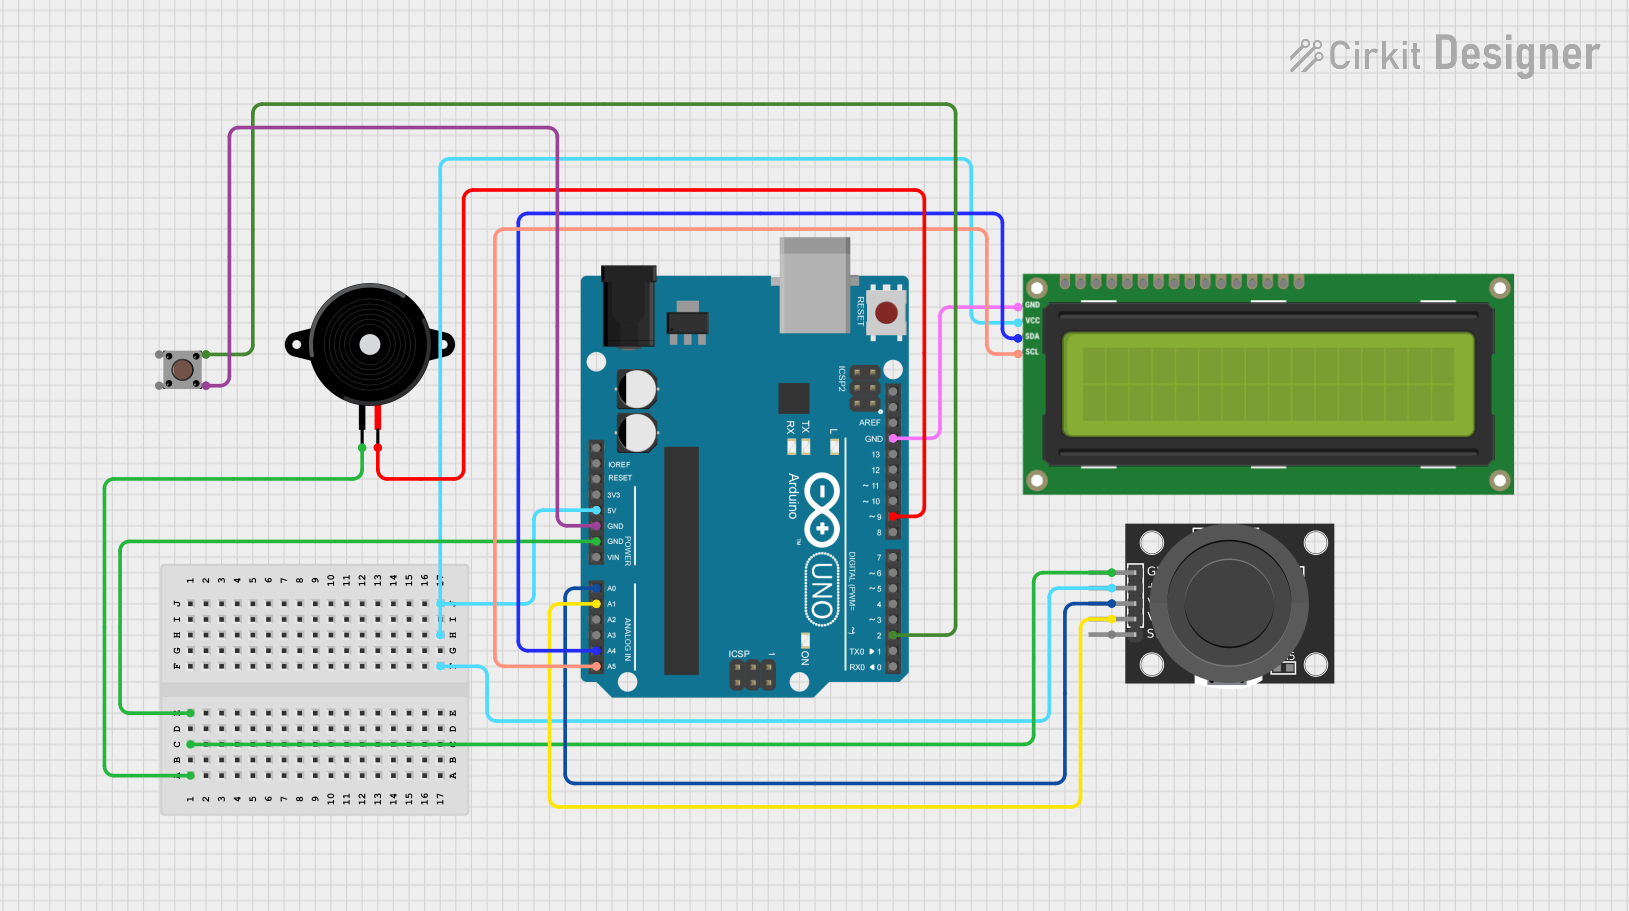
Circuit Documentation
Summary of the Circuit
This circuit is designed to interface with various input and output devices controlled by an Arduino UNO microcontroller. The circuit includes a pushbutton, a KY-023 dual-axis joystick module, a piezo speaker, and an I2C LCD 16x2 screen. The Arduino UNO reads inputs from the pushbutton and joystick, drives the piezo speaker, and communicates with the LCD screen via I2C protocol. The circuit is powered by the Arduino's 5V output, and ground connections are distributed to all components requiring it.
Component List
Pushbutton
- Description: A simple pushbutton switch that can be used to input a binary signal to the microcontroller.
- Pins: Pin 3 (out), Pin 4 (out), Pin 1 (in), Pin 2 (in)
KY-023 Dual Axis Joystick Module
- Description: A joystick module that provides two analog outputs corresponding to the X and Y axis positions and a digital output for the joystick pushbutton.
- Pins: GND, +5V, VRx, VRy, SW
Piezo Speaker
- Description: An electronic device that can be used to generate tones or simple beeps.
- Pins: pin1, pin2
I2C LCD 16x2 Screen
- Description: A 16x2 character LCD display that uses the I2C bus for communication.
- Pins: SCL, SDA, VCC (5V), GND, VDD, VO, RS, RW, E, D0, D1, D2, D3, D4, D5, D6, D7, BLA, BLK
Arduino UNO
- Description: A microcontroller board based on the ATmega328P, with a variety of digital and analog I/O pins.
- Pins: UNUSED, IOREF, Reset, 3.3V, 5V, GND, Vin, A0, A1, A2, A3, A4, A5, SCL, SDA, AREF, D13, D12, D11, D10, D9, D8, D7, D6, D5, D4, D3, D2, D1, D0
Wiring Details
Pushbutton
- Wiring:
- Pin 2 (in) connected to Arduino UNO GND
- Pin 4 (out) connected to Arduino UNO D2
KY-023 Dual Axis Joystick Module
- Wiring:
- GND connected to Arduino UNO GND
- +5V connected to Arduino UNO 5V
- VRx connected to Arduino UNO A0
- VRy connected to Arduino UNO A1
Piezo Speaker
- Wiring:
- pin1 connected to Arduino UNO GND
- pin2 connected to Arduino UNO D9
I2C LCD 16x2 Screen
- Wiring:
- SCL connected to Arduino UNO A5
- SDA connected to Arduino UNO A4
- VCC (5V) connected to Arduino UNO 5V
- GND connected to Arduino UNO GND
Documented Code
void setup() {
  // put your setup code here, to run once:

}

void loop() {
  // put your main code here, to run repeatedly:

}
Filename: sketch.ino
Note: The provided code is a template and does not include specific functionality. It needs to be filled in with the logic to read the joystick and pushbutton inputs, control the piezo speaker, and update the LCD screen.