
Arduino UNO Bluetooth-Controlled Robotic Car with LCD Display and RGB LED
View and Edit Project In Cirkit Designer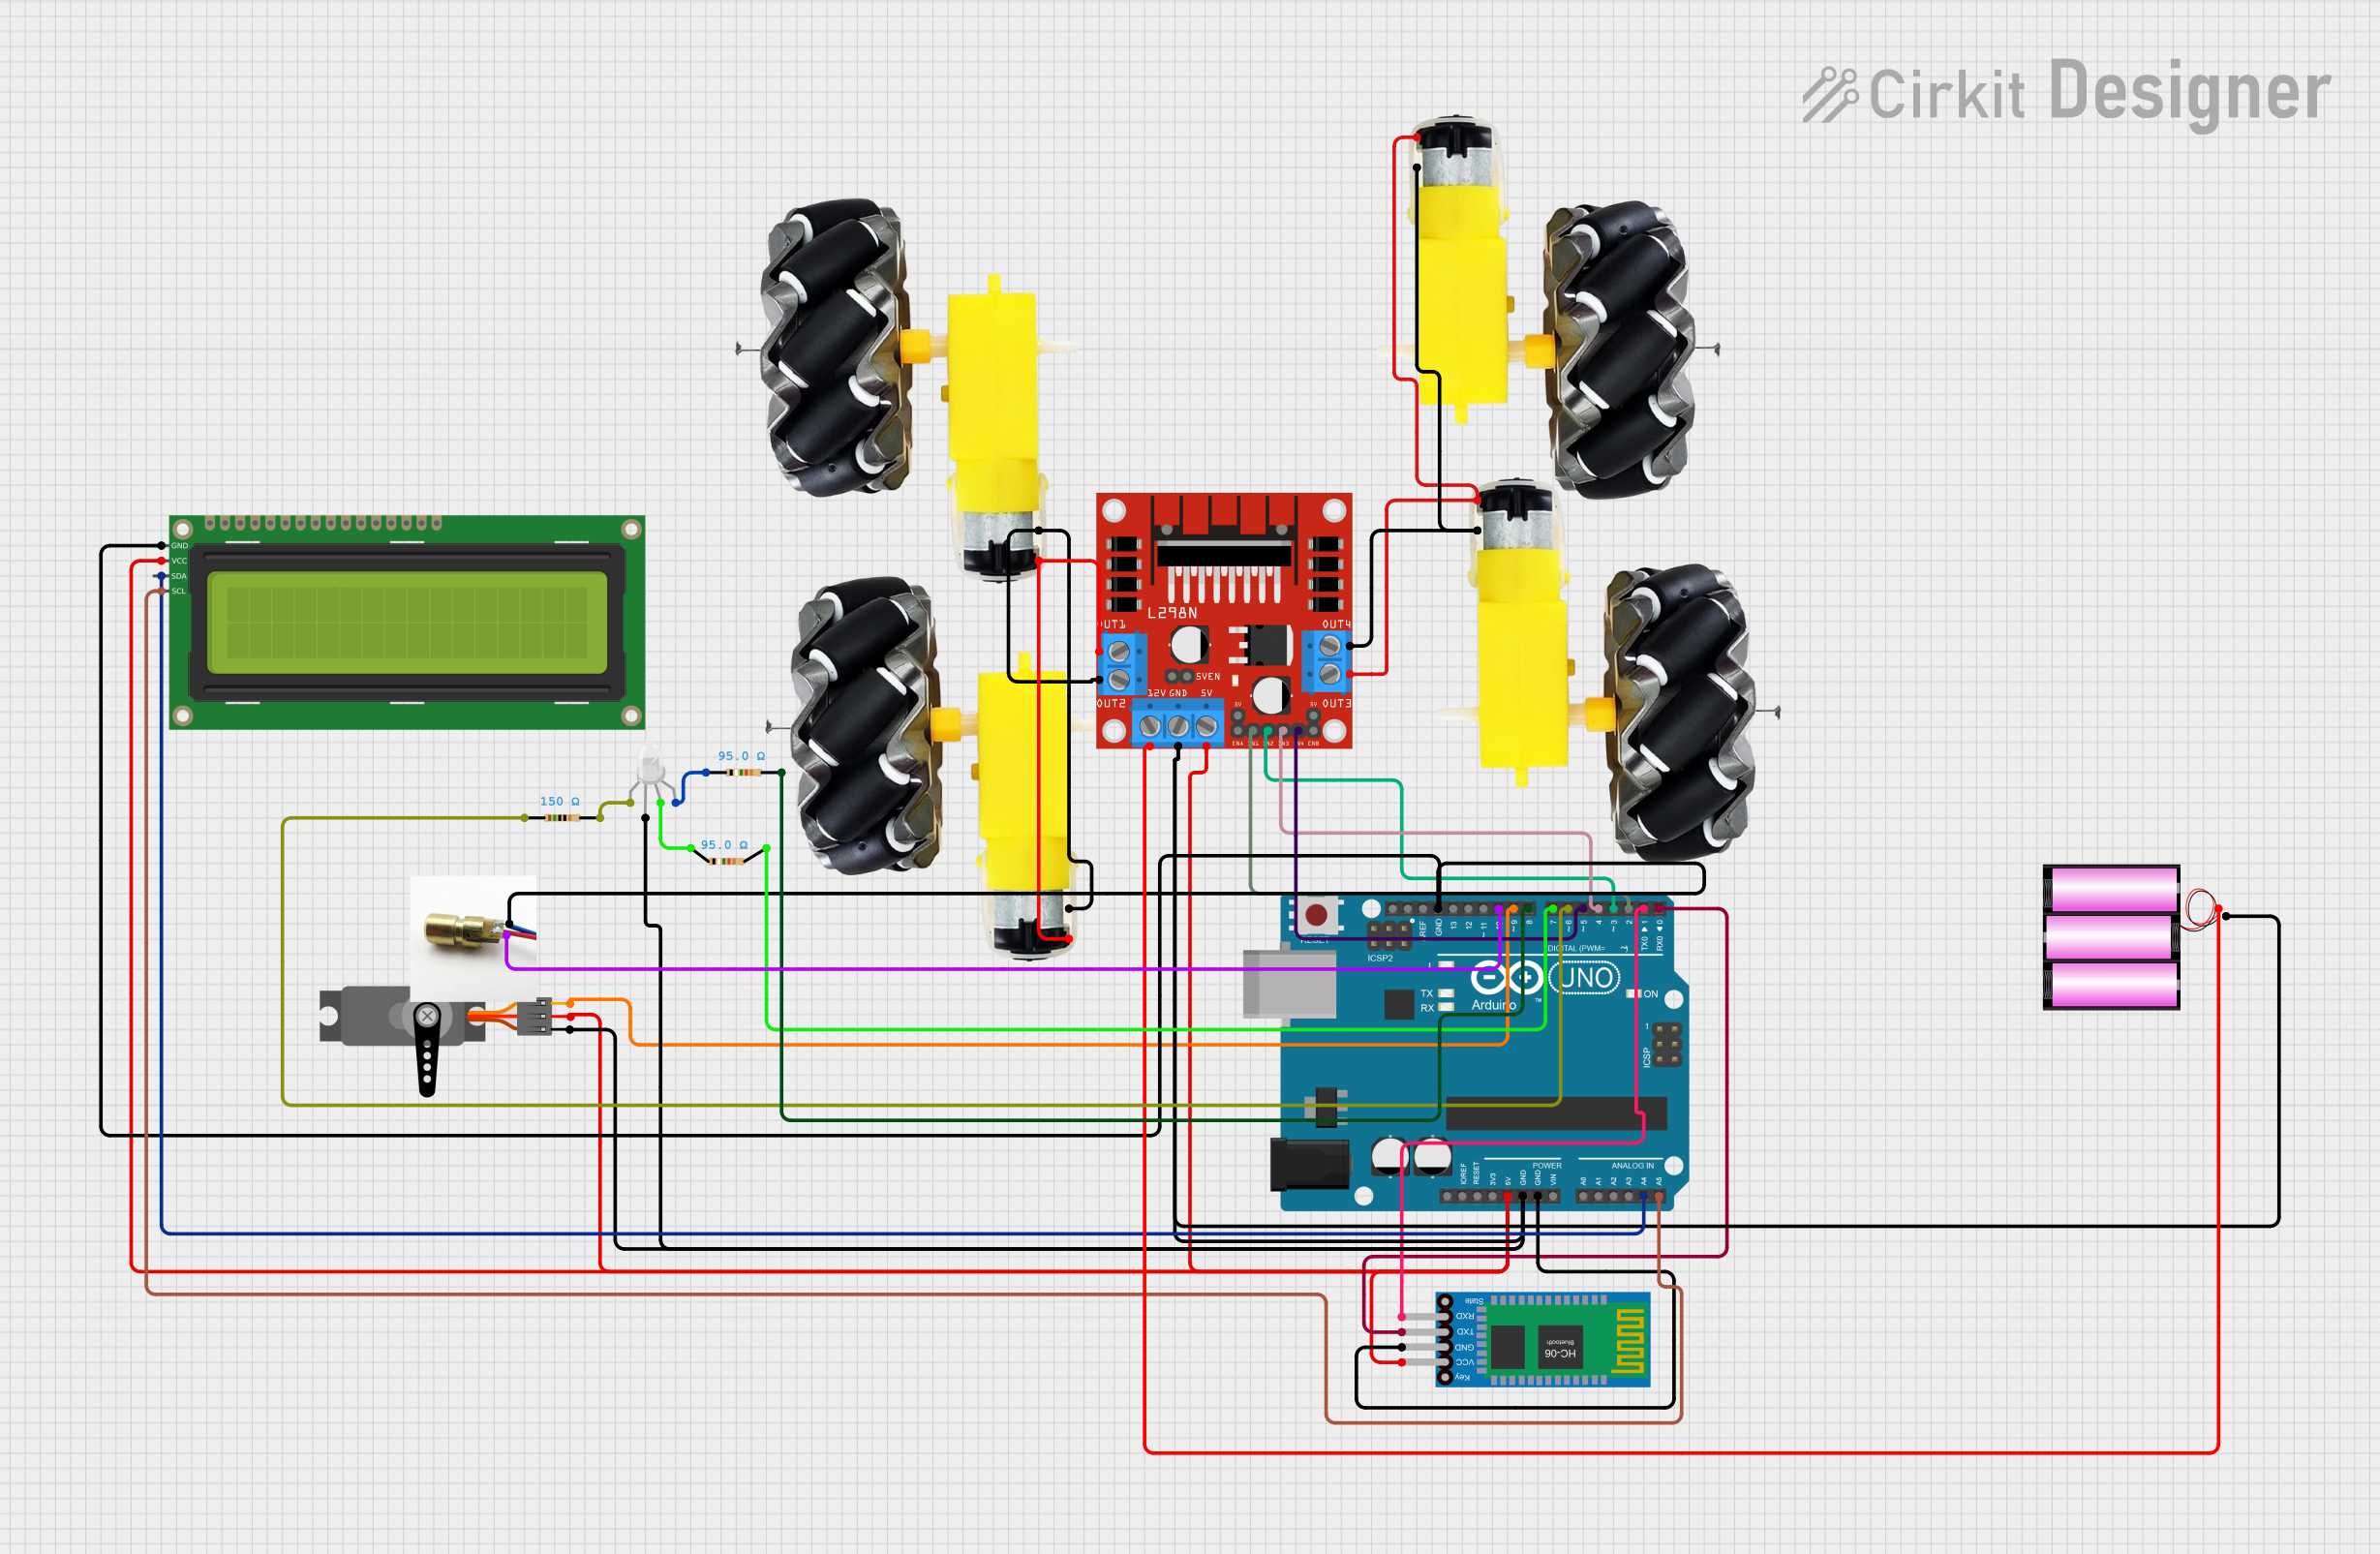
Circuit Documentation
Summary
This circuit is designed to control a robotic vehicle with motorized wheels, an RGB LED, a laser diode, a servo motor, an LCD display, and Bluetooth communication. The control is managed by an Arduino UNO microcontroller, which interfaces with various components to perform actions based on received commands.
Component List
Motor and Wheels
- Description: Motorized wheels for movement.
- Pins: VCC, GND
Arduino UNO
- Description: Microcontroller for controlling the circuit.
- Pins: UNUSED, IOREF, Reset, 3.3V, 5V, GND, Vin, A0, A1, A2, A3, A4, A5, SCL, SDA, AREF, D13, D12, D11, D10, D9, D8, D7, D6, D5, D4, D3, D2, D1, D0
L298N DC Motor Driver
- Description: Motor driver for controlling the motors.
- Pins: OUT1, OUT2, 12V, GND, 5V, OUT3, OUT4, 5V-ENA-JMP-I, 5V-ENA-JMP-O, +5V-J1, +5V-J2, ENA, IN1, IN2, IN3, IN4, ENB
Bluetooth HC-06
- Description: Bluetooth module for wireless communication.
- Pins: VCC, GND, TXD, RXD
Servo
- Description: Servo motor for precise control.
- Pins: GND, VCC, PWM
RGB LED (Wokwi compatible)
- Description: RGB LED for visual indications.
- Pins: R, COM, G, B
16x2 I2C LCD
- Description: LCD display for visual output.
- Pins: GND, VCC, SDA, SCL
Battery 12V
- Description: Power source for the circuit.
- Pins: +, -
Resistor (150 Ohms)
- Description: Resistor for current limiting.
- Pins: pin1, pin2
Resistor (95 Ohms)
- Description: Resistor for current limiting.
- Pins: pin1, pin2
Laser Diode
- Description: Laser diode for emitting laser light.
- Pins: negative, positive
Wiring Details
Motor and Wheels
VCC: Connected to L298N DC Motor Driver OUT1
GND: Connected to L298N DC Motor Driver OUT2
VCC: Connected to L298N DC Motor Driver OUT3
GND: Connected to L298N DC Motor Driver OUT4
Arduino UNO
- 5V: Connected to 16x2 I2C LCD VCC, Servo VCC, Bluetooth HC-06 VCC, L298N DC Motor Driver 5V
- GND: Connected to Servo GND, RGB LED COM, Battery 12V -, L298N DC Motor Driver GND, Bluetooth HC-06 GND, 16x2 I2C LCD GND, Laser Diode negative
- A4: Connected to 16x2 I2C LCD SDA
- A5: Connected to 16x2 I2C LCD SCL
- D10: Connected to Laser Diode positive
- D9: Connected to Servo PWM
- D8: Connected to Resistor (95 Ohms) pin2
- D7: Connected to Resistor (95 Ohms) pin2
- D6: Connected to Resistor (150 Ohms) pin1
- D5: Connected to L298N DC Motor Driver IN4
- D4: Connected to L298N DC Motor Driver IN3
- D3: Connected to L298N DC Motor Driver IN2
- D2: Connected to L298N DC Motor Driver IN1
- D1: Connected to Bluetooth HC-06 RXD
- D0: Connected to Bluetooth HC-06 TXD
L298N DC Motor Driver
- OUT1: Connected to Motor and Wheels VCC
- OUT2: Connected to Motor and Wheels GND
- OUT3: Connected to Motor and Wheels VCC
- OUT4: Connected to Motor and Wheels GND
- 12V: Connected to Battery 12V +
- GND: Connected to Arduino UNO GND, Servo GND, RGB LED COM, Battery 12V -
- 5V: Connected to Arduino UNO 5V, 16x2 I2C LCD VCC, Servo VCC, Bluetooth HC-06 VCC
- IN1: Connected to Arduino UNO D2
- IN2: Connected to Arduino UNO D3
- IN3: Connected to Arduino UNO D4
- IN4: Connected to Arduino UNO D5
Bluetooth HC-06
- VCC: Connected to Arduino UNO 5V
- GND: Connected to Arduino UNO GND
- TXD: Connected to Arduino UNO D0
- RXD: Connected to Arduino UNO D1
Servo
- GND: Connected to Arduino UNO GND
- VCC: Connected to Arduino UNO 5V
- PWM: Connected to Arduino UNO D9
RGB LED (Wokwi compatible)
- R: Connected to Resistor (150 Ohms) pin2
- COM: Connected to Arduino UNO GND
- G: Connected to Resistor (95 Ohms) pin1
- B: Connected to Resistor (95 Ohms) pin1
16x2 I2C LCD
- GND: Connected to Arduino UNO GND, Laser Diode negative
- VCC: Connected to Arduino UNO 5V
- SDA: Connected to Arduino UNO A4
- SCL: Connected to Arduino UNO A5
Battery 12V
- +: Connected to L298N DC Motor Driver 12V
- -: Connected to Arduino UNO GND, Servo GND, RGB LED COM, L298N DC Motor Driver GND
Resistor (150 Ohms)
- pin1: Connected to Arduino UNO D6
- pin2: Connected to RGB LED R
Resistor (95 Ohms)
- pin1: Connected to RGB LED G, RGB LED B
- pin2: Connected to Arduino UNO D7, Arduino UNO D8
Laser Diode
- negative: Connected to Arduino UNO GND, 16x2 I2C LCD GND
- positive: Connected to Arduino UNO D10
Code Documentation
#include <Servo.h>
#include <Wire.h>
#include <LiquidCrystal_I2C.h>

// Pin configuration
const int motorRightForward = 2;
const int motorRightBackward = 3;
const int motorLeftForward = 4;
const int motorLeftBackward = 5;
const int ledRed = 6;
const int ledGreen = 7;
const int ledBlue = 8;
const int laserPin = 10;
const int servoPin = 9;

Servo servo;
LiquidCrystal_I2C lcd(0x27, 16, 2);
int servoAngle = 90;
char command;

void setup() {
  Serial.begin(9600); // Set the baud rate to your Bluetooth module

  // Motor pins
  pinMode(motorRightForward, OUTPUT);
  pinMode(motorRightBackward, OUTPUT);
  pinMode(motorLeftForward, OUTPUT);
  pinMode(motorLeftBackward, OUTPUT);

  // LED pins
  pinMode(ledRed, OUTPUT);
  pinMode(ledGreen, OUTPUT);
  pinMode(ledBlue, OUTPUT);

  // Laser pin
  pinMode(laserPin, OUTPUT);

  // Servo setup
  servo.attach(servoPin);
  servo.write(servoAngle);

  // LCD setup
  lcd.init();
  lcd.backlight();
  lcd.setCursor(0, 0);
  lcd.print("Ready");
}

void loop() {
  if (Serial.available() > 0) {
    command = Serial.read();

    if (isalpha(command)) {
      switch (command) {
        case 'F':
          forward();
          break;
        case 'B':
          backward();
          break;
        case 'L':
          turnLeft();
          break;
        case 'R':
          turnRight();
          break;
        case 'S':
          stopMotors();
          break;
        case 'V':
          Red();
          break;
        case 'G':
          Green();
          break;
        case 'v':
          Blue();
          break;
        case 'q':
          offRGB();
          break;
        case 'l ':
          laserOn();
          break;
        case 'K':
          laserOff();
          break;
        case 'W':
          servoUp();
          break;
        case 'w':
          servoUp();
          break;
        case 'U':
          servoDown();
          break;