
Arduino UNO-Based Motion-Activated LED Strip with MPU6050 and Battery Power
View and Edit Project In Cirkit Designer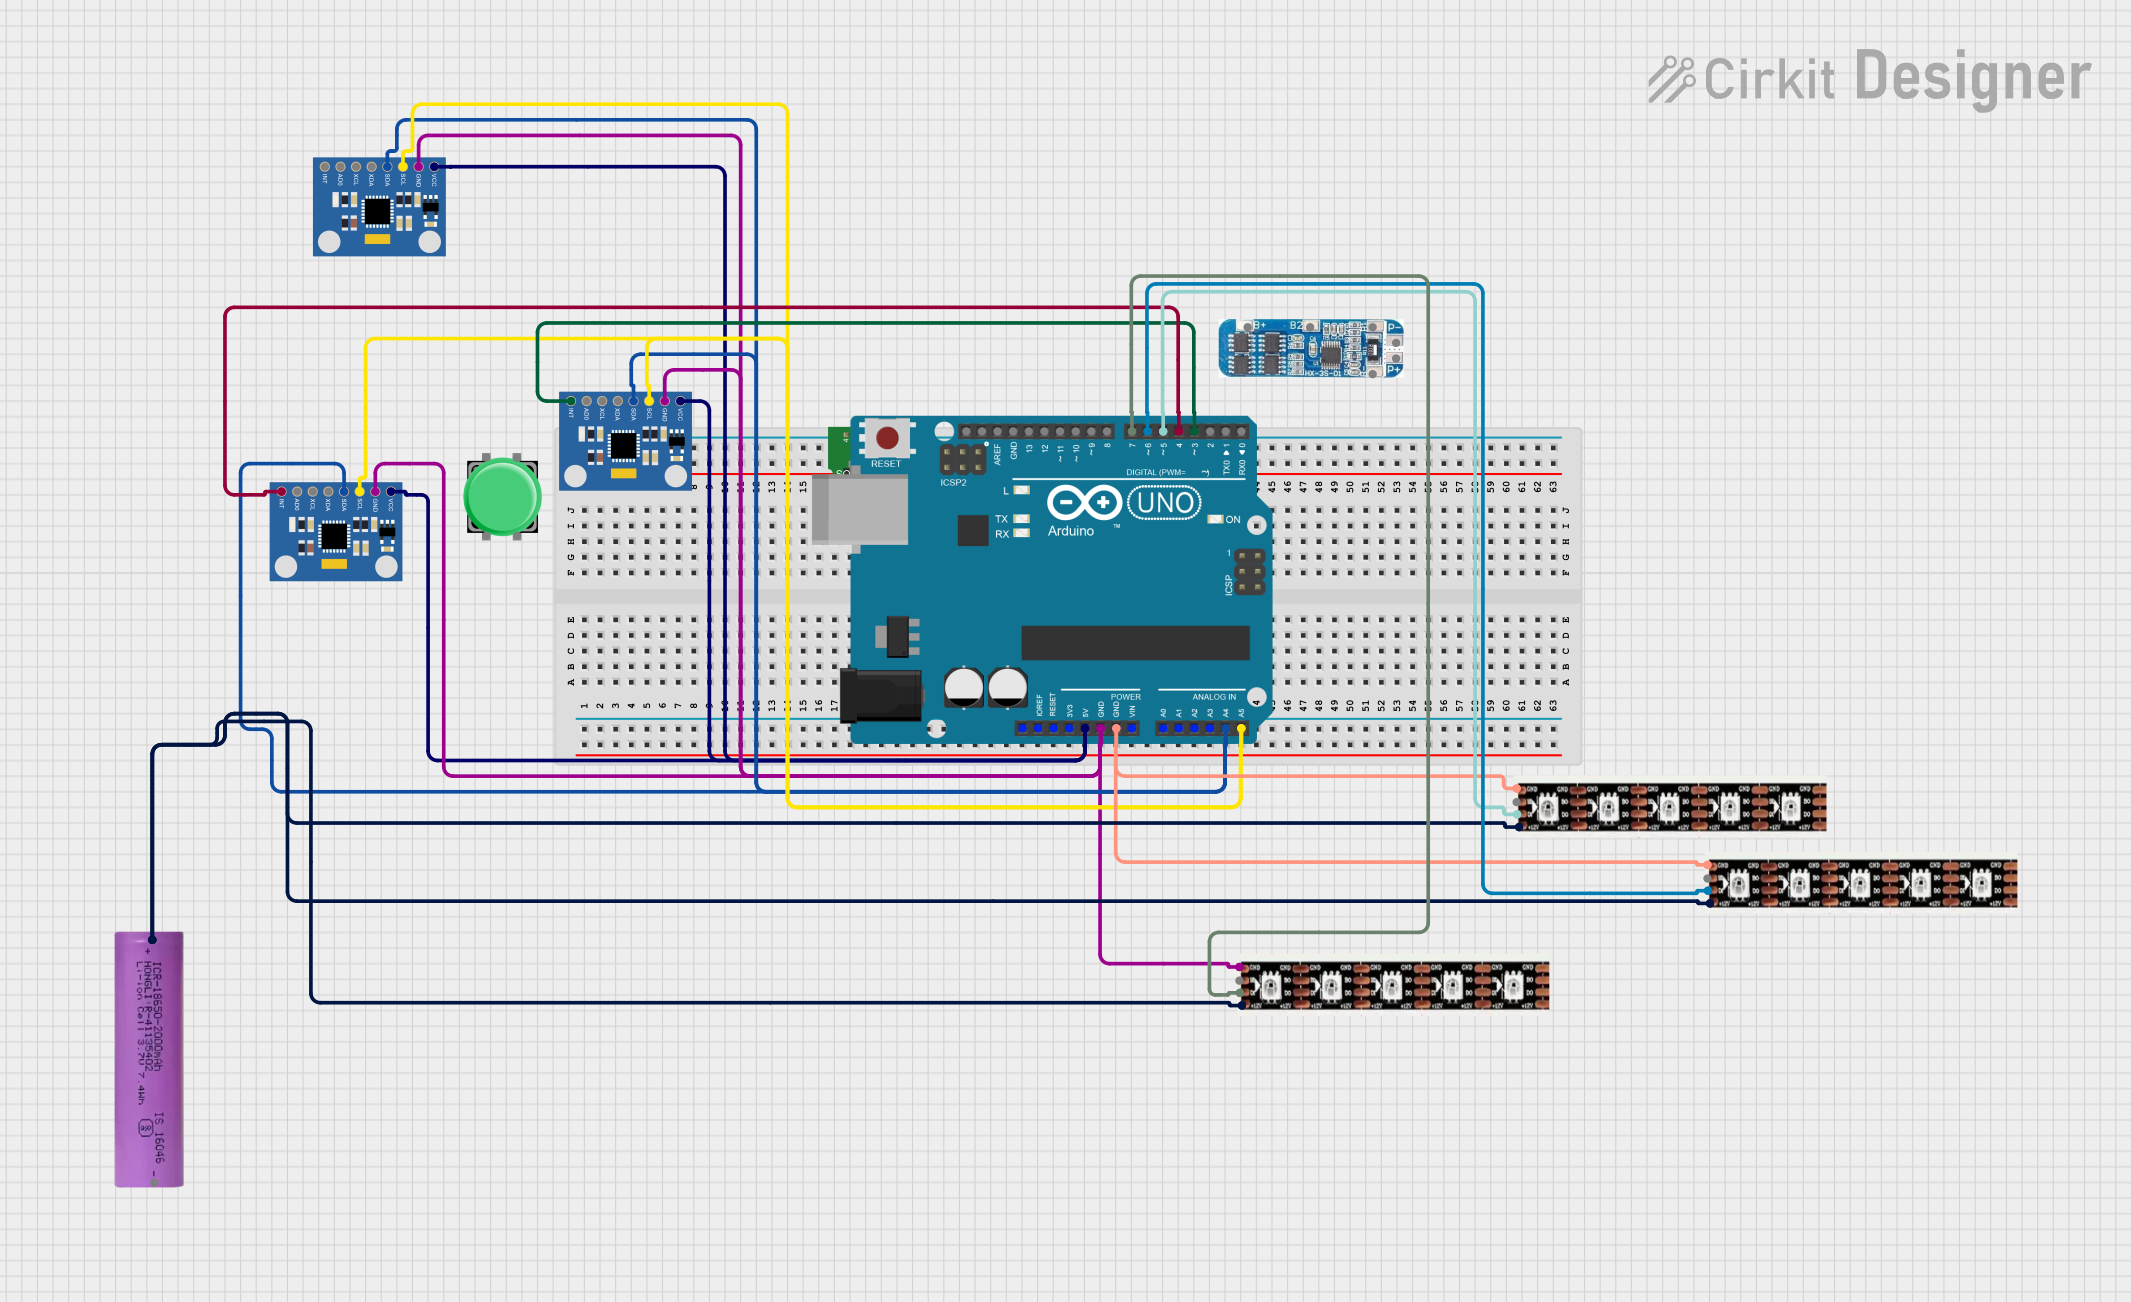
Circuit Documentation
Summary
This circuit involves an Arduino UNO microcontroller interfacing with multiple MPU6050 Accelerometer + Gyroscope sensors, WS2815 LED strips, a pushbutton, a voltage regulator, a BMS, and a Li-ion battery. The Arduino UNO is used to control the sensors and LED strips, while the voltage regulator ensures stable power supply, and the BMS manages the battery.
Component List
Arduino UNO
- Description: A microcontroller board based on the ATmega328P.
- Pins: UNUSED, IOREF, Reset, 3.3V, 5V, GND, Vin, A0, A1, A2, A3, A4, A5, SCL, SDA, AREF, D13, D12, D11, D10, D9, D8, D7, D6, D5, D4, D3, D2, D1, D0
MPU6050 Accelerometer + Gyroscope (Wokwi Compatible)
- Description: A 6-axis motion tracking device.
- Pins: INT, AD0, XCL, XDA, SDA, SCL, GND, VCC
Pushbutton
- Description: A simple pushbutton switch.
- Pins: Pin 2, Pin 1, Pin 3, Pin 4
WS2815 LED Strip
- Description: An addressable LED strip.
- Pins: GND, B0, D0, +12V
Voltage Regulator
- Description: A device to regulate voltage.
- Pins: ADJ, OUT, IN
BMS
- Description: Battery Management System for Li-ion batteries.
- Pins: B+, B2, B1, B-, P-, P+
Li-ion battery 18650-2000mAh 3.7V 7.4WH
- Description: A rechargeable Li-ion battery.
- Pins: +, -
Wiring Details
Arduino UNO
- 5V connected to VCC of all MPU6050 sensors.
- GND connected to GND of all MPU6050 sensors and all WS2815 LED strips.
- A4 connected to SDA of all MPU6050 sensors.
- A5 connected to SCL of all MPU6050 sensors.
- D7 connected to D0 of one WS2815 LED strip.
- D6 connected to D0 of another WS2815 LED strip.
- D5 connected to D0 of another WS2815 LED strip.
- D4 connected to INT of one MPU6050 sensor.
- D3 connected to INT of another MPU6050 sensor.
MPU6050 Accelerometer + Gyroscope (Wokwi Compatible)
- VCC connected to 5V of Arduino UNO.
- GND connected to GND of Arduino UNO.
- SDA connected to A4 of Arduino UNO.
- SCL connected to A5 of Arduino UNO.
- INT connected to D4 or D3 of Arduino UNO.
Pushbutton
- No specific connections provided in the net list.
WS2815 LED Strip
- GND connected to GND of Arduino UNO.
- D0 connected to D7, D6, or D5 of Arduino UNO.
- +12V connected to + of Li-ion battery.
Voltage Regulator
- No specific connections provided in the net list.
BMS
- No specific connections provided in the net list.
Li-ion battery 18650-2000mAh 3.7V 7.4WH
- + connected to +12V of all WS2815 LED strips.
Documented Code
Arduino UNO Code (sketch.ino)
void setup() {
  // put your setup code here, to run once:

}

void loop() {
  // put your main code here, to run repeatedly:

}
Additional Documentation (documentation.txt)
This documentation provides a comprehensive overview of the circuit, including a summary, detailed component list, wiring details, and the code used in the Arduino UNO.