Arduino UNO-Based Motion Sensing and Wireless Communication Module
Circuit Documentation
Summary
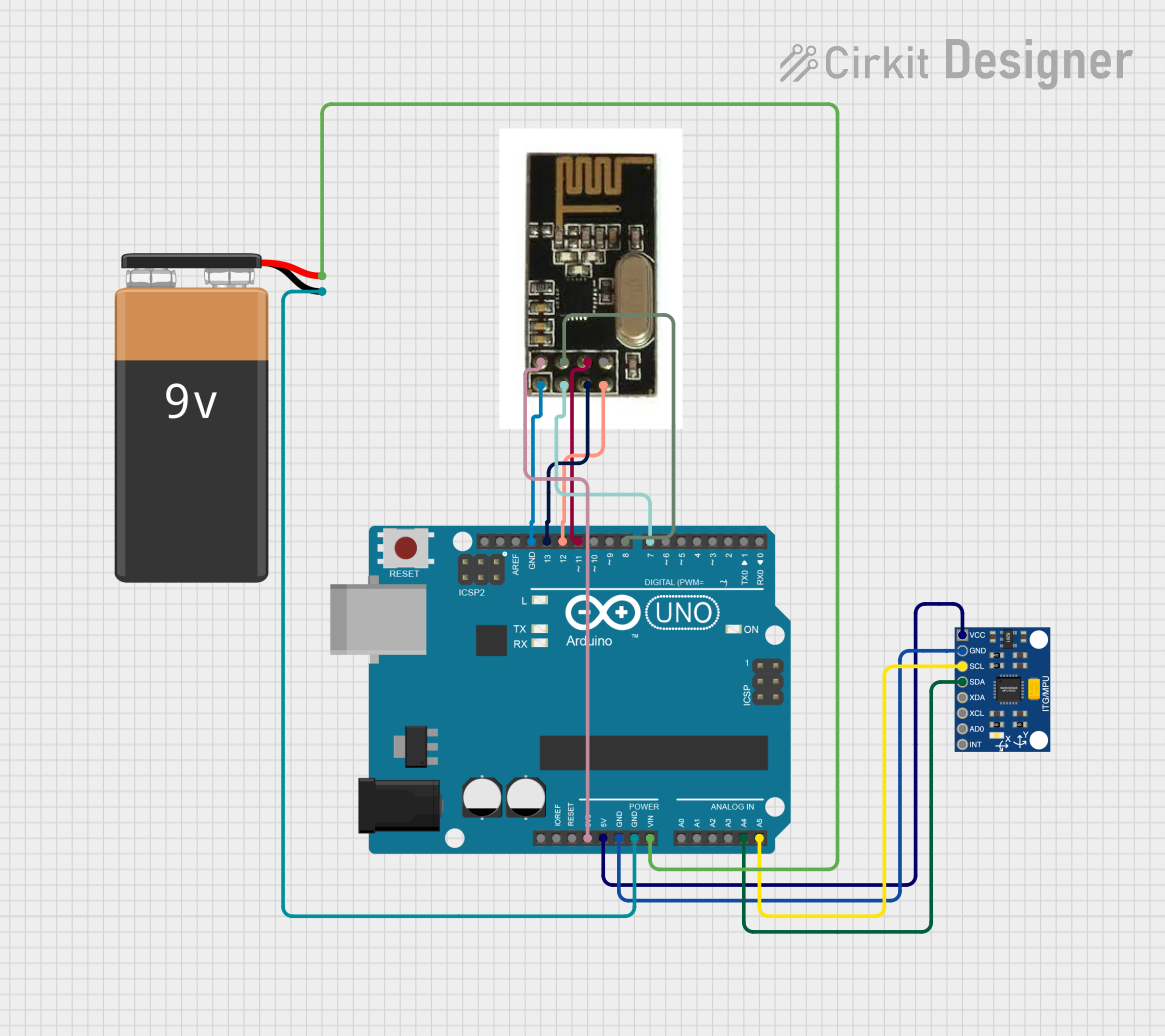
This circuit integrates an Arduino UNO microcontroller with an InvenSense MPU6050 accelerometer/gyroscope and an NRF24L01 wireless transceiver module. The Arduino UNO is powered by a 9V battery and provides regulated voltage to the other components. The MPU6050 communicates with the Arduino over the I2C protocol, while the NRF24L01 uses SPI for communication. This setup could be used for a wireless sensor application where the MPU6050 provides motion data that the Arduino processes and sends via the NRF24L01.
Component List
Arduino UNO
- Description: A microcontroller board based on the ATmega328P.
- Purpose: Acts as the central processing unit of the circuit, controlling the data flow and logic.
- Pins Used: IOREF, Reset, 3.3V, 5V, GND, Vin, A0-A5, SCL, SDA, AREF, D13, D12, D11, D10, D9, D8, D7, D6, D5, D4, D3, D2, D1, D0.
InvenSense MPU6050
- Description: A 6-axis motion tracking device that combines a 3-axis gyroscope and a 3-axis accelerometer.
- Purpose: Provides motion tracking data to the Arduino.
- Pins Used: VCC, GND, SCL, SDA, XDA, XCL, AD0, INT.
NRF24L01
- Description: A 2.4GHz wireless transceiver module.
- Purpose: Enables wireless communication for the circuit.
- Pins Used: GND, VCC, CE, CSN, SCK, MOSI, MISO, IRQ.
9V Battery
- Description: A standard 9V battery.
- Purpose: Provides power to the Arduino UNO and, indirectly, to the other components.
- Pins Used: -, +.
Wiring Details
Arduino UNO
- 3.3V to NRF24L01 VCC
- 5V to MPU6050 VCC
- GND to MPU6050 GND, NRF24L01 GND, and 9V Battery -
- Vin to 9V Battery +
- A4 (SDA) to MPU6050 SDA
- A5 (SCL) to MPU6050 SCL
- D13 (SCK) to NRF24L01 SCK
- D12 (MISO) to NRF24L01 MISO
- D11 (MOSI) to NRF24L01 MOSI
- D8 (CSN) to NRF24L01 CSN
- D7 (CE) to NRF24L01 CE
InvenSense MPU6050
- VCC to Arduino UNO 5V
- GND to Arduino UNO GND
- SDA to Arduino UNO A4
- SCL to Arduino UNO A5
NRF24L01
- VCC to Arduino UNO 3.3V
- GND to Arduino UNO GND
- CE to Arduino UNO D7
- CSN to Arduino UNO D8
- SCK to Arduino UNO D13
- MOSI to Arduino UNO D11
- MISO to Arduino UNO D12
9V Battery
- + to Arduino UNO Vin
- - to Arduino UNO GND
Documented Code
Arduino UNO Code (sketch.ino)
void setup() {
  // put your setup code here, to run once:

}

void loop() {
  // put your main code here, to run repeatedly:

}
Note: The provided code is a template and does not include specific functionality. It should be populated with the setup and loop code required to initialize the components and handle the data communication between the MPU6050, NRF24L01, and any other peripherals or logic required by the application.