
Arduino Nano-Based Smart Irrigation System with Sound Sensor and Soil Moisture Detection
View and Edit Project In Cirkit Designer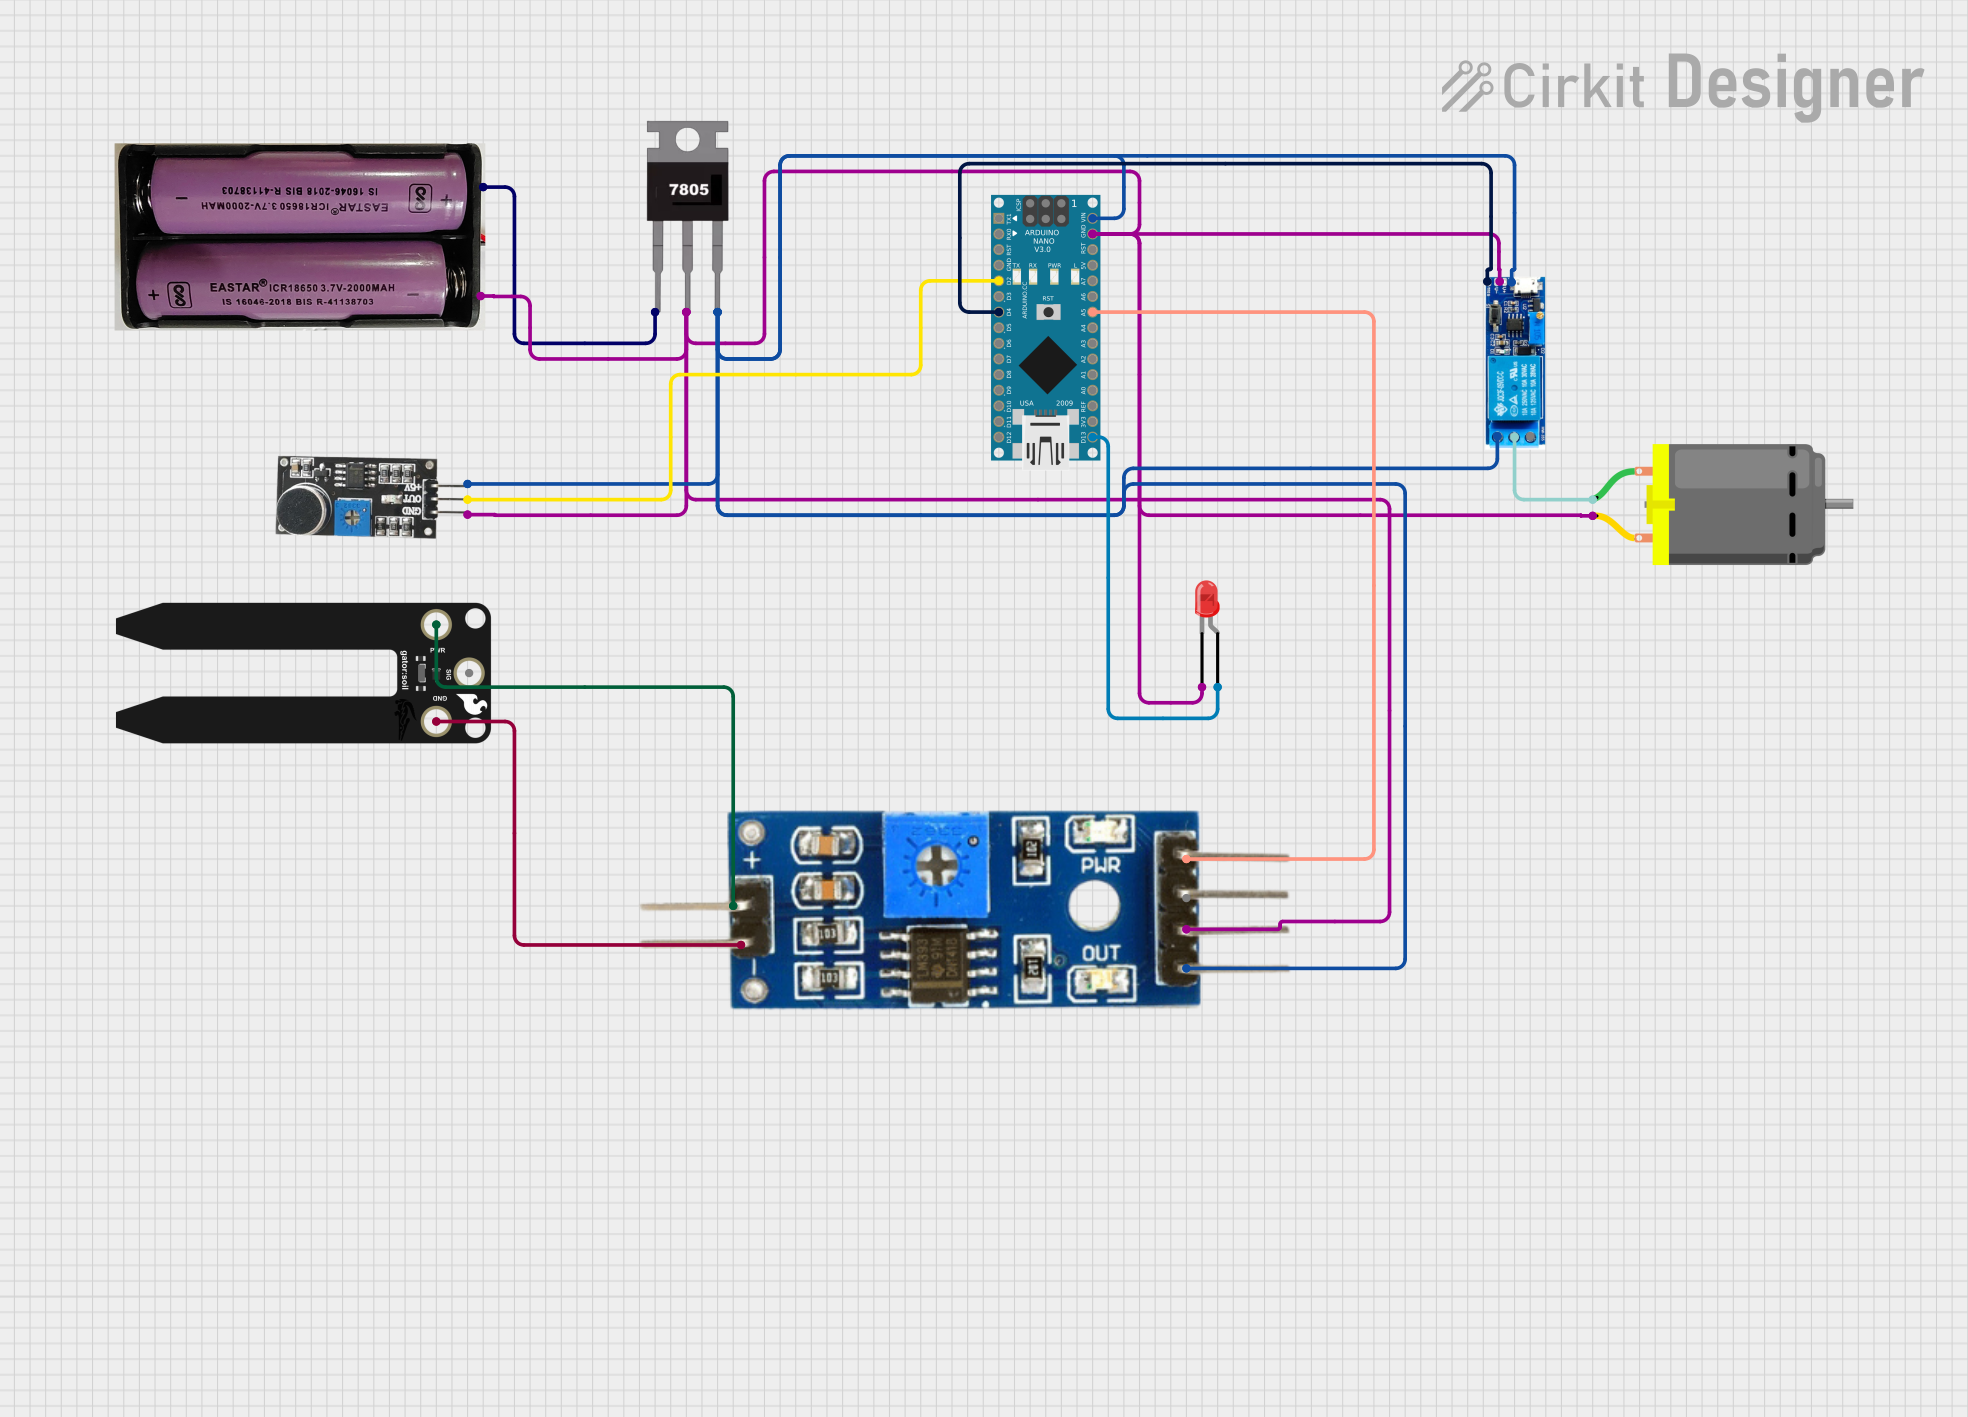
Circuit Documentation
Summary
This circuit involves an Arduino Nano microcontroller interfacing with various sensors and actuators, including a sound sensor, soil moisture module, relay module, DC motor, and an LED. The circuit is powered by a 7.4V battery regulated by a 7805 voltage regulator to provide a stable 5V supply.
Component List
Arduino Nano
- Description: A small, complete, and breadboard-friendly board based on the ATmega328P.
- Pins: D1/TX, D0/RX, RESET, GND, D2, D3, D4, D5, D6, D7, D8, D9, D10, D11/MOSI, D12/MISO, VIN, 5V, A7, A6, A5, A4, A3, A2, A1, A0, AREF, 3V3, D13/SCK
Sound Sensor
- Description: A sensor module that detects sound and outputs a corresponding signal.
- Pins: 5V +, OUT, GND
SparkFun gator:soil
- Description: A soil moisture sensor that measures the volumetric content of water in soil.
- Pins: VCC, GND, SIG
Soil Moisture Module
- Description: A module used to measure the moisture level in the soil.
- Pins: positive, negative, Analog, Digital, Ground, VCC
Relay Module 5V-30V
- Description: A relay module that can switch higher voltage and current loads.
- Pins: common contact, normally open, normally closed, trigger, V-, V+
DC Motor
- Description: A motor that runs on direct current (DC) electricity.
- Pins: pin 1, pin 2
7805 Voltage Regulator
- Description: A voltage regulator that outputs a stable 5V from a higher input voltage.
- Pins: Vin, Gnd, Vout
7.4V Battery
- Description: A battery providing a 7.4V power supply.
- Pins: +, -
LED: Two Pin (red)
- Description: A red LED with two pins.
- Pins: cathode, anode
Wiring Details
Arduino Nano
- D2 connected to Sound Sensor OUT
- D4 connected to Relay Module trigger
- VIN connected to 7805 Vout, Relay Module V+, Sound Sensor 5V +, Soil Moisture Module VCC
- GND connected to 7805 Gnd, Relay Module V-, Sound Sensor GND, Soil Moisture Module Ground, DC Motor pin 2, LED cathode
- A5 connected to Soil Moisture Module Analog
- D13/SCK connected to LED anode
Sound Sensor
- OUT connected to Arduino Nano D2
- 5V + connected to 7805 Vout, Relay Module V+, Arduino Nano VIN, Soil Moisture Module VCC
- GND connected to 7805 Gnd, Relay Module V-, Arduino Nano GND, Soil Moisture Module Ground, DC Motor pin 2, LED cathode
SparkFun gator:soil
- VCC connected to Soil Moisture Module positive
- GND connected to Soil Moisture Module negative
Soil Moisture Module
- positive connected to SparkFun gator:soil VCC
- negative connected to SparkFun gator:soil GND
- Analog connected to Arduino Nano A5
- Ground connected to 7805 Gnd, Relay Module V-, Sound Sensor GND, Arduino Nano GND, DC Motor pin 2, LED cathode
- VCC connected to 7805 Vout, Relay Module V+, Sound Sensor 5V +, Arduino Nano VIN
Relay Module 5V-30V
- trigger connected to Arduino Nano D4
- normally open connected to Relay Module V+, 7805 Vout, Arduino Nano VIN, Sound Sensor 5V +, Soil Moisture Module VCC
- V- connected to 7805 Gnd, 7.4V -, Arduino Nano GND, Sound Sensor GND, Soil Moisture Module Ground, DC Motor pin 2, LED cathode
- common contact connected to DC Motor pin 1
DC Motor
- pin 1 connected to Relay Module common contact
- pin 2 connected to 7805 Gnd, Relay Module V-, Sound Sensor GND, Soil Moisture Module Ground, Arduino Nano GND, LED cathode
7805 Voltage Regulator
- Vin connected to 7.4V +
- Gnd connected to 7.4V -, Relay Module V-, Arduino Nano GND, Sound Sensor GND, Soil Moisture Module Ground, DC Motor pin 2, LED cathode
- Vout connected to Relay Module V+, Arduino Nano VIN, Sound Sensor 5V +, Soil Moisture Module VCC
7.4V Battery
- + connected to 7805 Vin
- - connected to 7805 Gnd, Relay Module V-, Arduino Nano GND, Sound Sensor GND, Soil Moisture Module Ground, DC Motor pin 2, LED cathode
LED: Two Pin (red)
- cathode connected to 7805 Gnd, Relay Module V-, Sound Sensor GND, Soil Moisture Module Ground, Arduino Nano GND, DC Motor pin 2
- anode connected to Arduino Nano D13/SCK
Documented Code
Arduino Nano Code (sketch.ino)
void setup() {
  // put your setup code here, to run once:

}

void loop() {
  // put your main code here, to run repeatedly:

}
Additional Documentation (documentation.txt)