
Circuit Documentation
Summary
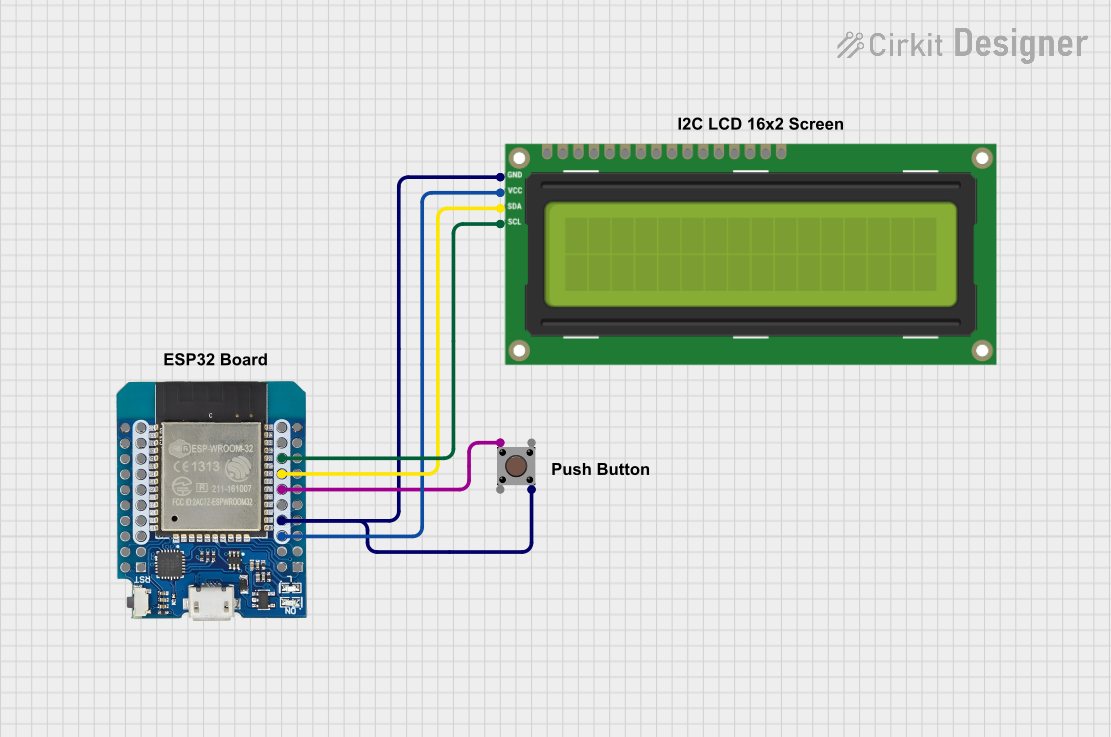
This circuit consists of an ESP32 Wemos microcontroller, a pushbutton, and an I2C LCD 16x2 screen. The ESP32 Wemos reads the state of the pushbutton and displays the button state on the LCD screen. The components are interconnected to facilitate communication and power distribution.
Component List
ESP32 Wemos
- Description: A microcontroller with Wi-Fi and Bluetooth capabilities.
- Pins: SD3, TCK, 3V3, IO5, IO23, IO19, IO18, IO26, SVP, RST, CDM, SD2, NC, TMS, IO34, IO33, IO35, SVN, GND, SD0, TD0, VCC, IO16, IO17, IO21, IO22, RXD, IO27, IO25, IO32, TDI, IO4, IO0, IO2, SD1, CLK, TXD
Pushbutton
- Description: A simple pushbutton switch.
- Pins: Pin 3 (out), Pin 4 (out), Pin 1 (in), Pin 2 (in)
I2C LCD 16x2 Screen
- Description: A 16x2 character LCD screen with I2C interface.
- Pins: SCL, SDA, VCC (5V), GND, VDD, VO, RS, RW, E, D0, D1, D2, D3, D4, D5, D6, D7, BLA, BLK
Comment
- Description: Placeholder for comments in the circuit design.
- Pins: None
Wiring Details
ESP32 Wemos
- VCC is connected to VCC (5V) of the I2C LCD 16x2 Screen.
- GND is connected to GND of the I2C LCD 16x2 Screen and Pin 4 (out) of the Pushbutton.
- IO17 is connected to Pin 1 (in) of the Pushbutton.
- IO21 is connected to SDA of the I2C LCD 16x2 Screen.
- IO22 is connected to SCL of the I2C LCD 16x2 Screen.
Pushbutton
- Pin 1 (in) is connected to IO17 of the ESP32 Wemos.
- Pin 4 (out) is connected to GND of the ESP32 Wemos and GND of the I2C LCD 16x2 Screen.
I2C LCD 16x2 Screen
- VCC (5V) is connected to VCC of the ESP32 Wemos.
- GND is connected to GND of the ESP32 Wemos and Pin 4 (out) of the Pushbutton.
- SDA is connected to IO21 of the ESP32 Wemos.
- SCL is connected to IO22 of the ESP32 Wemos.
Code Documentation
/*
 * This Arduino Sketch initializes an I2C LCD screen and reads the state of a
 * pushbutton. The button state is displayed on the LCD screen.
 */

#include <Wire.h>
#include <LiquidCrystal_I2C.h>

// Define the I2C address for the LCD
#define I2C_ADDR 0x27
#define LCD_COLUMNS 16
#define LCD_ROWS 2

// Initialize the LCD
LiquidCrystal_I2C lcd(I2C_ADDR, LCD_COLUMNS, LCD_ROWS);

// Define pin for the pushbutton
const int buttonPin = 17;

void setup() {
  // Initialize the LCD
  lcd.begin(LCD_COLUMNS, LCD_ROWS);
  lcd.backlight();
  lcd.print("Button State:");

  // Initialize the pushbutton pin as an input
  pinMode(buttonPin, INPUT);
}

void loop() {
  // Read the state of the pushbutton
  int buttonState = digitalRead(buttonPin);

  // Display the button state on the LCD
  lcd.setCursor(0, 1);
  if (buttonState == HIGH) {
    lcd.print("Pressed ");
  } else {
    lcd.print("Released");
  }

  // Small delay to debounce the button
  delay(50);
}
This code initializes the I2C LCD screen and sets up the pushbutton pin as an input. In the main loop, it reads the state of the pushbutton and displays the state ("Pressed" or "Released") on the LCD screen. A small delay is added to debounce the button.