Cirkit Designer
Your all-in-one circuit design IDE
Home /
Project Documentation
Arduino UNO Air Quality Monitor with MQ135 Sensor and I2C LCD Display
Circuit Documentation
Summary
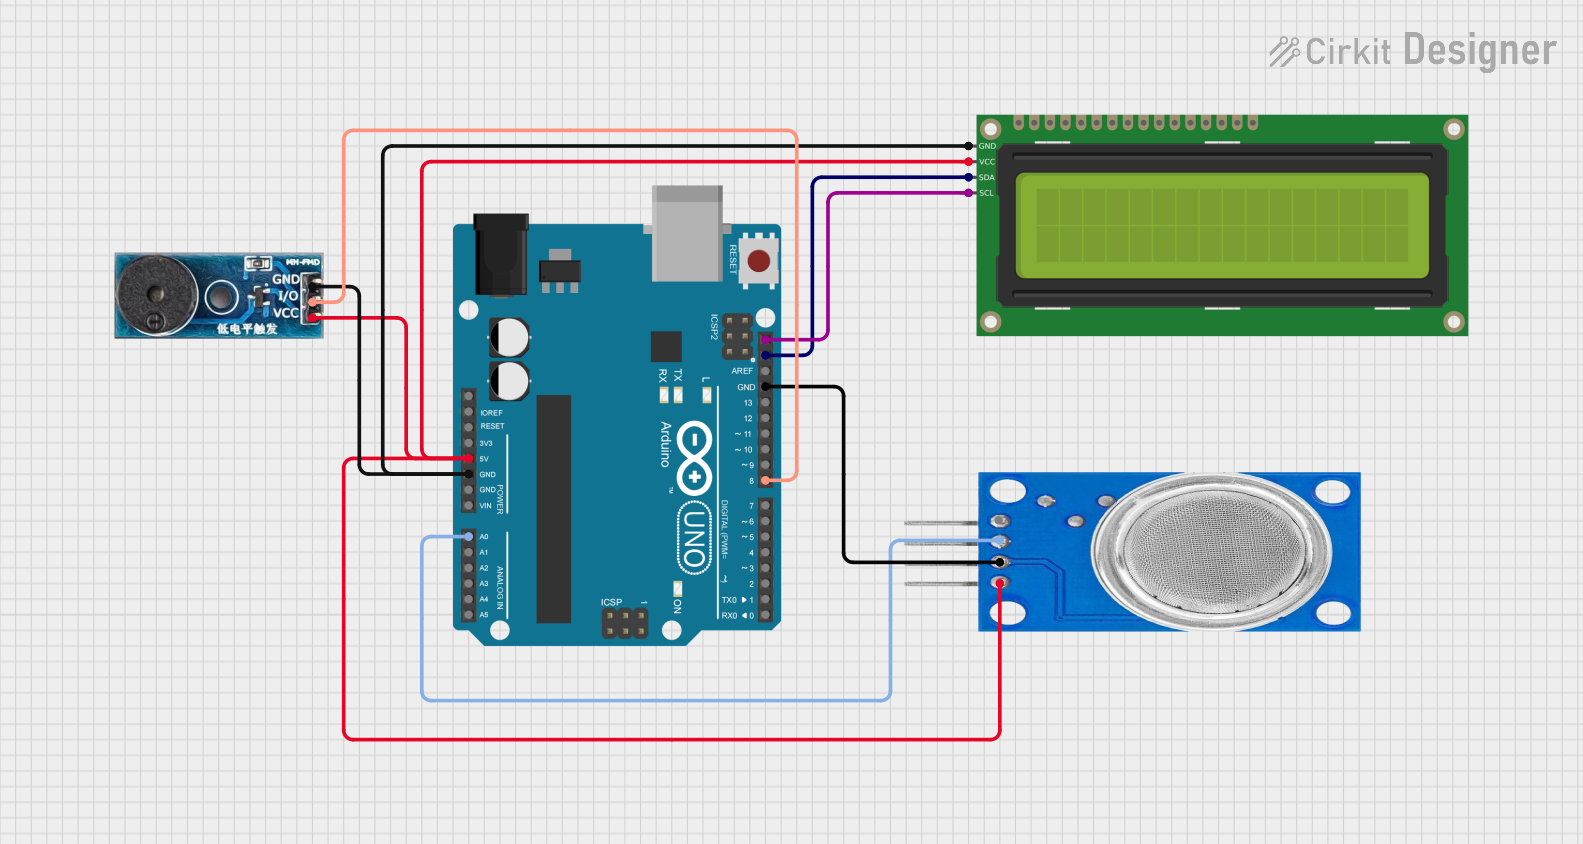
This circuit is designed to interface an MQ135 gas sensor, a 16x2 I2C LCD, and a Buzzer Module with an Arduino UNO. The MQ135 sensor detects gas levels, the LCD displays information, and the Buzzer provides audible alerts. The Arduino UNO serves as the central microcontroller, managing the sensor data and controlling the display and buzzer.
Component List
MQ135
- Description: Gas sensor for detecting various gases including CO2, NH3, NOx, alcohol, benzene, smoke, and others.
- Pins: VCC, GND, A0, D0
Arduino UNO
- Description: A microcontroller board based on the ATmega328P. It has 14 digital input/output pins, 6 analog inputs, and is programmable with the Arduino IDE.
- Pins: UNUSED, IOREF, Reset, 3.3V, 5V, GND, Vin, A0, A1, A2, A3, A4, A5, SCL, SDA, AREF, D13, D12, D11, D10, D9, D8, D7, D6, D5, D4, D3, D2, D1, D0
16x2 I2C LCD
- Description: A 16x2 character LCD display with I2C interface for easy connection and reduced pin usage.
- Pins: GND, VCC, SDA, SCL
Buzzer Module
- Description: A simple buzzer module for generating sound alerts.
- Pins: GND, Vcc, I/O
Wiring Details
MQ135
- VCC: Connected to Arduino UNO 5V
- GND: Connected to Arduino UNO GND
- A0: Connected to Arduino UNO A0
- D0: Not connected
Arduino UNO
- 5V: Connected to VCC of MQ135, 16x2 I2C LCD, and Buzzer Module
- GND: Connected to GND of MQ135, 16x2 I2C LCD, and Buzzer Module
- A0: Connected to A0 of MQ135
- SCL: Connected to SCL of 16x2 I2C LCD
- SDA: Connected to SDA of 16x2 I2C LCD
- D8: Connected to I/O of Buzzer Module
16x2 I2C LCD
- VCC: Connected to Arduino UNO 5V
- GND: Connected to Arduino UNO GND
- SCL: Connected to Arduino UNO SCL
- SDA: Connected to Arduino UNO SDA
Buzzer Module
- Vcc: Connected to Arduino UNO 5V
- GND: Connected to Arduino UNO GND
- I/O: Connected to Arduino UNO D8
Code Documentation
Arduino UNO Code
File Name: sketch.ino
void setup() {
  // put your setup code here, to run once:

}

void loop() {
  // put your main code here, to run repeatedly:

}
This code is a basic template for the Arduino UNO. The setup() function is where you initialize your components and settings, and the loop() function is where the main logic of your program runs repeatedly.
File Name: documentation.txt
This file is empty and intended for additional documentation or notes.