
Battery-Powered Vibration Motor Control with ESP32 and DRV2605L
View and Edit Project In Cirkit Designer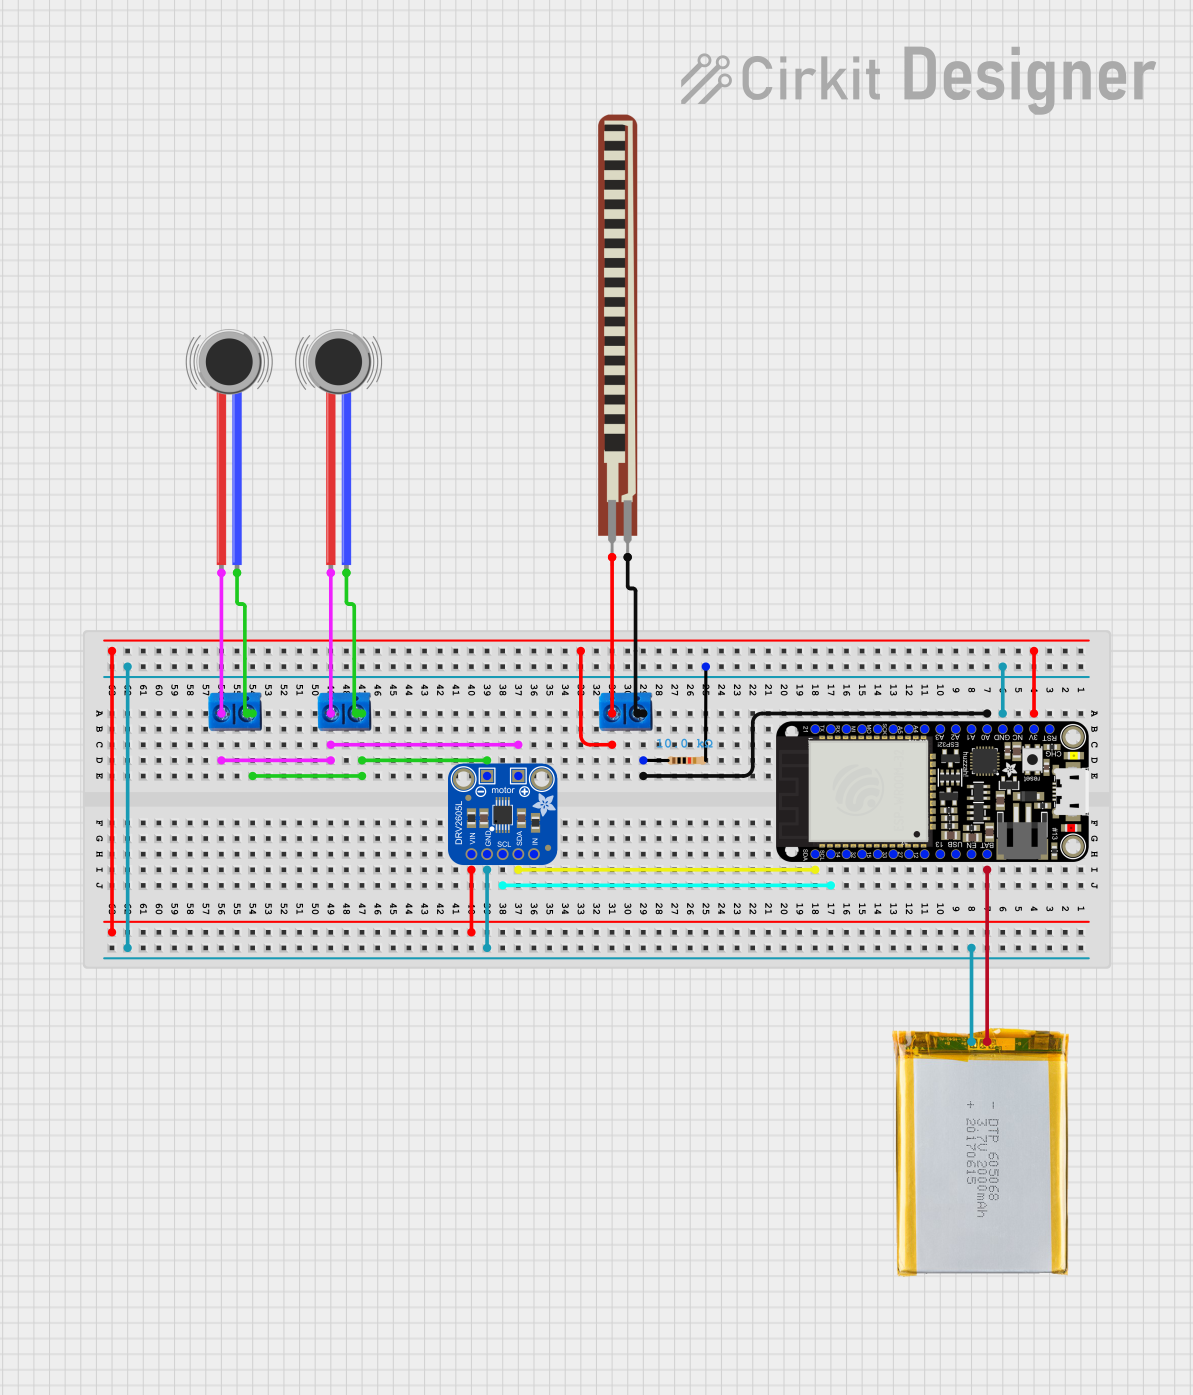
Circuit Documentation
Summary
This circuit is designed to control two vibration motors using an Adafruit DRV2605L haptic driver, which is managed by an Adafruit HUZZAH32 ESP32 Feather microcontroller. The circuit is powered by a 2000mAh battery. Additionally, a 2.2 inch Basic Flex Resistor and a 10k Ohm resistor are used in the circuit.
Component List
2000mAh Battery
- Pins: VCC, GND
- Description: Provides power to the circuit.
- Purpose: Supplies power to the microcontroller and other components.
Vibration Motor
- Pins: POS, NEG
- Description: Small motor that provides vibration feedback.
- Purpose: Used to create haptic feedback.
Adafruit DRV2605L
- Pins: VIN, GND, SCL, SDA, IN/TRIG, OUT+, OUT-
- Description: Haptic driver for controlling vibration motors.
- Purpose: Drives the vibration motors based on commands from the microcontroller.
Resistor
- Pins: pin1, pin2
- Description: 10k Ohm resistor.
- Purpose: Used for current limiting or voltage division.
Terminal PCB 2 Pin
- Pins: Pin A, Pin B
- Description: Terminal block for connecting wires.
- Purpose: Provides a convenient way to connect and disconnect wires.
2.2 inch Basic Flex Resistor
- Pins: Pin 2, pin 1
- Description: Flexible resistor.
- Purpose: Used for sensing flex or bend.
Adafruit HUZZAH32 ESP32 Feather
- Pins: IO21, IO17, IO16, MISO, MOSI, SCK, A5_IO4, A4_IO36, A3_I39, A2_I34, A1_DAC1, A0_DAC2, GND, N/C, 3.3V, RESET, VBAT, EN, VBUS, IO13_A12, IO12_A11, IO27_A10, IO33_A9, IO15_A8, IO32_A7, IO14_A6, SCL, SDA
- Description: ESP32-based microcontroller.
- Purpose: Controls the haptic driver and processes input from the flex resistor.
Wiring Details
2000mAh Battery
- VCC is connected to VBAT of the Adafruit HUZZAH32 ESP32 Feather.
- GND is connected to GND of the Adafruit HUZZAH32 ESP32 Feather and the Adafruit DRV2605L.
Vibration Motor 1
- POS is connected to OUT+ of the Adafruit DRV2605L via a Terminal PCB 2 Pin.
- NEG is connected to OUT- of the Adafruit DRV2605L via a Terminal PCB 2 Pin.
Vibration Motor 2
- POS is connected to OUT+ of the Adafruit DRV2605L via a Terminal PCB 2 Pin.
- NEG is connected to OUT- of the Adafruit DRV2605L via a Terminal PCB 2 Pin.
Adafruit DRV2605L
- VIN is connected to 3.3V of the Adafruit HUZZAH32 ESP32 Feather via a Terminal PCB 2 Pin and the 2.2 inch Basic Flex Resistor.
- GND is connected to GND of the Adafruit HUZZAH32 ESP32 Feather and the 2000mAh Battery.
- SCL is connected to SCL of the Adafruit HUZZAH32 ESP32 Feather.
- SDA is connected to SDA of the Adafruit HUZZAH32 ESP32 Feather.
- OUT+ is connected to POS of both Vibration Motors via Terminal PCB 2 Pins.
- OUT- is connected to NEG of both Vibration Motors via Terminal PCB 2 Pins.
Resistor
- pin1 is connected to A0_DAC2 of the Adafruit HUZZAH32 ESP32 Feather via a Terminal PCB 2 Pin and the 2.2 inch Basic Flex Resistor.
- pin2 is connected to GND of the Adafruit HUZZAH32 ESP32 Feather and the Adafruit DRV2605L.
Terminal PCB 2 Pin
- Pin A of the first Terminal PCB 2 Pin is connected to 3.3V of the Adafruit HUZZAH32 ESP32 Feather.
- Pin B of the first Terminal PCB 2 Pin is connected to pin1 of the Resistor and Pin 2 of the 2.2 inch Basic Flex Resistor.
- Pin A of the second Terminal PCB 2 Pin is connected to OUT+ of the Adafruit DRV2605L.
- Pin B of the second Terminal PCB 2 Pin is connected to OUT- of the Adafruit DRV2605L.
2.2 inch Basic Flex Resistor
- Pin 2 is connected to 3.3V of the Adafruit HUZZAH32 ESP32 Feather via a Terminal PCB 2 Pin.
- pin 1 is connected to pin1 of the Resistor via a Terminal PCB 2 Pin.
Adafruit HUZZAH32 ESP32 Feather
- 3.3V is connected to VIN of the Adafruit DRV2605L via a Terminal PCB 2 Pin and the 2.2 inch Basic Flex Resistor.
- GND is connected to GND of the Adafruit DRV2605L and the 2000mAh Battery.
- VBAT is connected to VCC of the 2000mAh Battery.
- SCL is connected to SCL of the Adafruit DRV2605L.
- SDA is connected to SDA of the Adafruit DRV2605L.
- A0_DAC2 is connected to pin1 of the Resistor via a Terminal PCB 2 Pin.
Documented Code
sketch.ino
void setup() {
  // put your setup code here, to run once:

}

void loop() {
  // put your main code here, to run repeatedly:

}
documentation.txt