
Raspberry Pi 4B and ADS1115 Based Water Level Monitoring System
View and Edit Project In Cirkit Designer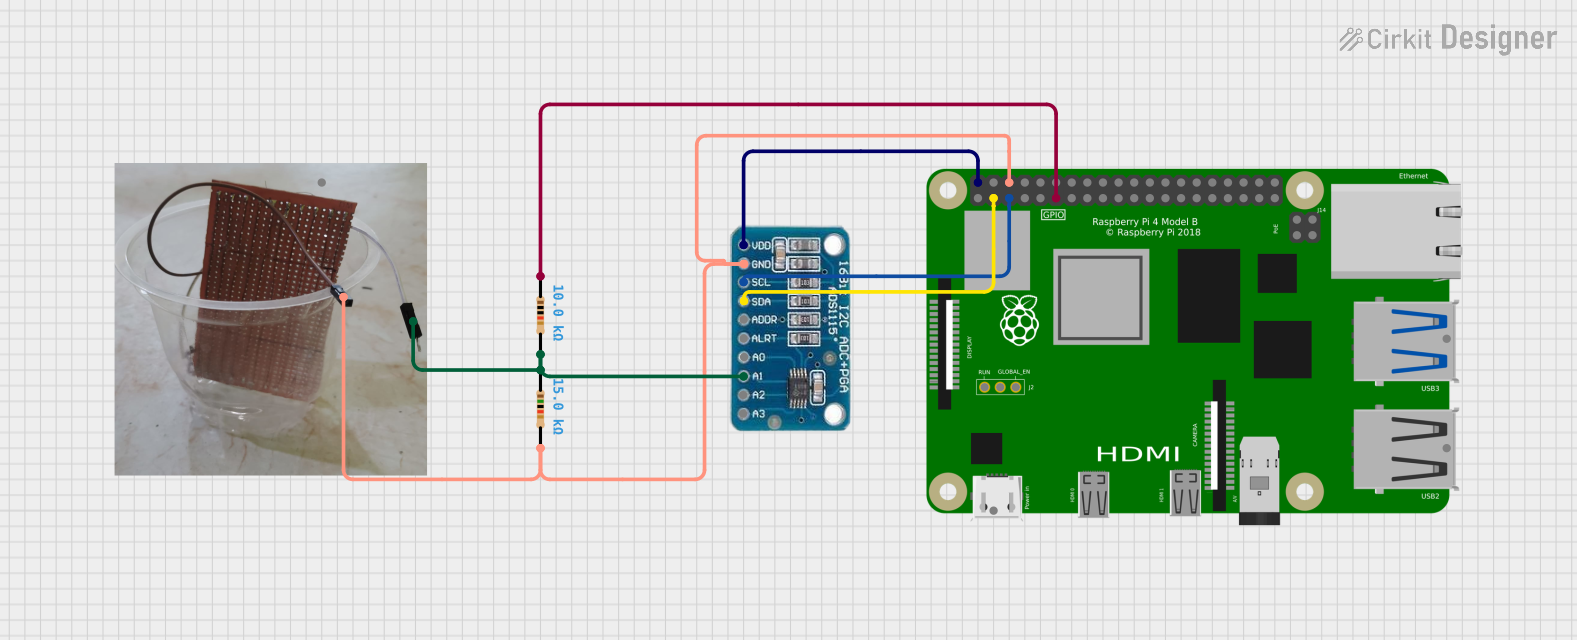
Circuit Documentation
Summary
This circuit integrates a Raspberry Pi 4B with an ADS1115 analog-to-digital converter (ADC) and a resistive-based water level sensor. The purpose of the circuit is to measure the water level using the sensor, with the ADC converting the analog signal to a digital value that the Raspberry Pi can process. The circuit also includes two resistors that likely form a voltage divider or are used for pull-up/pull-down purposes.
Component List
ADS1115
- Description: A precision, low-power, 16-bit ADC.
- Pins: VDD, GND, SCL, SDA, ADDR, ALRT, A0, A1, A2, A3.
Resistor (15k Ohms)
- Description: A passive two-terminal electrical component that implements electrical resistance as a circuit element.
- Resistance: 15,000 Ohms.
Resistor (10k Ohms)
- Description: Another resistor with a different resistance value.
- Resistance: 10,000 Ohms.
Raspberry Pi 4B
- Description: A small, powerful computer capable of running a full range of ARM GNU/Linux distributions.
- Pins: 3V3, 5V, multiple GPIOs, GND, and others.
Resistive Based Water Level Sensor
- Description: A sensor that detects the water level through the resistance change between two electrodes.
Wiring Details
ADS1115
- VDD: Connected to Raspberry Pi 4B 5V.
- GND: Connected to Raspberry Pi 4B GND.
- SCL: Connected to Raspberry Pi 4B GPIO3.
- SDA: Connected to Raspberry Pi 4B GPIO2.
- A1: Connected to the junction of two resistors (15k Ohms and 10k Ohms) and the water level sensor.
Resistor (15k Ohms)
- Pin1: Connected to the water level sensor.
- Pin2: Connected to Raspberry Pi 4B GND.
Resistor (10k Ohms)
- Pin1: Connected to Raspberry Pi 4B GPIO17.
- Pin2: Connected to the water level sensor and ADS1115 A1.
Raspberry Pi 4B
- 5V: Connected to ADS1115 VDD.
- GND: Connected to ADS1115 GND, water level sensor, and 15k Ohms resistor.
- GPIO3: Connected to ADS1115 SCL.
- GPIO2: Connected to ADS1115 SDA.
- GPIO17: Connected to 10k Ohms resistor.
Resistive Based Water Level Sensor
- Pin1: Connected to the junction of two resistors (15k Ohms and 10k Ohms) and ADS1115 A1.
- Pin2: Connected to Raspberry Pi 4B GND.
Documented Code
Raspberry Pi 4B Code (Python)
import time
import board
import busio
import adafruit_ads1x15.ads1115 as ADS

i2c = busio.I2C(board.SCL,board.SDA)

ads = ADS.ADS1115(i2c,address=0x48)
R2 = 66000.0
R1 = 331000.0

min_adcBatteryVoltage=15.0
max_adcBatteryVoltage=21.0
max_adc_adc_voltage=4.096
max_adc_adc_value=32767

def readbattery():
    try:
        adc_value=ads.read(0)
        print(adc_value)
        adc_value=adc_value+9000
        if adc_value==0 or adc_value==32767:
            return None,None,True

        measured_voltage=adc_value*(max_adc_adc_voltage/max_adc_adc_value)
        voltage=measured_voltage*((R1+R2)/R2)

        battery_percentage = ((voltage - min_adcBatteryVoltage) / (max_adcBatteryVoltage - min_adcBatteryVoltage)) * 100.0
        battery_percentage = max(0, min(battery_percentage, 100))

        return voltage,battery_percentage,False
    except Exception as e:
        print(f"Error reading battery status:{e}")
        return 'check connections'

def getbatterystatus():
    while True:
        battery_voltage=None
        battery_percentage=None
        error=True

        max_adc_attempts=5
        attempts=0
        success=False

        while attempts<max_adc_attempts and not success:
            battery_voltage,battery_percentage,error=readbattery()

            if not error:
                success=True

                print(f"Battery Voltage:{battery_voltage:.2f}V")
                print(f"Battery Percentage:{battery_percentage:.2f}%")

                if battery_percentage<20.0:
                    print("Warning: Battery level is below 20%")
                    return 0
                elif battery_percentage<50 and battery_percentage>20:
                    print('battry less than 50%')
                    return 1
                else:
                    print('good to go')
                    return 2
            else:

                attempts+=1
                if attempts<max_adc_attempts:
                    time.sleep(3)
                break

        if not success:

            print("Error: Unable to read battery status. Please check the connection.")

        time.sleep(5)

def get_battery_percentage():
    battery_voltage,battery_percentage,error=readbattery()
    if not error:
        return battery_percentage
    else:
        return error
ADS1115 Code (Arduino)
void setup() {
  // put your setup code here, to run once:

}

void loop() {
  // put your main code here, to run repeatedly:

}
This documentation provides an overview of the circuit, including the components used, their wiring, and the code that runs on the Raspberry Pi 4B. The ADS1115 code is currently empty and would need to be populated with the logic to interact with the Raspberry Pi and the water level sensor.