
Arduino and ESP8266 Based Environmental Monitoring System with GPS Tracking
View and Edit Project In Cirkit Designer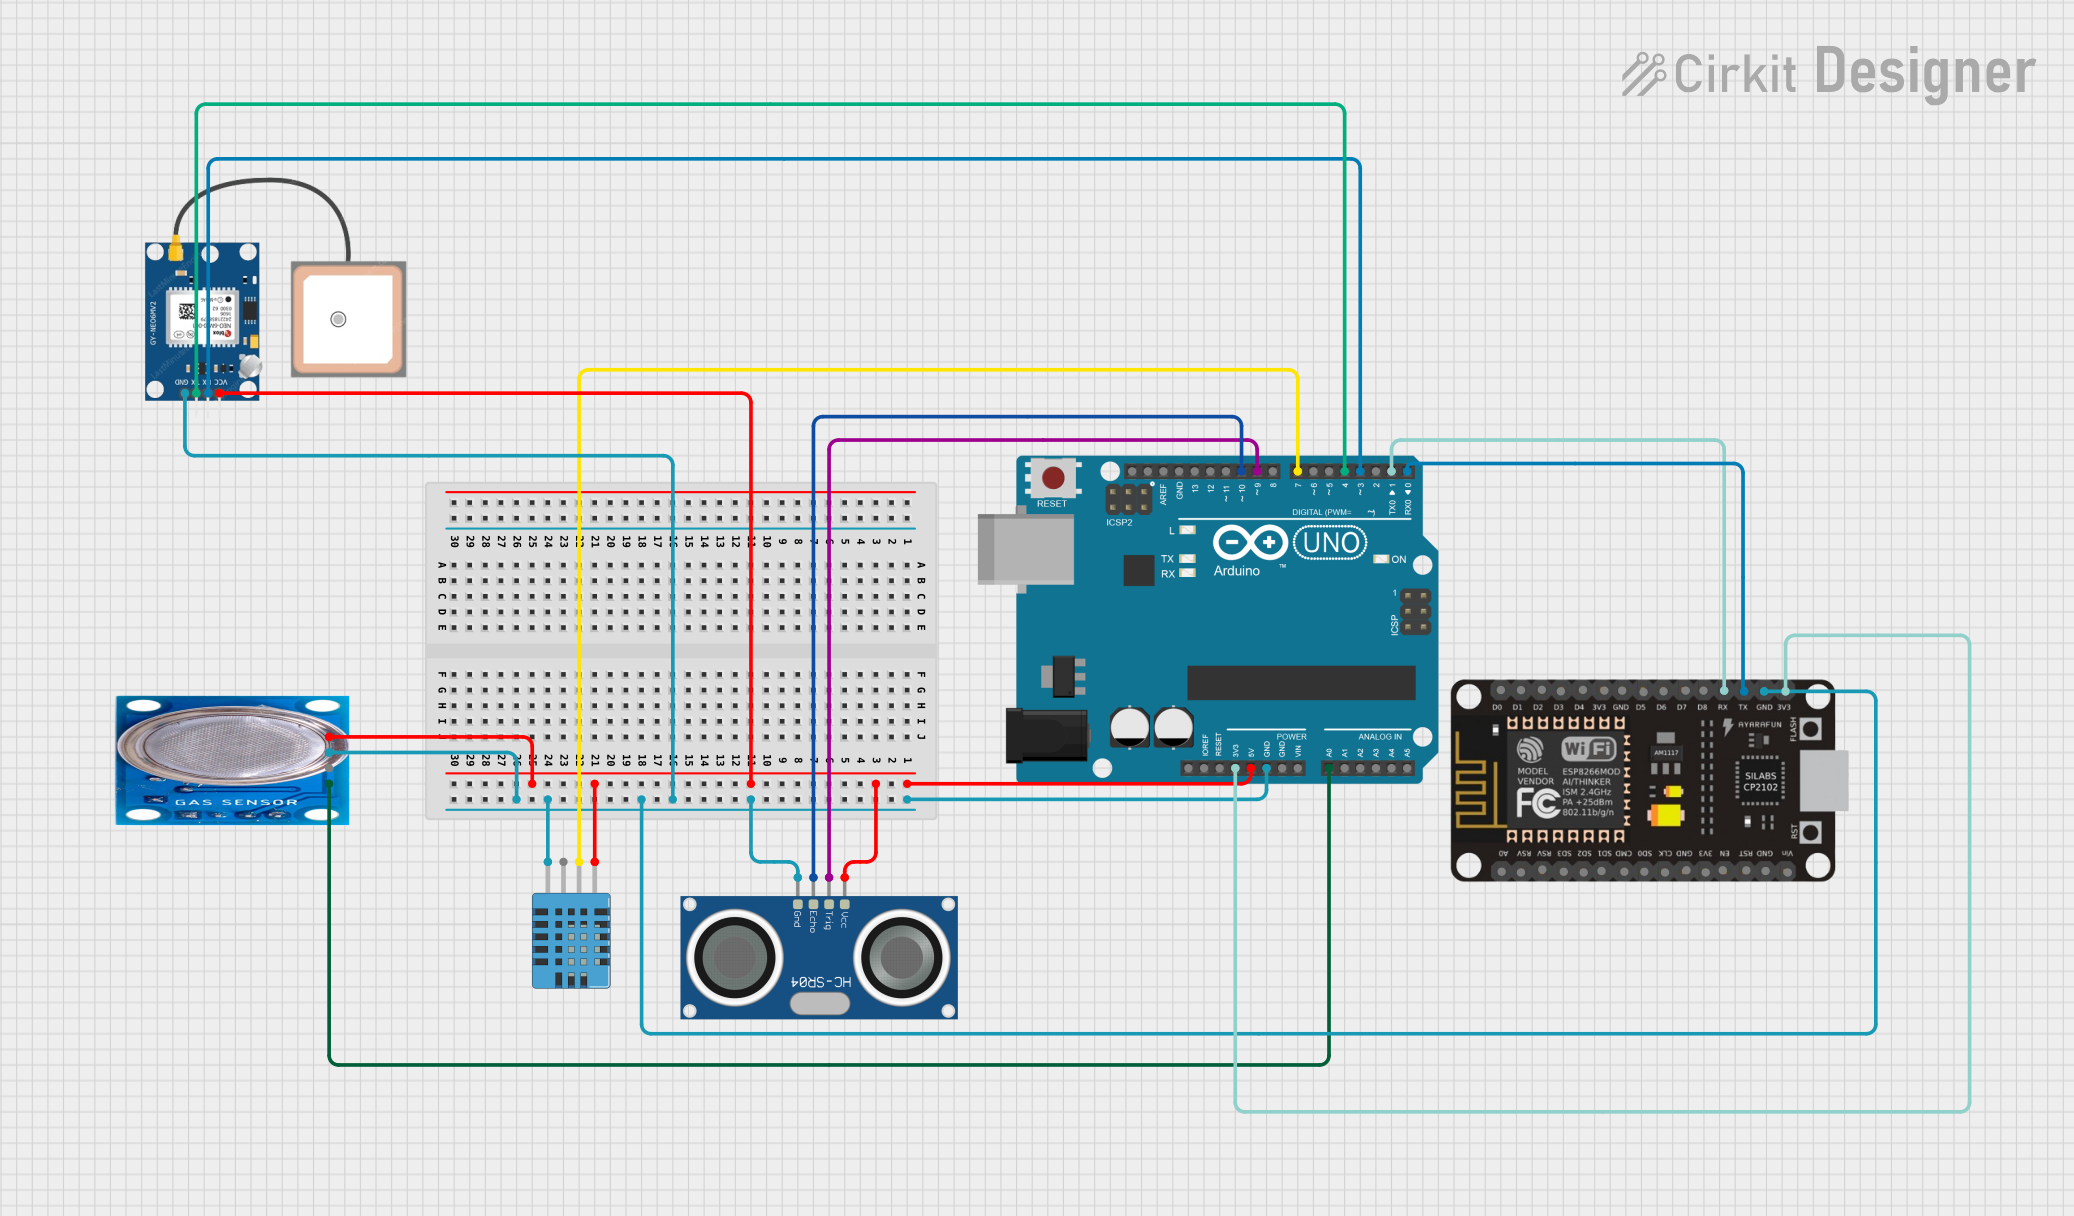
Circuit Documentation
Summary
The circuit is designed to interface various sensors and modules with an Arduino UNO and an ESP8266 NodeMCU microcontroller. The sensors include an HC-SR04 Ultrasonic Sensor for distance measurement, a DHT11 Humidity and Temperature Sensor for environmental data, an MQ-5 Gas Sensor for detecting gas concentrations, and a GPS NEO 6M module for location tracking. The ESP8266 NodeMCU is used for Wi-Fi connectivity and data transmission to a server. The Arduino UNO serves as the central processing unit, collecting data from the sensors, processing it, and sending it to the ESP8266 for further communication.
Component List
- HC-SR04 Ultrasonic Sensor: A sensor used for measuring distances using ultrasonic waves.
- Arduino UNO: A microcontroller board based on the ATmega328P, with a variety of digital and analog I/O pins.
- DHT11 Humidity and Temperature Sensor: A sensor used for measuring ambient temperature and humidity.
- MQ-5 Gas Sensor: A sensor for detecting various gases including natural gas and butane.
- ESP8266 NodeMCU: A Wi-Fi module with an integrated microcontroller, capable of connecting to the internet and communicating with web services.
- GPS NEO 6M: A module for receiving GPS signals and determining geographical location.
Wiring Details
HC-SR04 Ultrasonic Sensor
- VCC: Connected to the 5V output on the Arduino UNO.
- TRIG: Connected to digital pin D9 on the Arduino UNO.
- ECHO: Connected to digital pin D10 on the Arduino UNO.
- GND: Connected to the ground (GND) on the Arduino UNO.
Arduino UNO
- 5V: Provides power to the HC-SR04, DHT11, and GPS NEO 6M.
- GND: Common ground for all components.
- 3.3V: Connected to the 3V3 pin on the ESP8266 NodeMCU.
- A0: Connected to the analog output of the MQ-5 Gas Sensor.
- D7: Connected to the DATA pin of the DHT11 Sensor.
- D4: Connected to the TX pin of the GPS NEO 6M.
- D3: Connected to the RX pin of the GPS NEO 6M.
- D1: Connected to the RX pin of the ESP8266 NodeMCU.
- D0: Connected to the TX pin of the ESP8266 NodeMCU.
DHT11 Humidity and Temperature Sensor
- VDD: Connected to the 5V output on the Arduino UNO.
- DATA: Connected to digital pin D7 on the Arduino UNO.
- GND: Connected to the ground (GND) on the Arduino UNO.
MQ-5 Gas Sensor
- VCC: Connected to the 5V output on the Arduino UNO.
- GND: Connected to the ground (GND) on the Arduino UNO.
- Analog out: Connected to analog pin A0 on the Arduino UNO.
ESP8266 NodeMCU
- 3V3: Connected to the 3.3V output on the Arduino UNO.
- GND: Connected to the ground (GND) on the Arduino UNO.
- RX: Connected to digital pin D1 on the Arduino UNO.
- TX: Connected to digital pin D0 on the Arduino UNO.
GPS NEO 6M
- VCC: Connected to the 5V output on the Arduino UNO.
- RX: Connected to digital pin D3 on the Arduino UNO.
- TX: Connected to digital pin D4 on the Arduino UNO.
- GND: Connected to the ground (GND) on the Arduino UNO.
Documented Code
Arduino UNO Code
#include <DHT.h>
#include <SoftwareSerial.h>
#include <TinyGPS++.h>

// Define Ultrasonic Pins
#define trigPin 9
#define echoPin 10

// Define DHT Sensor Type and Pin
#define DHTPIN 7
#define DHTTYPE DHT11

// Create DHT object
DHT dht(DHTPIN, DHTTYPE);

// GPS Setup
SoftwareSerial ss(4, 3);  // RX, TX for GPS
TinyGPSPlus gps;

// Define Gas Sensor Pin
#define gasPin A0

void setup() {
  // Start Serial Communication
  Serial.begin(9600);
  ss.begin(9600);  // GPS Serial

  // Initialize DHT Sensor
  dht.begin();

  // Set Ultrasonic Pin modes
  pinMode(trigPin, OUTPUT);
  pinMode(echoPin, INPUT);

  Serial.println("System Initialized");
}

void loop() {
  // *** Read Ultrasonic Sensor ***
  long duration, distance;
  digitalWrite(trigPin, LOW);
  delayMicroseconds(2);
  digitalWrite(trigPin, HIGH);
  delayMicroseconds(10);
  digitalWrite(trigPin, LOW);
  duration = pulseIn(echoPin, HIGH);
  distance = duration * 0.034 / 2;  // Convert to cm

  // *** Read Temperature and Humidity ***
  float humidity = dht.readHumidity();
  float temperature = dht.readTemperature();  // Celsius

  // *** Read Gas Sensor ***
  int gasValue = analogRead(gasPin);  // Read analog value from MQ-135

  // *** Read GPS Data ***
  while (ss.available() > 0) {
    gps.encode(ss.read());
    if (gps.location.isUpdated()) {
      // Display GPS data if available
      Serial.print("Latitude: ");
      Serial.println(gps.location.lat(), 6);
      Serial.print("Longitude: ");
      Serial.println(gps.location.lng(), 6);
    }
  }

  // *** Display Sensor Data ***
  Serial.print("Distance: ");
  Serial.print(distance);
  Serial.println(" cm");

  Serial.print("Temperature: ");
  Serial.print(temperature);
  Serial.println(" °C");

  Serial.print("Humidity: ");
  Serial.print(humidity);
  Serial.println(" %");

  Serial.print("Gas Value: ");
  Serial.println(gasValue);  // Raw analog value

  delay(2000);  // Delay for 2 seconds before next reading
}
ESP8266 NodeMCU Code
#include <ESP8266WiFi.h>
#include <WiFiClient.h>
#include <ESP8266HTTPClient.h>

// Replace with your network credentials
const char* ssid = "YOUR_SSID";
const char* password = "YOUR_PASSWORD";

// MongoDB Atlas API Endpoint (Example)
String serverName = "http://your-atlas-api-url.com/data";

// Variables to hold sensor data
String distance = "";
String temperature = "";
String humidity = "";
String gasValue = "";

void setup() {
  // Start Serial for debugging and communication with Arduino
  Serial.begin(9600);

  // Connect to Wi-Fi
  WiFi.begin(ssid, password);
  Serial.println("Connecting to WiFi...");
  while (WiFi.status() != WL_CONNECTED) {
    delay(1000);
    Serial.println("Connecting...");
  }
  Serial.println("Connected to WiFi");
}

void loop() {
  // Check if data is available from Arduino
  if (Serial.available() > 0) {
    String sensorData = Serial.readStringUntil('\n');  // Read sensor data
    parseSensorData(sensorData);  // Parse the received data

    // Now send the data to MongoDB Atlas
    if (WiFi.status() == WL_CONNECTED) {
      HTTPClient http;

      // Prepare the data to send
      String postData = "distance=" + distance + "&temperature=" + temperature + "&humidity=" + humidity + "&gas=" + gasValue;

      // Start connection and send HTTP POST request
      http.begin(serverName);  // Specify destination for HTTP POST
      http.addHeader("Content-Type", "application/x-www-form-urlencoded");
      int httpResponseCode = http.POST(postData);

      // Check the response
      if (httpResponseCode > 0) {
        String response = http.getString();
        Serial.println("Response: " + response);  // Print server response
      } else {
        Serial.println("Error on sending POST: " + String(httpResponseCode));
      }
      http.end();  // Close connection
    }
  }

  delay(2000);  // Wait for 2 seconds before next data send
}

void parseSensorData(String data) {
  // Example received data: "Distance:35cm, Temp:28.5C, Humidity:65%, GasValue:300"
  int distanceStart = data.indexOf("Distance:") + 9;
  int distanceEnd = data.indexOf("cm");
  distance = data.substring(distanceStart, distanceEnd);

  int tempStart = data.indexOf("Temp:") + 5;
  int tempEnd = data.indexOf("C");
  temperature = data.substring(tempStart, tempEnd);

  int humStart = data.indexOf("Humidity:") + 9;
  int humEnd = data.indexOf("%");
  humidity = data.substring(humStart, humEnd);

  int gasStart = data.indexOf("GasValue:") + 9;
  gasValue = data.substring(gasStart);
}
This documentation provides an overview of the circuit, including the components used, their wiring connections, and the code