
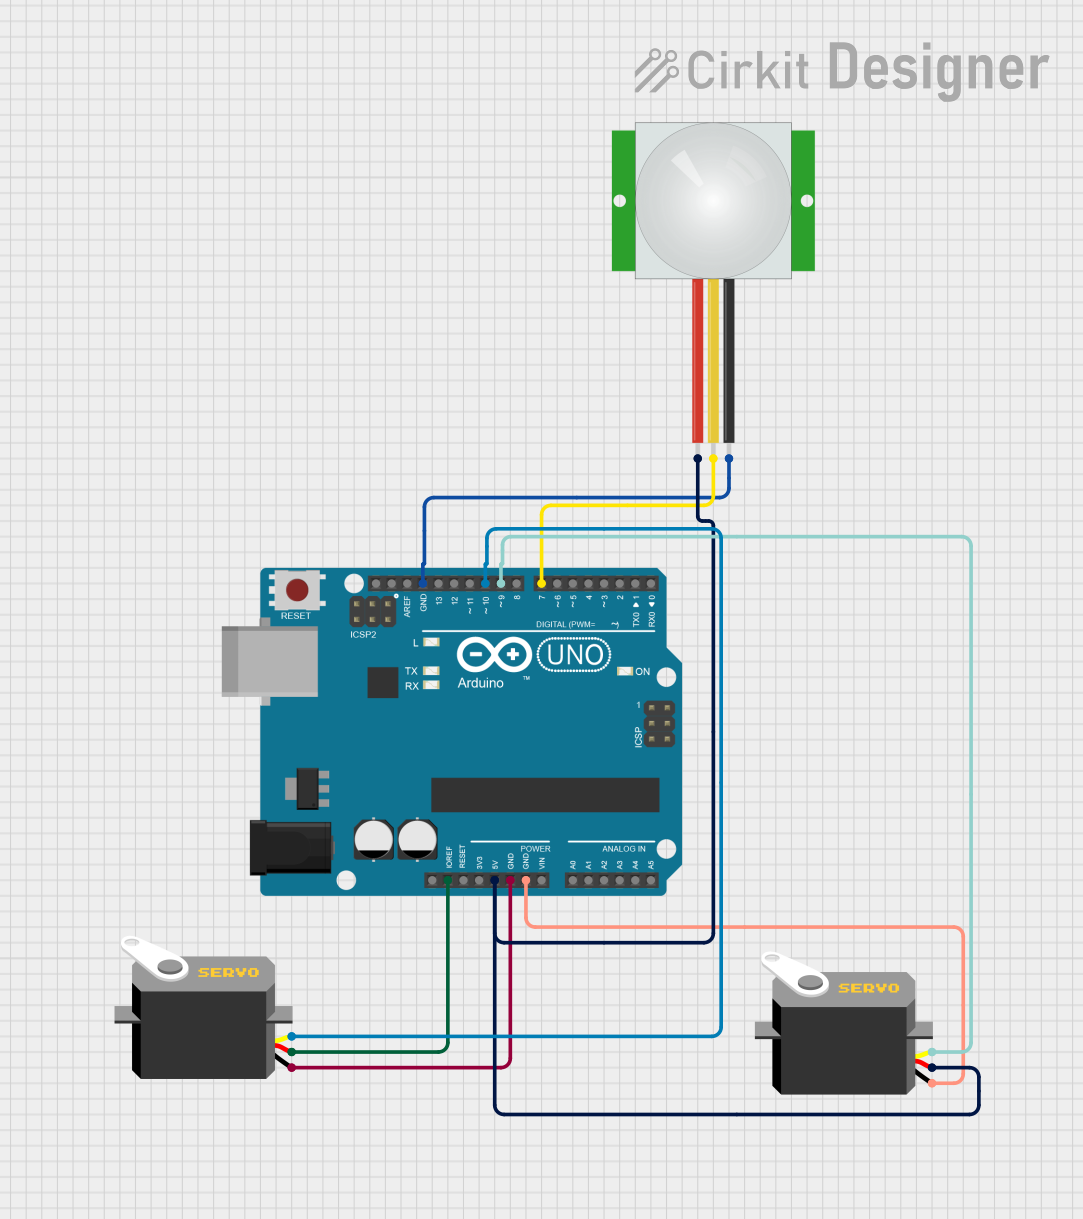
Circuit Documentation
Summary
This circuit consists of an Arduino UNO microcontroller, two servo motors, and a PIR sensor. The Arduino UNO serves as the central control unit, providing power and control signals to the servos and receiving input from the PIR sensor. The servos are used for actuation, while the PIR sensor detects motion.
Component List
Arduino UNO
- Description: A microcontroller board based on the ATmega328P.
- Pins: UNUSED, IOREF, Reset, 3.3V, 5V, GND, Vin, A0, A1, A2, A3, A4, A5, SCL, SDA, AREF, D13, D12, D11, D10, D9, D8, D7, D6, D5, D4, D3, D2, D1, D0
Servo (1)
- Description: A standard servo motor.
- Pins: gnd, vcc, pulse
Servo (2)
- Description: A standard servo motor.
- Pins: gnd, vcc, pulse
PIR Sensor
- Description: A passive infrared sensor used to detect motion.
- Pins: VDD, SIG, GND
Wiring Details
Arduino UNO
- IOREF: Connected to vcc of Servo (2)
- 5V: Connected to vcc of Servo (1) and VDD of PIR sensor
- GND: Connected to gnd of Servo (1), gnd of Servo (2), and GND of PIR sensor
- D10: Connected to pulse of Servo (2)
- D9: Connected to pulse of Servo (1)
- D7: Connected to SIG of PIR sensor
Servo (1)
- vcc: Connected to 5V of Arduino UNO
- gnd: Connected to GND of Arduino UNO
- pulse: Connected to D9 of Arduino UNO
Servo (2)
- vcc: Connected to IOREF of Arduino UNO
- gnd: Connected to GND of Arduino UNO
- pulse: Connected to D10 of Arduino UNO
PIR Sensor
- VDD: Connected to 5V of Arduino UNO
- SIG: Connected to D7 of Arduino UNO
- GND: Connected to GND of Arduino UNO
Code Documentation
Arduino UNO Code
sketch.ino
void setup() {
  // put your setup code here, to run once:

}

void loop() {
  // put your main code here, to run repeatedly:

}
documentation.txt
This document provides a comprehensive overview of the circuit, including a summary, detailed component list, wiring details, and documented code.