
Arduino Nano Controlled Wireless Communication System with Pushbutton Interface
View and Edit Project In Cirkit Designer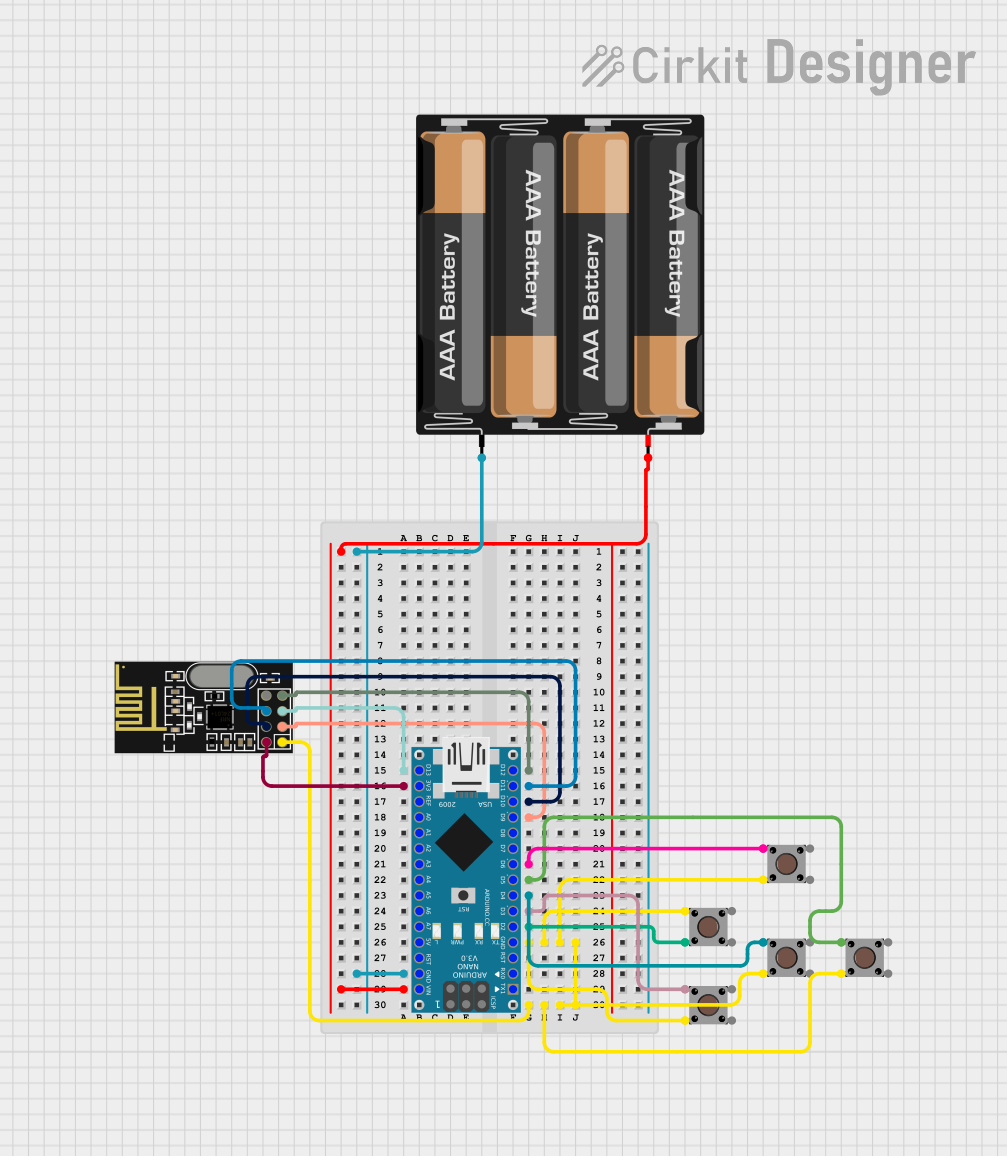
Circuit Documentation
Summary
This circuit is designed to interface an Arduino Nano with an NRF24L01 wireless transceiver module and multiple pushbuttons. The Arduino Nano is powered by a 4 x AAA battery mount, and it controls the NRF24L01 module as well as reads the state of the pushbuttons. The pushbuttons are used to provide input to the Arduino Nano, which can then transmit data wirelessly via the NRF24L01 module.
Component List
Arduino Nano
- Microcontroller board based on the ATmega328P
- It has a variety of digital and analog I/O pins
- Can be powered via the VIN pin with an external power supply
NRF24L01
- A 2.4GHz wireless transceiver module
- Interfaces with microcontrollers via SPI
- Has pins for MOSI, MISO, SCK, CE, CSN, as well as power (VCC) and ground (GND)
Pushbutton
- A simple switch mechanism for control or input
- Typically has four pins: two for the switch contacts and two for stability (not used in this circuit)
4 x AAA Battery Mount
- A battery holder for four AAA batteries
- Provides power to the circuit with positive (+) and negative (-) terminals
Wiring Details
Arduino Nano
- VIN connected to the positive terminal of the 4 x AAA Battery Mount
- GND connected to the negative terminal of the 4 x AAA Battery Mount
- Digital pins D2, D3, D4, D5, D6, D9, D10, D11, and D13 are used for interfacing with pushbuttons and the NRF24L01 module
- 3V3 pin provides power to the NRF24L01 module
NRF24L01
- SCK connected to D13/SCK of the Arduino Nano
- MISO connected to D12/MISO of the Arduino Nano
- MOSI connected to D11/MOSI of the Arduino Nano
- CSN connected to D10 of the Arduino Nano
- CE connected to D9 of the Arduino Nano
- VCC connected to 3V3 of the Arduino Nano
- GND connected to GND of the Arduino Nano
Pushbuttons
- One side of each pushbutton is connected to a digital pin on the Arduino Nano (D2, D3, D4, D5, or D6)
- The other side of each pushbutton is connected to GND
4 x AAA Battery Mount
- Positive terminal connected to VIN of the Arduino Nano
- Negative terminal connected to GND of the Arduino Nano
Documented Code
Arduino Nano Code (sketch.ino)
void setup() {
  // put your setup code here, to run once:

}

void loop() {
  // put your main code here, to run repeatedly:

}
Note: The provided code is a template and does not include specific functionality. It needs to be completed with the logic for reading the pushbutton states and controlling the NRF24L01 module.
Additional Documentation (documentation.txt)
No additional documentation was provided in the code input.