
Arduino UNO Ultrasonic Distance Sensor with Buzzer and LED Alert
View and Edit Project In Cirkit Designer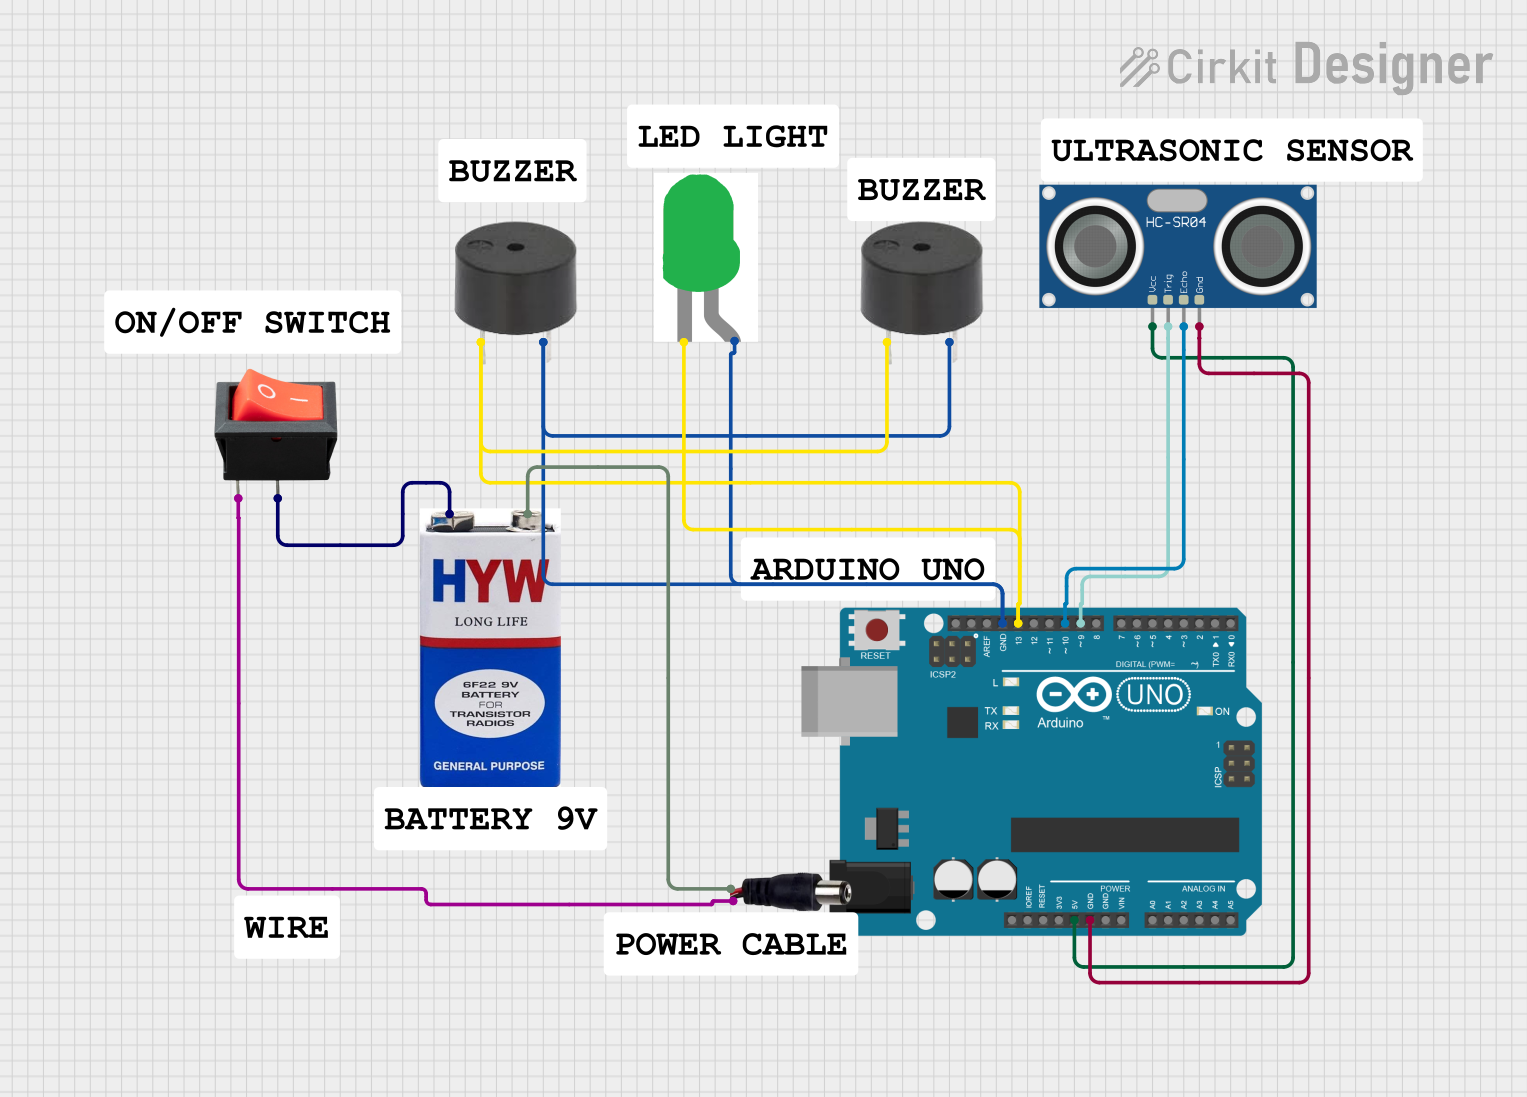
Circuit Documentation
Summary
This circuit is designed to measure distance using an HC-SR04 Ultrasonic Sensor and provide feedback through a buzzer and an LED. The circuit is controlled by an Arduino UNO microcontroller. The system is powered by a 9V battery connected through a rocker switch and a power jack.
Component List
Arduino UNO
- Description: Microcontroller board based on the ATmega328P.
- Pins: UNUSED, IOREF, Reset, 3.3V, 5V, GND, Vin, A0, A1, A2, A3, A4, A5, SCL, SDA, AREF, D13, D12, D11, D10, D9, D8, D7, D6, D5, D4, D3, D2, D1, D0
HC-SR04 Ultrasonic Sensor
- Description: Ultrasonic distance sensor.
- Pins: VCC, TRIG, ECHO, GND
Buzzer
- Description: Simple piezoelectric buzzer.
- Pins: PIN, GND
LED: Two Pin (green)
- Description: Green LED with two pins.
- Pins: cathode, anode
9V Battery
- Description: Standard 9V battery for power supply.
- Pins: +, -
Power Jack
- Description: Jack for connecting external power supply.
- Pins: POSITIF, NEGATIF
Rocker Switch
- Description: On/Off switch.
- Pins: output, input
Wiring Details
Arduino UNO
- 5V connected to VCC of HC-SR04 Ultrasonic Sensor.
- GND connected to GND of HC-SR04 Ultrasonic Sensor.
- GND connected to GND of Buzzer.
- GND connected to anode of LED.
- D13 connected to cathode of LED.
- D13 connected to PIN of Buzzer.
- D10 connected to ECHO of HC-SR04 Ultrasonic Sensor.
- D9 connected to TRIG of HC-SR04 Ultrasonic Sensor.
HC-SR04 Ultrasonic Sensor
- VCC connected to 5V of Arduino UNO.
- GND connected to GND of Arduino UNO.
- ECHO connected to D10 of Arduino UNO.
- TRIG connected to D9 of Arduino UNO.
Buzzer
- GND connected to GND of Arduino UNO.
- PIN connected to D13 of Arduino UNO.
LED: Two Pin (green)
- cathode connected to D13 of Arduino UNO.
- anode connected to GND of Arduino UNO.
9V Battery
- + connected to output of Rocker Switch.
- - connected to POSITIF of Power Jack.
Power Jack
- POSITIF connected to - of 9V Battery.
- NEGATIF connected to input of Rocker Switch.
Rocker Switch
- output connected to + of 9V Battery.
- input connected to NEGATIF of Power Jack.
Code Documentation
#include <107-Arduino-BMP388.h>
#include <107-Arduino-BMP388.h>

// defines pins numbers
const int trigPin = 9;
const int echoPin = 10;
const int buzzer = 11;
const int ledPin = 13;

// Project by - Be innovative with Prasad
// title - ultrasonic sensor project with buzzer and Arduino

// defines variables
long duration;
int distance;
int safetyDistance;

void setup() {
    pinMode(trigPin, OUTPUT); // Sets the trigPin as an Output
    pinMode(echoPin, INPUT); // Sets the echoPin as an Input
    pinMode(buzzer, OUTPUT);
    pinMode(ledPin, OUTPUT);
    Serial.begin(9600); // Starts the serial communication
}

void loop() {
    // Clears the trigPin
    digitalWrite(trigPin, LOW);
    delayMicroseconds(2);

    // Sets the trigPin on HIGH state for 10 micro seconds
    digitalWrite(trigPin, HIGH);
    delayMicroseconds(10);
    digitalWrite(trigPin, LOW);

    // Reads the echoPin, returns the sound wave travel time in microseconds
    duration = pulseIn(echoPin, HIGH);

    // Calculating the distance
    distance = duration * 0.034 / 2;

    safetyDistance = distance;
    if (safetyDistance <= 100) { // You can change safe distance from here changing value Ex. 20, 40, 60, 80, 100, all in cm
        digitalWrite(buzzer, HIGH);
        digitalWrite(ledPin, HIGH);
    } else {
        digitalWrite(buzzer, LOW);
        digitalWrite(ledPin, LOW);
    }

    // Prints the distance on the Serial Monitor
    Serial.print("Distance: ");
    Serial.println(distance);
}

// Project by - Be innovative with Prasad
// title - ultrasonic sensor project with buzzer and Arduino
This code initializes the pins for the ultrasonic sensor, buzzer, and LED. It continuously measures the distance using the ultrasonic sensor and activates the buzzer and LED if the measured distance is less than or equal to 100 cm. The distance is also printed to the Serial Monitor.