
Circuit Documentation
Summary
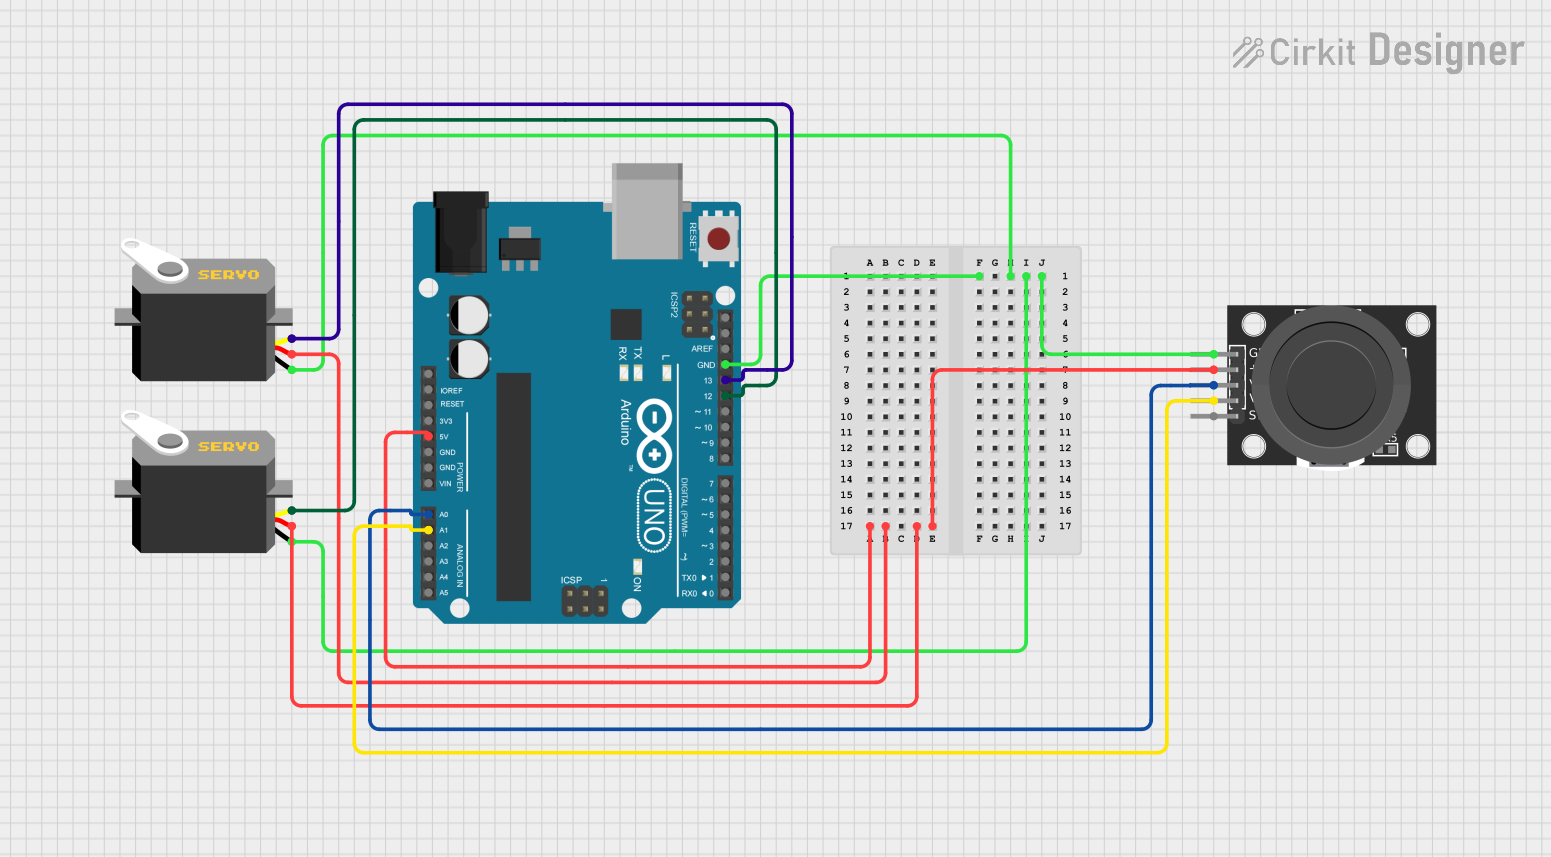
This circuit consists of an Arduino UNO microcontroller, two servo motors, and a KY-023 Dual Axis Joystick Module. The Arduino UNO is used as the central processing unit to control the servo motors based on the input from the joystick module. The servos are powered by the Arduino and receive control signals to adjust their position. The joystick module provides two-axis input to the Arduino, which then translates these inputs into movements for the servos.
Component List
Arduino UNO
- Description: A microcontroller board based on the ATmega328P.
- Pins: UNUSED, IOREF, Reset, 3.3V, 5V, GND, Vin, A0-A5, SCL, SDA, AREF, D0-D13.
Servo Motor
- Description: An actuator that can be precisely controlled for angular or linear position, velocity, and acceleration.
- Pins: gnd, vcc, pulse.
KY-023 Dual Axis Joystick Module
- Description: A joystick module that provides proportional control in two axes (X and Y) with an integrated pushbutton switch.
- Pins: GND, +5V, VRx, VRy, SW.
Wiring Details
Arduino UNO
- GND: Connected to the ground pins of both servo motors and the GND pin of the KY-023 Joystick Module.
- 5V: Powers both servo motors and the +5V pin of the KY-023 Joystick Module.
- A0: Receives the VRx (X-axis) output from the KY-023 Joystick Module.
- A1: Receives the VRy (Y-axis) output from the KY-023 Joystick Module.
- D13: Sends the pulse signal to control one of the servo motors.
- D12: Sends the pulse signal to control the other servo motor.
Servo Motor 1
- gnd: Connected to the GND pin on the Arduino UNO.
- vcc: Powered by the 5V pin on the Arduino UNO.
- pulse: Receives control signal from pin D13 on the Arduino UNO.
Servo Motor 2
- gnd: Connected to the GND pin on the Arduino UNO.
- vcc: Powered by the 5V pin on the Arduino UNO.
- pulse: Receives control signal from pin D12 on the Arduino UNO.
KY-023 Dual Axis Joystick Module
- GND: Connected to the GND pin on the Arduino UNO.
- +5V: Powered by the 5V pin on the Arduino UNO.
- VRx: Connected to the A0 pin on the Arduino UNO to provide X-axis position.
- VRy: Connected to the A1 pin on the Arduino UNO to provide Y-axis position.
- SW: Not connected in this circuit.
Documented Code
Arduino UNO Code (sketch.ino)
void setup() {
  // put your setup code here, to run once:

}

void loop() {
  // put your main code here, to run repeatedly:

}
Note: The provided code is a template and does not contain any functional code to control the servos or read the joystick input. This will need to be implemented to achieve the desired functionality of the circuit.