
Arduino UNO and RTC DS1307 Controlled Water Pump System with 12V Relay
View and Edit Project In Cirkit Designer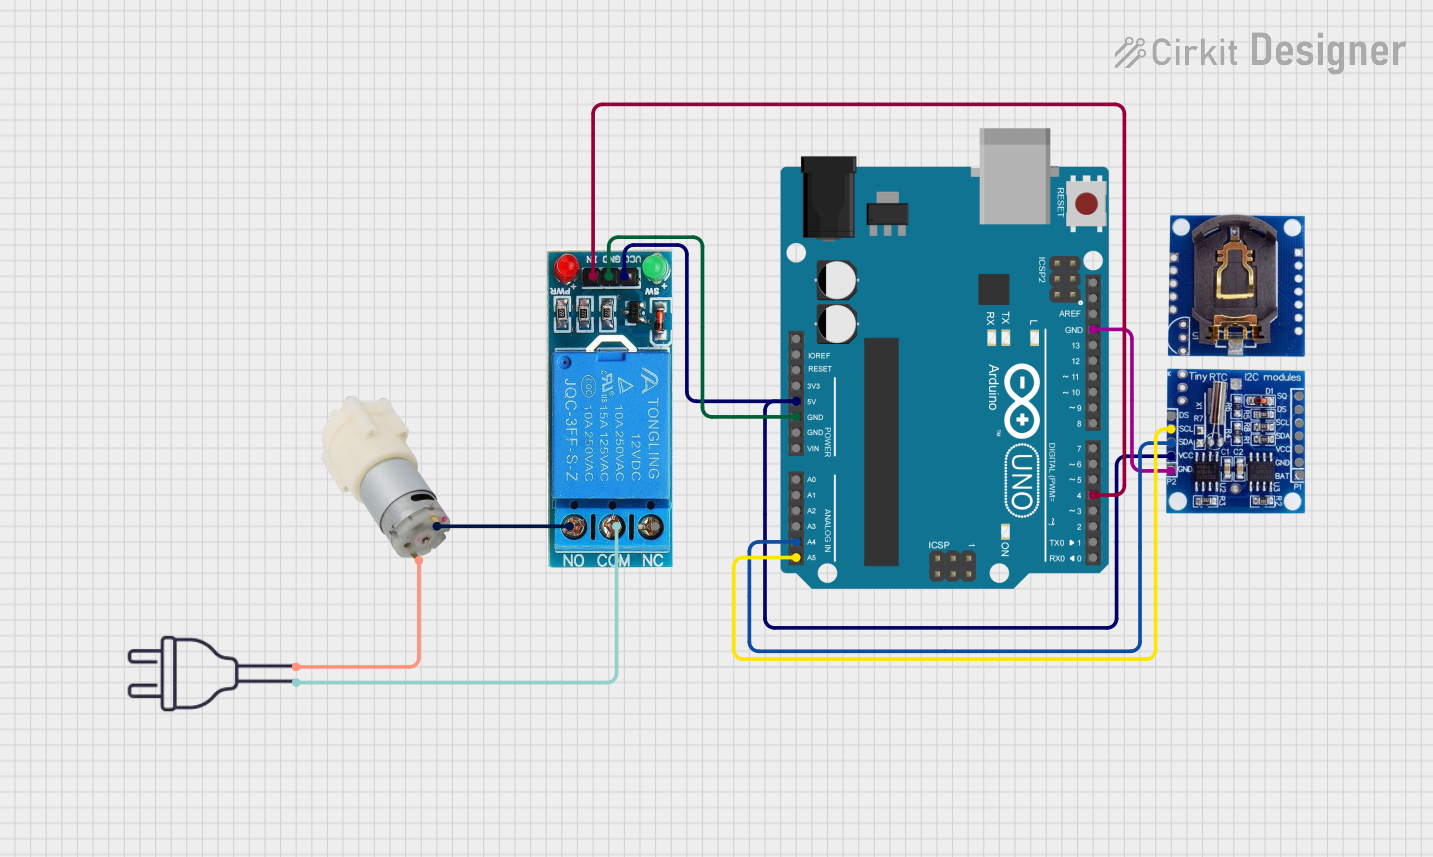
Circuit Documentation
Summary
This circuit is designed to control a 12V water pump using an Arduino UNO, a 12V single-channel relay, and an RTC DS1307 module for timekeeping. The Arduino UNO reads the time from the RTC module and controls the relay to switch the water pump on and off. The circuit is powered by a 220V power source.
Component List
RTC DS1307
- Description: Real-Time Clock module for timekeeping.
- Pins: DS, SCL, SDA, VCC, GND, SQ, BAT
Arduino UNO
- Description: Microcontroller board based on the ATmega328P.
- Pins: UNUSED, IOREF, Reset, 3.3V, 5V, GND, Vin, A0, A1, A2, A3, A4, A5, SCL, SDA, AREF, D13, D12, D11, D10, D9, D8, D7, D6, D5, D4, D3, D2, D1, D0
Water Pump 12V
- Description: 12V water pump.
- Pins: +, -
12V Single Channel Relay
- Description: Relay module for switching the water pump.
- Pins: NC, COM, NO, IN, GND, VCC
Power 220V
- Description: 220V power source.
- Pins: hot wire, neutral wire
Wiring Details
RTC DS1307
- SCL connected to A5 of Arduino UNO
- SDA connected to A4 of Arduino UNO
- VCC connected to 5V of Arduino UNO
- GND connected to GND of Arduino UNO
Arduino UNO
- A5 connected to SCL of RTC DS1307
- A4 connected to SDA of RTC DS1307
- 5V connected to VCC of RTC DS1307 and VCC of 12V Single Channel Relay
- GND connected to GND of RTC DS1307 and GND of 12V Single Channel Relay
- D4 connected to IN of 12V Single Channel Relay
Water Pump 12V
- + connected to NO of 12V Single Channel Relay
- - connected to neutral wire of Power 220V
12V Single Channel Relay
- VCC connected to 5V of Arduino UNO
- GND connected to GND of Arduino UNO
- IN connected to D4 of Arduino UNO
- NO connected to + of Water Pump 12V
- COM connected to hot wire of Power 220V
Power 220V
- neutral wire connected to - of Water Pump 12V
- hot wire connected to COM of 12V Single Channel Relay
Code Documentation
Arduino UNO Code
#include <Wire.h>
#include "RTClib.h"

RTC_DS1307 rtc;

char namaHari[7][12] = {"Minggu", "Senin", "Selasa", "Rabu", "Kamis", "Jumat", "Sabtu"};

void setup () {
  Serial.begin(9600);
  if (! rtc.begin()) {
    Serial.println("RTC TIDAK TERBACA");
    while (1);
  }

  if (! rtc.isrunning()) {
    Serial.println("RTC is NOT running!");
    rtc.adjust(DateTime(F(__DATE__), F(__TIME__)));//update rtc dari waktu komputer
  }
}

void loop () {
    DateTime now = rtc.now();
    Serial.print(namaHari[now.dayOfTheWeek()]);
    Serial.print(',');
    Serial.print(now.day(), DEC);
    Serial.print('/');
    Serial.print(now.month(), DEC);
    Serial.print('/');
    Serial.print(now.year(), DEC);
    Serial.print(" ");
    Serial.print(now.hour(), DEC);
    Serial.print(':');
    Serial.print(now.minute(), DEC);
    Serial.print(':');
    Serial.print(now.second(), DEC);
    Serial.println();

    delay(3000);
}
This code initializes the RTC DS1307 module and reads the current time. It then prints the day of the week, date, and time to the serial monitor every 3 seconds.