
ESP32-Based Solar-Powered Water Flow Monitoring System with LCD Display
View and Edit Project In Cirkit Designer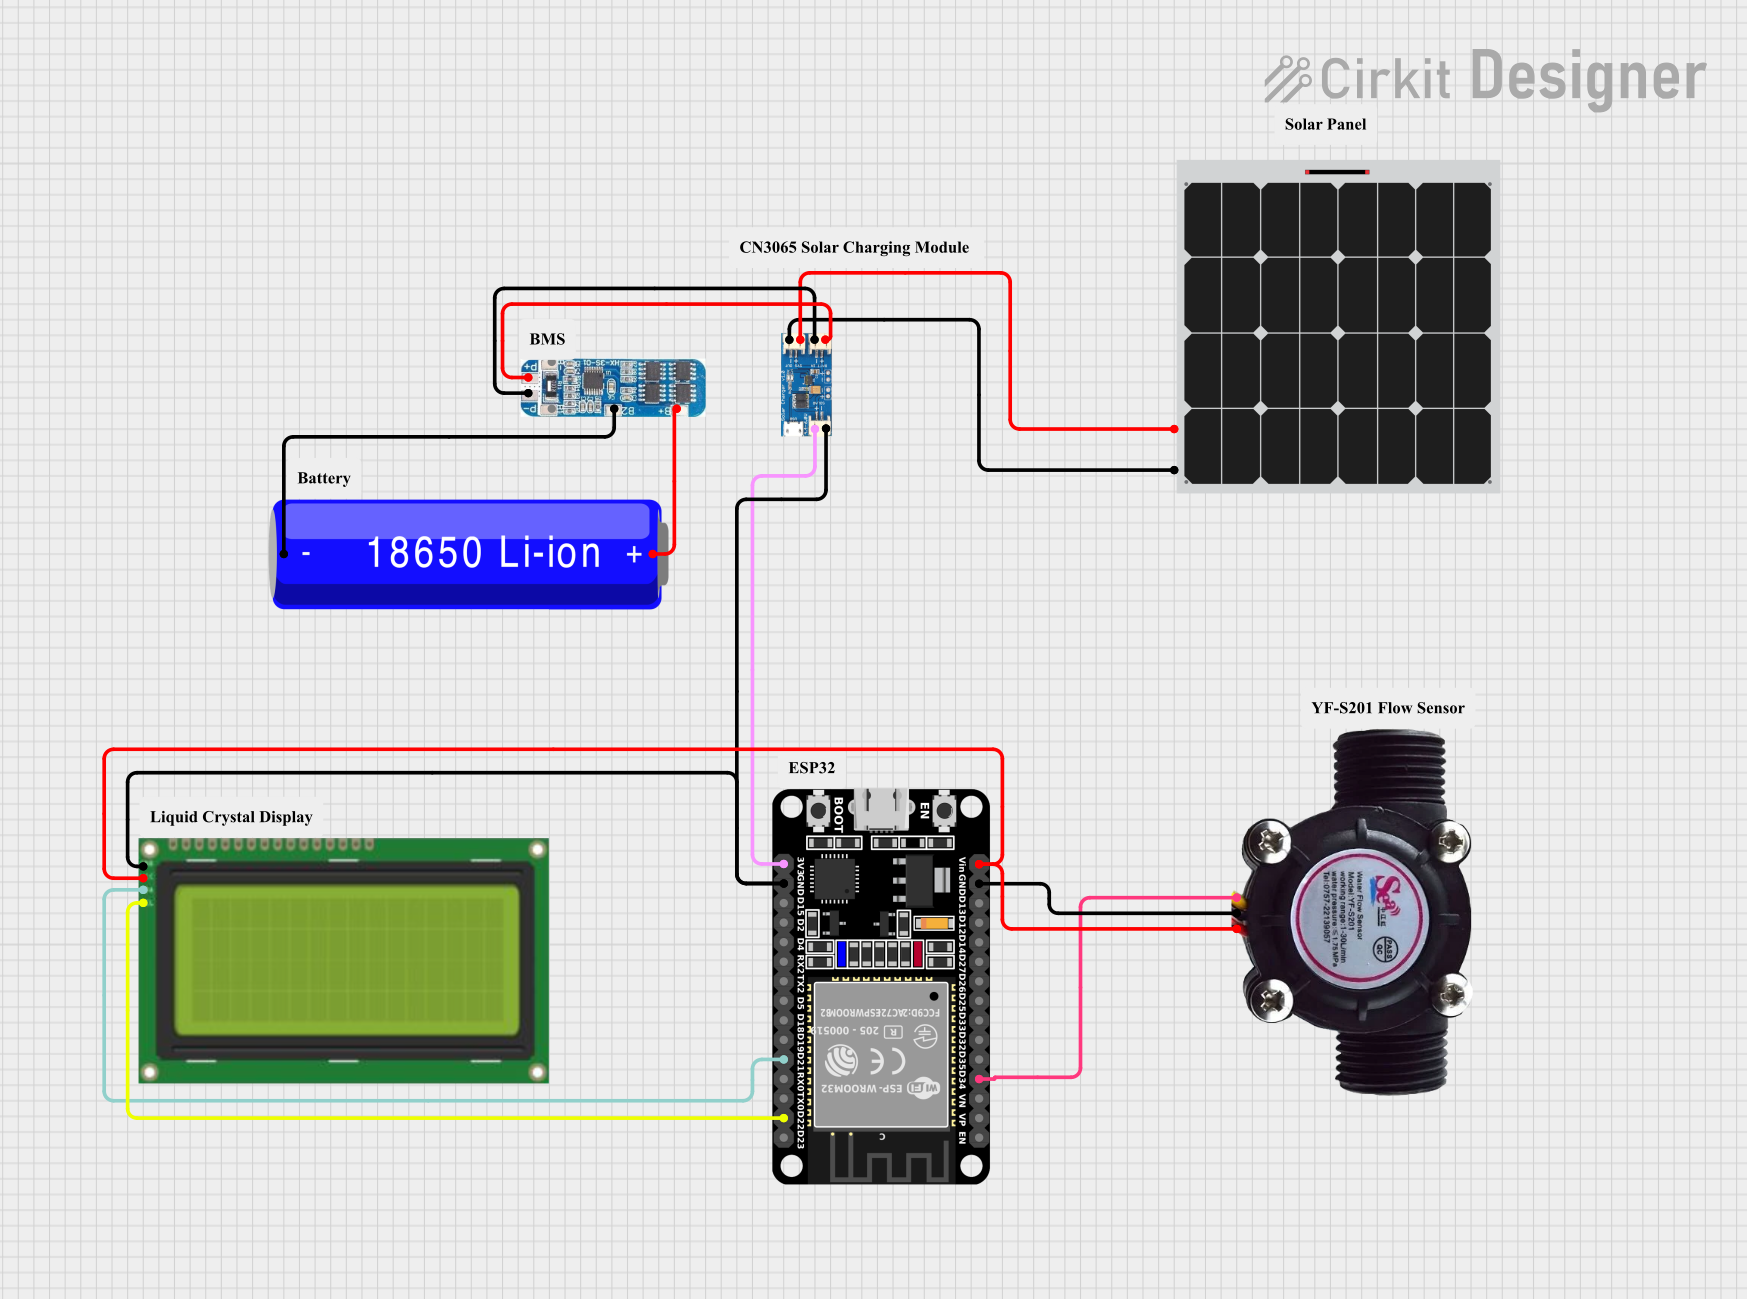
Circuit Documentation
Summary
This document provides a detailed overview of a water usage monitoring system. The system includes a water flow sensor, an LCD display, an ESP32 microcontroller, a solar charge controller, a battery management system (BMS), a solar panel, and a 18650 Li-ion battery. The system measures water flow, displays the data on an LCD, and sends the data to the cloud for real-time monitoring. The system is powered by a battery charged through solar panels, regulated by a solar charging module, and protected by a BMS.
Component List
BMS
- Description: Battery Management System
- Pins: B+, B2, B1, B-, P-, P+
Solar Panel
- Description: Solar Panel
- Pins: +, -
LCD 20x4 I2C
- Description: 20x4 LCD Display with I2C Interface
- Pins: GND, 5V, SCA, SCL
ESP32 (30 pin)
- Description: ESP32 Microcontroller with 30 Pins
- Pins: EN, VP, VN, D34, D35, D32, D33, D25, D26, D27, D14, D12, D13, GND, Vin, D23, D22, TX0, RX0, D21, D19, D18, D5, TX2, RX2, D4, D2, D15, 3V3
CN3065 Solar Charge
- Description: Solar Charge Controller
- Pins: SOLAR +, SOLAR -, BAT +, SYS -, SYS +, BAT -
18650 Li-ion Battery
- Description: 18650 Li-ion Battery
- Pins: +, -
Water Flow Sensor
- Description: Water Flow Sensor
- Pins: Signal, Vcc, GND
Wiring Details
BMS
- B+ connected to 18650 Li-ion Battery +
- B2 connected to 18650 Li-ion Battery -
- P- connected to CN3065 Solar Charge BAT -
- P+ connected to CN3065 Solar Charge BAT +
Solar Panel
- + connected to CN3065 Solar Charge SYS +
- - connected to CN3065 Solar Charge SYS -
LCD 20x4 I2C
- GND connected to ESP32 (30 pin) GND and CN3065 Solar Charge SOLAR -
- 5V connected to Water Flow Sensor Vcc and ESP32 (30 pin) Vin
- SCA connected to ESP32 (30 pin) D21
- SCL connected to ESP32 (30 pin) D22
ESP32 (30 pin)
- D34 connected to Water Flow Sensor Signal
- GND connected to Water Flow Sensor GND and LCD 20x4 I2C GND
- Vin connected to LCD 20x4 I2C 5V and Water Flow Sensor Vcc
- D21 connected to LCD 20x4 I2C SCA
- D22 connected to LCD 20x4 I2C SCL
- 3V3 connected to CN3065 Solar Charge SOLAR +
CN3065 Solar Charge
- SOLAR + connected to ESP32 (30 pin) 3V3
- SOLAR - connected to ESP32 (30 pin) GND and LCD 20x4 I2C GND
- BAT + connected to BMS P+
- BAT - connected to BMS P-
- SYS + connected to Solar Panel +
- SYS - connected to Solar Panel -
18650 Li-ion Battery
- + connected to BMS B+
- - connected to BMS B2
Water Flow Sensor
- Signal connected to ESP32 (30 pin) D34
- Vcc connected to ESP32 (30 pin) Vin and LCD 20x4 I2C 5V
- GND connected to ESP32 (30 pin) GND
Documented Code
ESP32 (30 pin)
/*
 * AquaTrack: An App-Based Water Usage Monitoring System
 * This Arduino sketch is designed for the water flow sensor in the digital
 * water meter system. The system measures water flow, displays the data on
 * an LCD, and sends the data to the cloud via ESP8266 NodeMCU for real-time
 * monitoring through a mobile application.
 */

#include <Wire.h>
#include <LiquidCrystal_I2C.h>

// Pin definitions
const int flowSensorPin = 34; // Water flow sensor signal pin
const int lcdSdaPin = 21;     // LCD SDA pin
const int lcdSclPin = 22;     // LCD SCL pin

// Variables
volatile int flowPulseCount = 0;
float flowRate = 0.0;
unsigned long oldTime = 0;

// Initialize the LCD
LiquidCrystal_I2C lcd(0x27, 20, 4);

void setup() {
  // Initialize serial communication
  Serial.begin(9600);
  // Set flow sensor pin as input
  pinMode(flowSensorPin, INPUT);
  // Attach interrupt to the flow sensor pin
  attachInterrupt(digitalPinToInterrupt(flowSensorPin), pulseCounter, RISING);
  // Initialize the LCD
  lcd.begin();
  lcd.backlight();
  lcd.setCursor(0, 0);
  lcd.print("AquaTrack System");
}

void loop() {
  // Calculate flow rate every second
  if (millis() - oldTime > 1000) {
    // Disable interrupt while calculating
    detachInterrupt(digitalPinToInterrupt(flowSensorPin));
    // Calculate flow rate in L/min
    flowRate = (flowPulseCount / 7.5);
    // Print flow rate to serial monitor
    Serial.print("Flow rate: ");
    Serial.print(flowRate);
    Serial.println(" L/min");
    // Display flow rate on LCD
    lcd.setCursor(0, 1);
    lcd.print("Flow rate: ");
    lcd.print(flowRate);
    lcd.print(" L/min");
    // Reset pulse count and old time
    flowPulseCount = 0;
    oldTime = millis();
    // Re-enable interrupt
    attachInterrupt(digitalPinToInterrupt(flowSensorPin), pulseCounter, RISING);
  }
}

// Interrupt service routine for counting pulses
void pulseCounter() {
  flowPulseCount++;
}
Water Flow Sensor
/*
 * Digital Water Meter System
 * This Arduino sketch is designed for the water flow sensor in the digital
 * water meter system. The system measures water flow and sends the data to
 * the cloud via ESP8266 NodeMCU for real-time monitoring through a mobile
 * application. The system is powered by a battery charged through solar
 * panels, regulated by a solar charging module, and protected by a BMS.
 */

// Pin definitions
const int flowSensorPin = 34; // Water flow sensor signal pin

// Variables
volatile int flowPulseCount = 0;
float flowRate = 0.0;
unsigned long oldTime = 0;

void setup() {
  // Initialize serial communication
  Serial.begin(9600);
  // Set flow sensor pin as input
  pinMode(flowSensorPin, INPUT);
  // Attach interrupt to the flow sensor pin
  attachInterrupt(digitalPinToInterrupt(flowSensorPin), pulseCounter, RISING);
}

void loop() {
  // Calculate flow rate every second
  if (millis() - oldTime > 1000) {
    // Disable interrupt while calculating
    detachInterrupt(digitalPinToInterrupt(flowSensorPin));
    // Calculate flow rate in L/min
    flowRate = (flowPulseCount / 7.5);
    // Print flow rate to serial monitor
    Serial.print("Flow rate: ");
    Serial.print(flowRate);
    Serial.println(" L/min");
    // Reset pulse count and old time
    flowPulseCount = 0;
    oldTime = millis();
    // Re-enable interrupt
    attachInterrupt(digitalPinToInterrupt(flowSensorPin), pulseCounter, RISING);
  }
}

// Interrupt service routine for counting pulses
void pulseCounter() {
  flowPulseCount++;
}
BMS
void setup() {
  // put your setup code here, to run once:

}

void loop() {
  // put your main code here, to run repeatedly:

}
Solar Panel
void setup() {
  // put your setup code here, to run once:

}

void loop() {
  // put your main code here, to run repeatedly:

}
LCD 20x4 I2C
void setup() {
  // put your setup code here, to run once:

}

void loop() {
  // put your main code here, to run repeatedly:

}