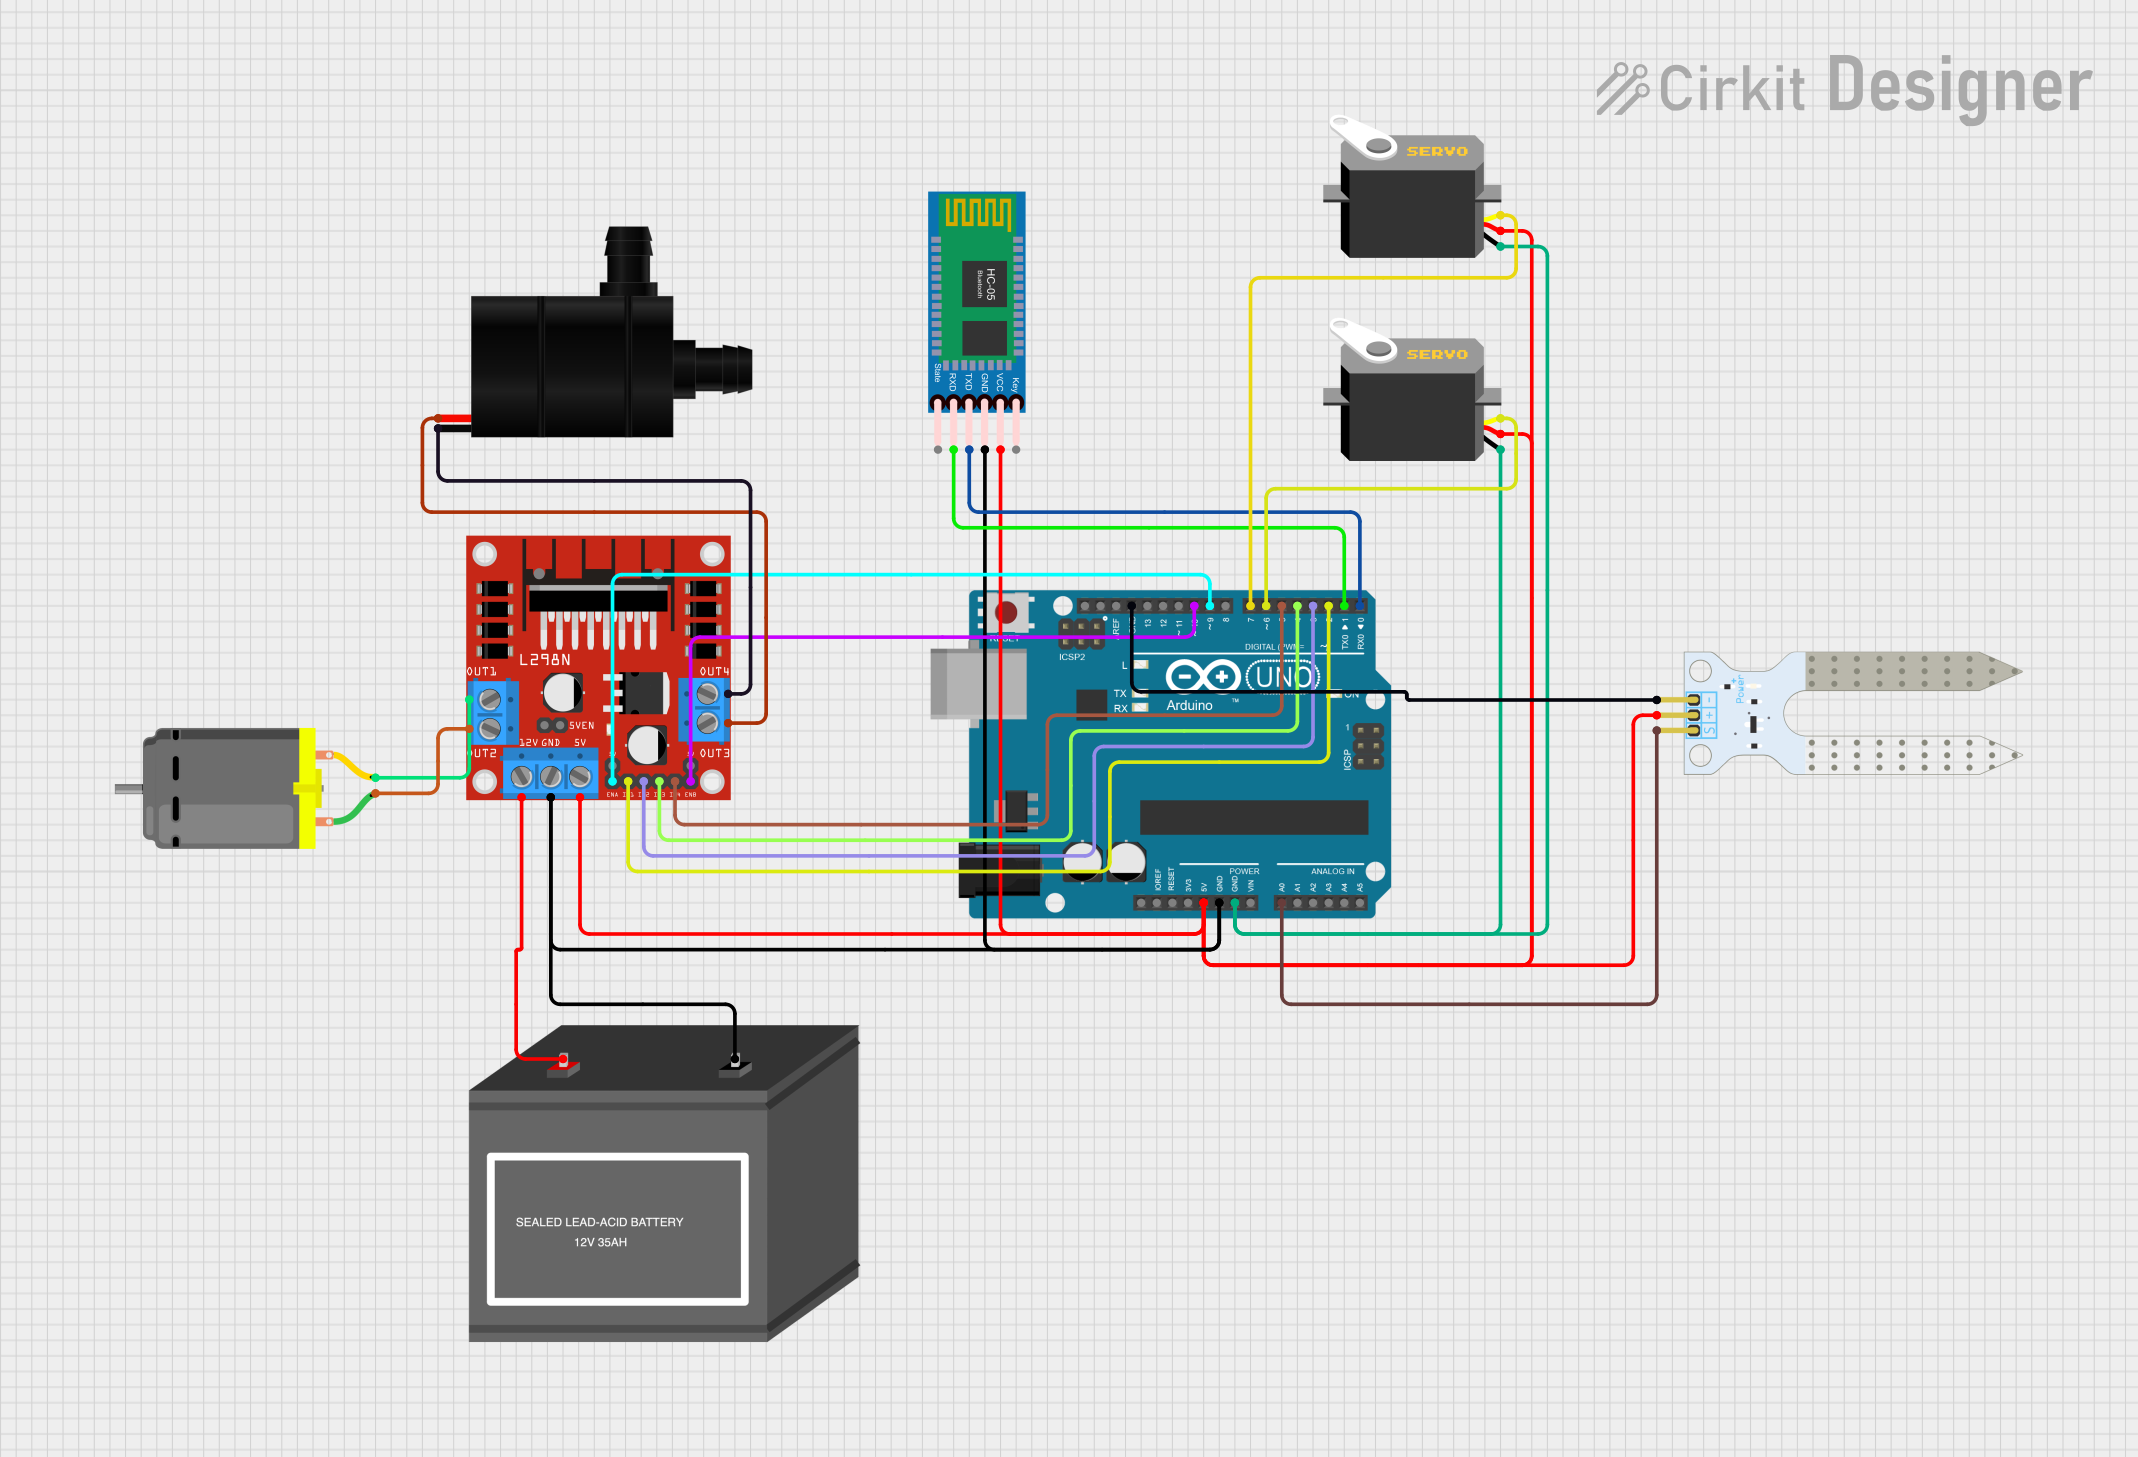
Arduino-Controlled Smart Irrigation System with Bluetooth Connectivity

Circuit Documentation
Summary
This circuit integrates various components to perform a set of functions that likely involve controlling a servo, reading soil moisture levels, driving a DC motor, and possibly remote communication via Bluetooth. The Arduino UNO serves as the central microcontroller, interfacing with a servo motor, a soil moisture sensor, an L298N DC motor driver, a DC motor, an HC-05 Bluetooth module, and a water pump. Power is supplied by a 12V battery and distributed to the components through the Arduino's 5V output and the motor driver.
Component List
Arduino UNO
- Microcontroller board based on the ATmega328P
- Provides I/O pins for interfacing with various sensors and actuators
- Operates at 5V and includes a voltage regulator for external power sources
Servo
- An electromechanical device that can rotate to a specified position
- Utilizes a control signal (pulse) for positioning
- Powered by a 5V supply
Soil Moisture Sensor
- Detects the moisture level in the soil
- Outputs an analog signal representing the moisture level
- Powered by a 5V supply
L298N DC Motor Driver
- An H-bridge motor driver capable of driving a couple of DC motors
- Operates at up to 12V and includes an onboard 5V regulator
- Provides direction and speed control for motors
DC Motor
- A simple electric motor that converts electrical energy into mechanical rotation
- Powered by the motor driver
HC-05 Bluetooth Module
- A wireless communication module that enables Bluetooth connectivity
- Communicates with the Arduino via serial (TX/RX) pins
Water Pump
- An electric pump for moving water
- Controlled by the motor driver
12V Battery (mini)
- Provides the power source for the circuit
- Supplies 12V which is regulated down for the 5V components
Wiring Details
Arduino UNO
- 5V pin connected to the 5V power rail supplying the Servo, Soil Moisture Sensor, HC-05 Bluetooth Module, and L298N Motor Driver
- GND pin connected to the ground rail supplying the Servo, Soil Moisture Sensor, HC-05 Bluetooth Module, and L298N Motor Driver
- A0 pin connected to the SIG pin of the Soil Moisture Sensor
- Digital pins D2-D10 connected to the IN1-IN4, ENA, and ENB pins of the L298N Motor Driver, and the pulse pins of the Servos
- RX (D0) and TX (D1) pins connected to the TXD and RXD pins of the HC-05 Bluetooth Module
Servo
- VCC pin connected to the 5V power rail
- GND pin connected to the ground rail
- Pulse pin connected to a digital pin (D6 or D7) on the Arduino UNO
Soil Moisture Sensor
- VCC pin connected to the 5V power rail
- GND pin connected to the ground rail
- SIG pin connected to the A0 pin on the Arduino UNO
L298N DC Motor Driver
- 12V pin connected to the + pin of the 12V Battery
- GND pin connected to the - pin of the 12V Battery
- 5V pin connected to the 5V power rail
- IN1-IN4 pins connected to digital pins D2-D5 on the Arduino UNO
- ENA and ENB pins connected to digital pins D9 and D10 on the Arduino UNO
- OUT1 and OUT2 pins connected to the DC Motor
- OUT3 and OUT4 pins connected to the Water Pump
DC Motor
- Pin 1 connected to OUT2 on the L298N Motor Driver
- Pin 2 connected to OUT1 on the L298N Motor Driver
HC-05 Bluetooth Module
- VCC pin connected to the 5V power rail
- GND pin connected to the ground rail
- TXD pin connected to the RX (D0) pin on the Arduino UNO
- RXD pin connected to the TX (D1) pin on the Arduino UNO
Water Pump
- VCC pin connected to OUT3 on the L298N Motor Driver
- GND pin connected to OUT4 on the L298N Motor Driver
12V Battery (mini)
- pin connected to the 12V pin on the L298N Motor Driver
- pin connected to the ground rail
Documented Code
void setup() {
  // put your setup code here, to run once:

}

void loop() {
  // put your main code here, to run repeatedly:

}
The provided code is a template with empty setup() and loop() functions, which are the standard structure for Arduino sketches. The setup() function is intended to contain initialization code that runs once when the program starts, such as pin mode declarations. The loop() function is for code that runs continuously, containing the main logic of the program. Additional code is required to control the components based on the wiring and desired functionality.