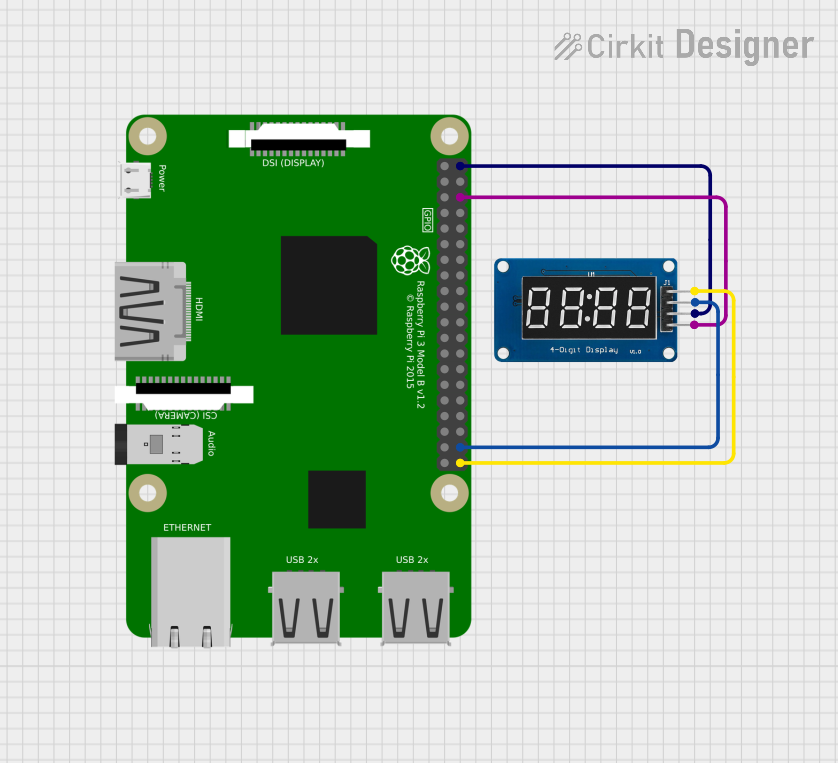
Raspberry Pi 3B Controlled TM1637 Digital Display Interface

Circuit Documentation
Summary
The circuit in question consists of a Raspberry Pi 3B microcomputer interfaced with a TM1637, which is a 4-digit seven-segment display driver. The Raspberry Pi 3B is responsible for controlling the display via its GPIO pins. The TM1637 receives clock and data signals from the Raspberry Pi to display the required information. The power for the TM1637 is sourced from the Raspberry Pi's 5V pin, and the ground connection is shared between the two components.
Component List
Raspberry Pi 3B
- Description: A powerful microcomputer capable of running a full Linux operating system and interfacing with various peripherals through its GPIO pins.
- Pins: 3v3, GPIO2, GPIO3, GPIO4, GND, GPIO17, GPIO27, GPIO22, 3V3, GPIO10, GPIO9, GPIO11, ID_SD, GPIO5, GPIO6, GPIO13, GPIO19, GPIO26, GPIO21, GPIO20, GPIO16, GPIO12, ID_SC, GPIO7, GPIO8, GPIO25, GPIO24, GPIO23, GPIO18, GPIO15, GPIO14, 5V
- Purpose: To control the TM1637 display driver and provide power to the display.
TM1637
- Description: A 4-digit seven-segment display driver that communicates with microcontrollers through a serial interface.
- Pins: CLK, DIO, VCC, GND
- Purpose: To drive a 4-digit seven-segment display based on the signals received from the Raspberry Pi.
Wiring Details
Raspberry Pi 3B
- GPIO21 connected to TM1637 CLK
- GPIO20 connected to TM1637 DIO
- GND connected to TM1637 GND
- 5V connected to TM1637 VCC
TM1637
- CLK connected to Raspberry Pi GPIO21
- DIO connected to Raspberry Pi GPIO20
- GND connected to Raspberry Pi GND
- VCC connected to Raspberry Pi 5V
Code Documentation
No code has been provided for the microcontrollers in the circuit. To operate the TM1637 display with the Raspberry Pi 3B, code would typically be required to initialize the GPIO pins for communication, send data to the display, and potentially handle any input or output processing as needed for the application. Since no code is available, this section cannot be completed at this time.