
Raspberry Pi Pico Controlled Filament Pelletizer with OLED Display and TMC2209 Stepper Driver
View and Edit Project In Cirkit Designer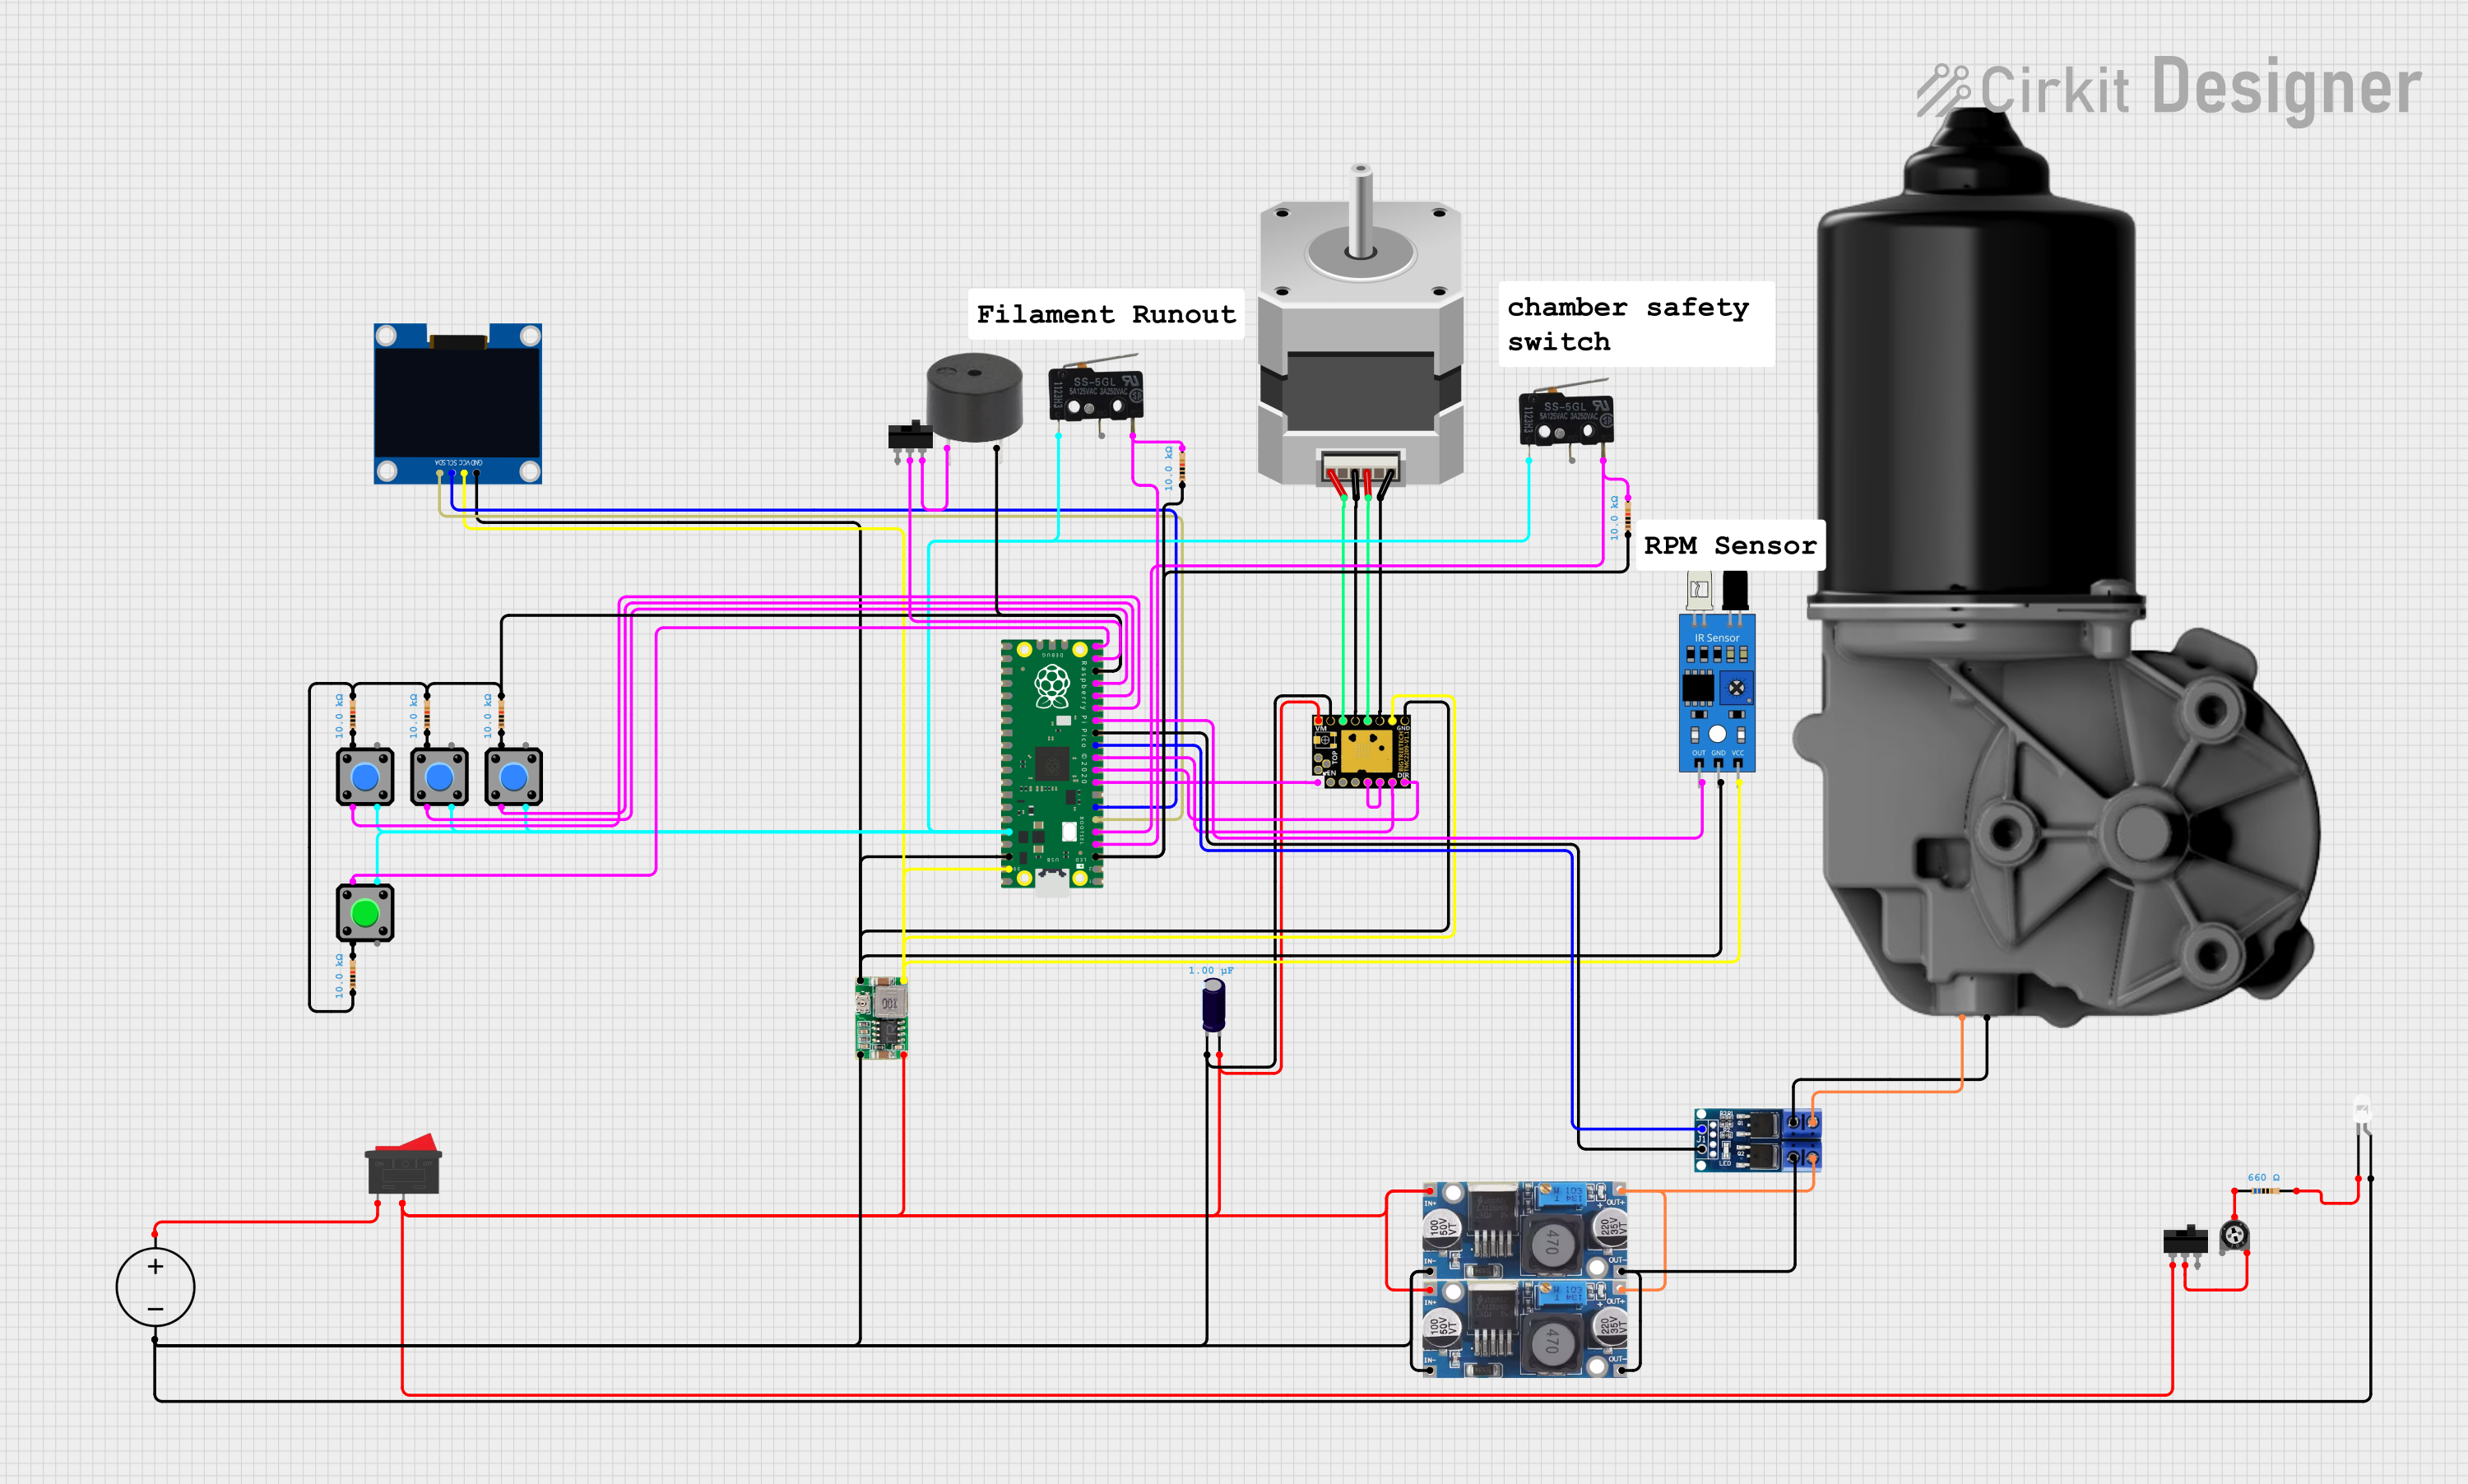
Circuit Documentation
Summary
The circuit is designed to control a filament pelletizer with variable pellet size settings. It includes a Raspberry Pi Pico microcontroller that interfaces with various components such as a filament presence microswitch, control buttons, a PWM-controlled DC worm gear motor, a TMC2209 stepper motor driver controlling a NEMA 17 stepper motor, and a 128x64 OLED display for user feedback. The circuit is powered by a DC power source, with voltage regulation provided by step-down buck converters. The circuit also includes resistors, capacitors, switches, an IR sensor, and a buzzer for additional functionality and user interaction.
Component List
Passive Components
- Resistors: Used for current limiting and voltage division.
- Trimmer Potentiometer: Provides an adjustable resistance for tuning circuits.
- Electrolytic Capacitor: Used for power supply filtering and decoupling.
Power Components
- DC Power Source: Supplies power to the circuit.
- Step-down Buck Converters: Reduce the input voltage to a lower, regulated output voltage.
- Mini 360 Buck Converter: A compact DC-DC step-down converter.
Control Components
- Rocker Switch: A binary switch for power control.
- Toggle Switches: Used for switching circuit paths or control signals.
Indicators and User Interface
- LED: A two-pin white LED used as an indicator.
- 128x64 OLED Display (I2C IIC SPI Serial): Displays system status and settings.
- Pushbuttons: Used for user input to control the system.
- Micro Switches: Detect the presence of filament and other conditions.
Actuators
- DC Worm Gear Motor: Provides rotational motion for cutting pellets.
- Stepper Motor (Bipolar): Provides precise rotational motion for feeding pellets.
Sensors
- IR Sensor: Detects the presence of objects or materials.
Sound
- Buzzer: Generates audible feedback for user interaction.
Microcontroller
- Raspberry Pi Pico: The central processing unit of the circuit, running the control code.
Motor Control
- Motor Driver - N-Mos PWM Trigger: Controls the DC motor using PWM signals.
- TMC2209: A stepper motor driver module for controlling stepper motors.
Wiring Details
Resistor
- Connected to various components and microcontroller pins for current limiting and pull-up/pull-down resistances.
Trimmer Potentiometer
- Wiper connected to a resistor for adjustable voltage division.
DC Power Source
- Ground and Positive pins provide power to the circuit and are connected to switches, converters, and the microcontroller.
Step-down Buck Converter
- Input pins connected to the power source and output pins provide regulated voltage to the motor driver and other components.
Motor Driver - N-Mos PWM Trigger
- PWM input from the microcontroller to control motor speed.
- Output pins connected to the DC worm gear motor.
Stepper Motor (Bipolar)
- Connected to the TMC2209 stepper motor driver for controlled movement.
Rocker Switch and Toggle Switch
- Used to control power flow and circuit paths.
LED: Two Pin (white)
- Cathode connected to a resistor and anode to the power source for indication.
Micro Switch
- Used to detect the presence of filament and connected to the microcontroller.
Mini 360 Buck Converter
- Input connected to the power source and output provides regulated voltage to the OLED display and IR sensor.
128x64 OLED Display (I2C IIC SPI Serial)
- SDA and SCL pins connected to the corresponding microcontroller pins for communication.
Pushbutton
- Connected to the microcontroller for user input.
Buzzer
- Connected to the microcontroller for audible feedback.
IR Sensor
- Output connected to the microcontroller for object detection.
Electrolytic Capacitor
- Connected across the power supply for filtering.
Raspberry Pi Pico
- Various GPIO pins connected to switches, sensors, actuators, and display for control and feedback.
Documented Code
/*
 * Filament Pelletizer Control Code
 * This code controls a filament pelletizer with variable pellet size
 * of 1-5mm in 0.5mm steps. It checks for filament presence via a
 * microswitch and allows control via up, down, menu, and start buttons.
 * The status is displayed on a 128x64 OLED display. The cutting is done
 * by a 400rpm DC worm gear motor (controlled by PWM) and the feeding by
 * a NEMA 17 stepper motor (controlled by TMC2209).
 */

#include <GyverOLED.h>
#include <AccelStepper.h>

// Pin definitions
#define FILAMENT_SWITCH_PIN 2
#define UP_BUTTON_PIN 12
#define DOWN_BUTTON_PIN 11
#define MENU_BUTTON_PIN 13
#define START_BUTTON_PIN 15
#define PWM_PIN 9
#define BUZZER_PIN 14
#define IR_SENSOR_PIN 10
#define OLED_SDA_PIN 4
#define OLED_SCL_PIN 5

// OLED display
GyverOLED <SSD1306_128x64> oled;

// Stepper motor
AccelStepper stepper(AccelStepper::DRIVER, 9, 10); // first is step, second is enable

// Variables
int pelletSize = 1; // Pellet size in mm
int pelletSizeStep = 0.5; // Step size in mm
int maxPelletSize = 5; // Max pellet size in mm
int minPelletSize = 1; // Min pellet size in mm
int feedRate = 10; // Feed rate in mm/s (example value)
int motorSpeedPercent = 50; // DC motor speed percentage (example value)

void setup() {
  Serial.begin(9600);
  // Initialize pins
  pinMode(FILAMENT_SWITCH_PIN, INPUT);
  pinMode(UP_BUTTON_PIN, INPUT);
  pinMode(DOWN_BUTTON_PIN, INPUT);
  pinMode(MENU_BUTTON_PIN, INPUT);
  pinMode(START_BUTTON_PIN, INPUT);
  pinMode(PWM_PIN, OUTPUT);
  pinMode(BUZZER_PIN, OUTPUT);
  pinMode(IR_SENSOR_PIN, INPUT);
  // initialize digital pin LED_BUILTIN as an output.
  pinMode(LED_BUILTIN, OUTPUT);

  // Initialize OLED display
  oled.init();
  oled.clear();
  oled.update();

  // Initialize stepper motor
  stepper.setMaxSpeed(8000);
  stepper.setAcceleration(1000);

  // Display initial message
  updateDisplay();
}

void loop() {
  digitalWrite(LED_BUILTIN, HIGH);  // turn the LED on (HIGH is the voltage level)
  delay(1000);                      // wait for a second
  digitalWrite(LED_BUILTIN, LOW);   // turn the LED off by making the voltage LOW
  delay(1000);
  // Check for filament presence
  if (digitalRead(FILAMENT_SWITCH_PIN) == LOW) {
    // Filament detected
    oled.setCursor(0, 6);
    oled.print("Filament: Present");
  } else {
    // No filament
    oled.setCursor(0, 6);
    oled.print("Filament: Absent ");
  }
  oled.update();

  // Check button presses
  if (digitalRead(UP_BUTTON_PIN) == HIGH) {
    if (pelletSize < maxPelletSize) {
      pelletSize += pelletSizeStep;
      updateDisplay();
      buzz();
    }
  }
  if (digitalRead(DOWN_BUTTON_PIN) == HIGH) {
    if (pelletSize > minPelletSize) {
      pelletSize -= pelletSizeStep;
      updateDisplay();
      buzz();
    }
  }
  if (digitalRead(MENU_BUTTON_PIN) == HIGH) {
    // Menu button pressed
    // Add menu functionality here
    buzz();
  }
  if (digitalRead(START_BUTTON_PIN) == HIGH) {
    // Start button pressed
    startPelletizing();
    buzz();
  }
}

void updateDisplay() {
  // Clear the display
  oled.clear();

  // Display feed rate in the top left
  oled.setCursor(0, 0);
  oled.print(feedRate);
  oled.print(" mm/s");

  // Display motor speed percentage in the top right
  oled.setCursor(90, 0);
  oled.print(motorSpeedPercent);
  oled.print("%");

  // Display pellet size in the middle
  oled.setCursor(0, 3);
  oled.print(pelletSize);
  oled.print(" mm");

  // Update the display
  oled.update();
}

void startPelletizing() {
  digitalWrite(LED_BUILTIN, HIGH);
  // Start the pelletizing process
  // Control the DC motor via PWM
  analogWrite(PWM_PIN, 128); // Set PWM to 50%

  // Control the stepper motor
  stepper.moveTo(1000); // Move stepper to position
  while (stepper.distanceToGo() != 0) {
    stepper.run();
  }

  // Stop the DC motor
  analogWrite(PWM_PIN, 0);

  // Signal completion with buzzer
  buzz();
}

void buzz() {
  // Make the buzzer sound
  digitalWrite(BUZZER_PIN, HIGH);
  delay(100);
  digitalWrite(BUZZER_PIN, LOW);
}
This code is responsible for the operation of the filament