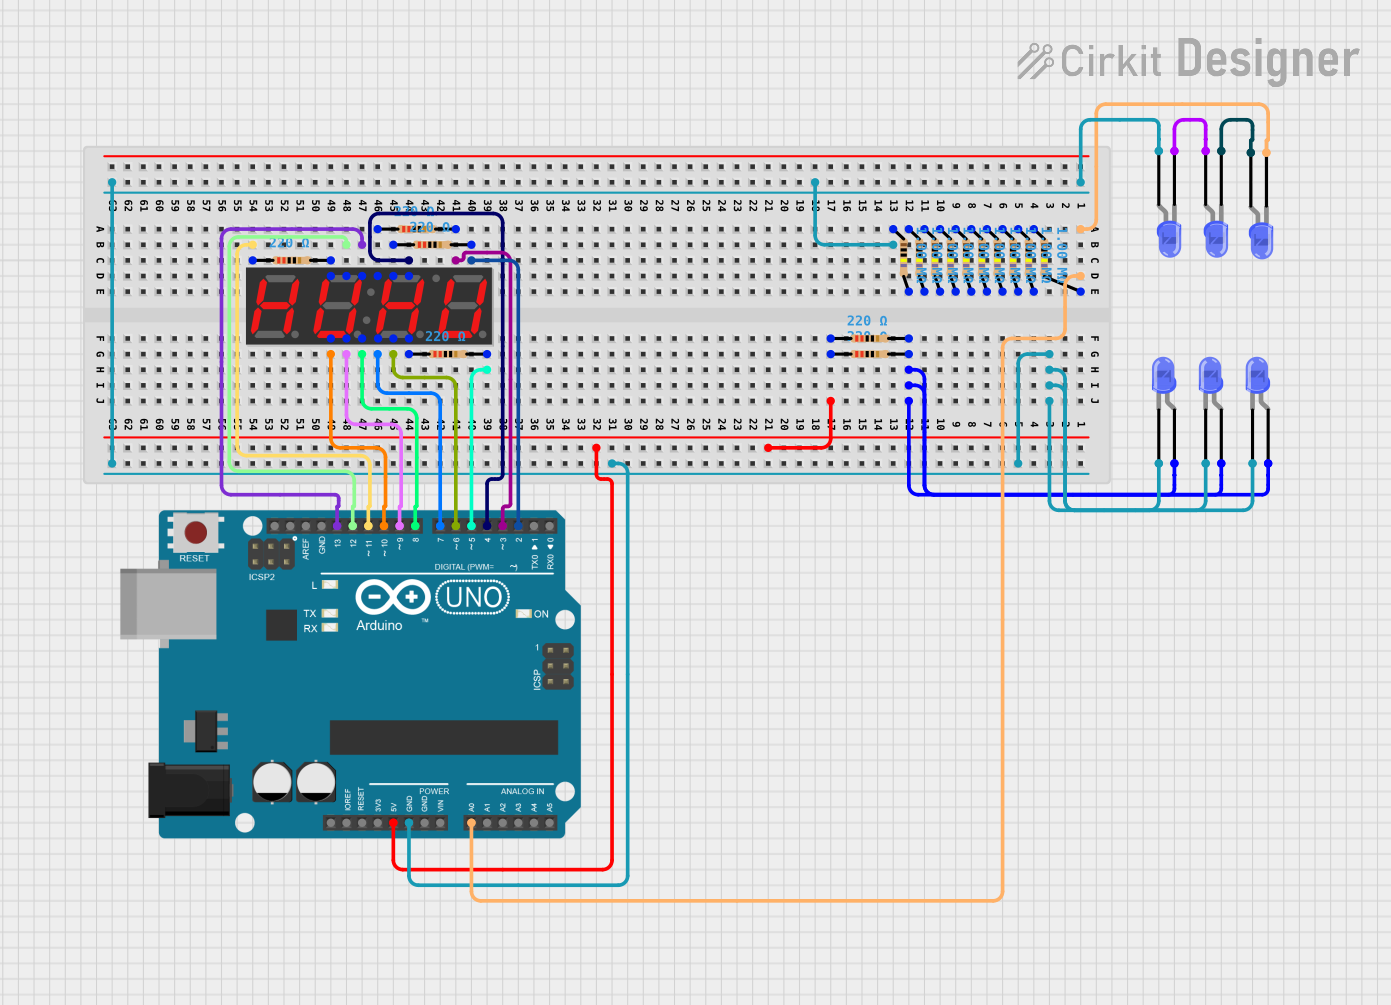
Arduino UNO Controlled LED and 7-Segment Display Circuit

Circuit Documentation
Summary of the Circuit
The circuit described by the provided inputs consists of multiple blue two-pin LEDs, a 4-digit 7-segment display, several resistors with different resistance values, and an Arduino UNO microcontroller. The circuit appears to be designed to control the LEDs and the 7-segment display using the Arduino UNO. The resistors are likely used for current limiting for the LEDs and for the segments of the display, as well as for potential voltage division or pull-up/pull-down configurations.
Component List
LEDs
- LED: Two Pin (blue): A standard blue LED with two pins, anode and cathode.
7-Segment Display
- 7-Segment Display (4 Digit) YOUNGSUN: A display with 4 digits, each digit having 7 segments to display numbers and some letters.
Resistors
- Resistor (220 Ohms): A resistor with a resistance of 220 Ohms, likely used for current limiting for the LEDs.
- Resistor (1 Megaohm): A resistor with a resistance of 1 Megaohm, possibly used for pull-up or pull-down configurations.
Microcontroller
- Arduino UNO: A microcontroller board based on the ATmega328P, with a variety of digital and analog I/O pins.
Wiring Details
LEDs
- LED: Two Pin (blue)
- Cathode connected to the ground (GND) of the Arduino UNO.
- Anode connected to a 220 Ohm resistor, which is then connected to a digital or analog pin on the Arduino UNO for control.
7-Segment Display (4 Digit) YOUNGSUN
- Segments (A to G) and decimal point (.) connected to digital pins on the Arduino UNO.
- Digit selection pins (1 to 4) connected to digital pins on the Arduino UNO through 220 Ohm resistors.
Resistors
Resistor (220 Ohms)
- One pin connected to an LED anode or 7-segment display segment.
- Other pin connected to a digital pin on the Arduino UNO.
Resistor (1 Megaohm)
- Used in a configuration that is not fully described by the net list. Could be part of a voltage divider or pull-up/pull-down network.
Documented Code
Arduino UNO Code (sketch.ino)
void setup() {
  // put your setup code here, to run once:

}

void loop() {
  // put your main code here, to run repeatedly:

}
The provided code is a template with empty setup() and loop() functions. The setup() function is intended for code that runs once upon reset or power-up, such as pin mode configurations. The loop() function contains code that runs continuously as long as the Arduino is powered.
Additional Notes
- The code for the Arduino UNO is minimal and does not include any functionality. It needs to be populated with instructions to control the LEDs and the 7-segment display according to the desired behavior of the circuit.
- The
documentation.txtfile is empty and does not provide additional information about the code or circuit operation.