
Arduino Nano-Based Automated Train System with IR Sensor and Motor Control
View and Edit Project In Cirkit Designer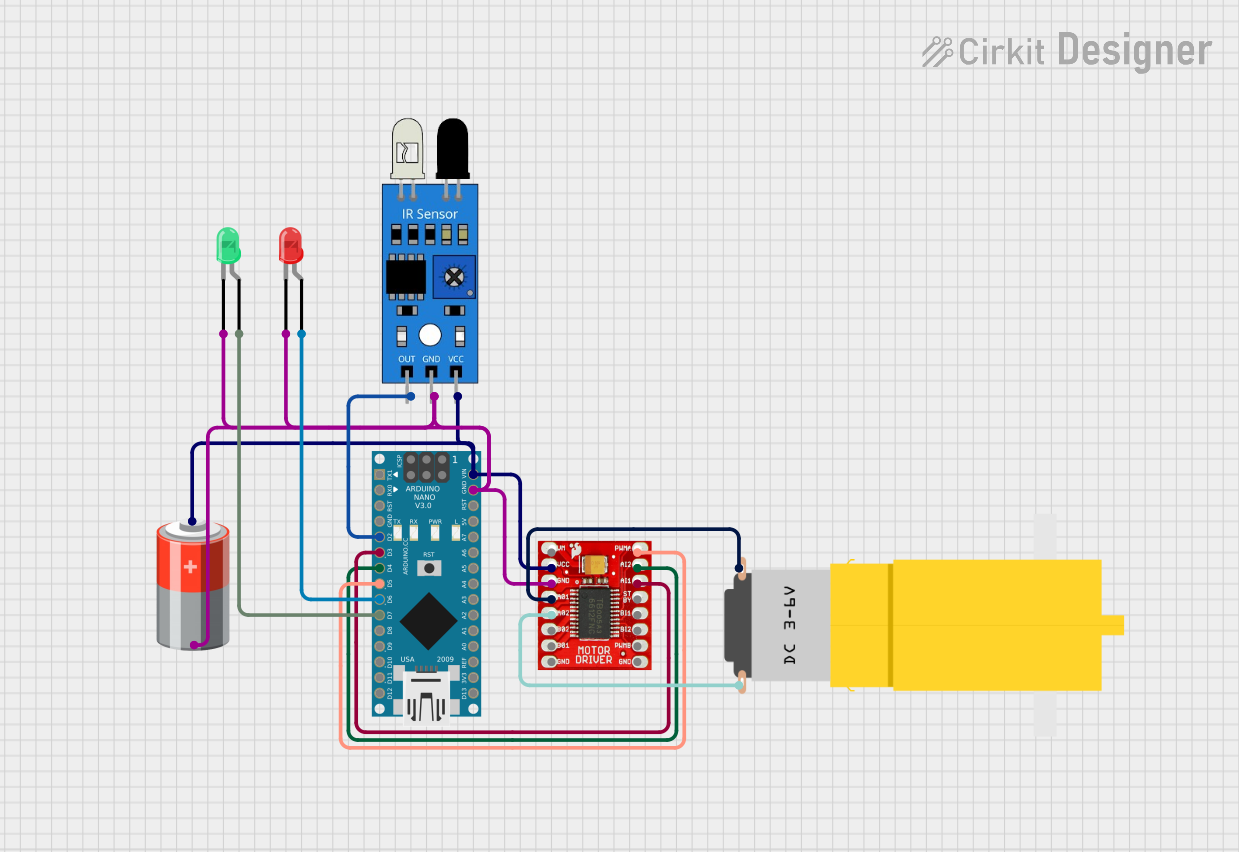
Circuit Documentation
Summary
This circuit is designed to control a motor using an Arduino Nano, an IR sensor, and a motor driver. The circuit also includes two LEDs to indicate the direction of the motor. The IR sensor detects a black marker to stop the motor at specific intervals, and the motor changes direction after reaching the last station.
Component List
Arduino Nano
- Description: A small, complete, and breadboard-friendly board based on the ATmega328P.
- Pins: D1/TX, D0/RX, RESET, GND, D2, D3, D4, D5, D6, D7, D8, D9, D10, D11/MOSI, D12/MISO, VIN, 5V, A7, A6, A5, A4, A3, A2, A1, A0, AREF, 3V3, D13/SCK
5V Battery
- Description: A power source providing 5V.
- Pins: +, -
TB6612FNG Motor Driver
- Description: A motor driver capable of controlling two DC motors.
- Pins: GND, B01, B02, A02, A01, VCC, VM, PWMB, BI2, BI1, STBY, AI1, AI2, PWMA
IR Sensor
- Description: An infrared sensor used to detect black markers.
- Pins: out, gnd, vcc
Motor (Yellow Gear Motor)
- Description: A hobby motor with a gearbox.
- Pins: vcc, GND
LED: Two Pin (Red)
- Description: A red LED.
- Pins: cathode, anode
LED: Two Pin (Green)
- Description: A green LED.
- Pins: cathode, anode
Wiring Details
Arduino Nano
- D2: Connected to IR Sensor (out)
- D3: Connected to Motor Driver (AI1)
- D4: Connected to Motor Driver (AI2)
- D5: Connected to Motor Driver (PWMA)
- D6: Connected to Red LED (anode)
- D7: Connected to Green LED (anode)
- VIN: Connected to 5V Battery (+)
- GND: Connected to 5V Battery (-), IR Sensor (gnd), Red LED (cathode), Green LED (cathode), Motor Driver (GND)
5V Battery
- +: Connected to IR Sensor (vcc), Arduino Nano (VIN), Motor Driver (VCC)
- -: Connected to IR Sensor (gnd), Arduino Nano (GND), Red LED (cathode), Green LED (cathode), Motor Driver (GND)
TB6612FNG Motor Driver
- AI1: Connected to Arduino Nano (D3)
- AI2: Connected to Arduino Nano (D4)
- PWMA: Connected to Arduino Nano (D5)
- VCC: Connected to 5V Battery (+)
- GND: Connected to 5V Battery (-)
- A01: Connected to Motor (vcc)
- A02: Connected to Motor (GND)
IR Sensor
- out: Connected to Arduino Nano (D2)
- vcc: Connected to 5V Battery (+)
- gnd: Connected to 5V Battery (-)
Motor (Yellow Gear Motor)
- vcc: Connected to Motor Driver (A01)
- GND: Connected to Motor Driver (A02)
LED: Two Pin (Red)
- anode: Connected to Arduino Nano (D6)
- cathode: Connected to 5V Battery (-)
LED: Two Pin (Green)
- anode: Connected to Arduino Nano (D7)
- cathode: Connected to 5V Battery (-)
Code Documentation
#include <Arduino.h>

// IR sensor and motor driver pins
const int irSensorPin = 2;    // IR sensor pin
const int motorPin1 = 3;      // Motor driver AIN1
const int motorPin2 = 4;      // Motor driver AIN2
const int motorPWM = 5;       // Motor driver PWMA (PWM for speed control)

// LED pins
const int greenLEDPin = 6;    // Green LED for forward
const int yellowLEDPin = 7;   // Yellow LED for reverse

// Train logic variables
int stationCount = 6;         // Number of stations
int currentStation = 0;       // Current station
bool isStopped = false;       // Train stop state
bool isForward = true;        // Direction flag (true = forward, false = reverse)
unsigned long stopTime = 0;   // Timer for stop

void setup() {
  pinMode(irSensorPin, INPUT);
  pinMode(motorPin1, OUTPUT);
  pinMode(motorPin2, OUTPUT);
  pinMode(motorPWM, OUTPUT);
  pinMode(greenLEDPin, OUTPUT);
  pinMode(yellowLEDPin, OUTPUT);

  // Start the train in forward direction with green LED on
  digitalWrite(greenLEDPin, HIGH);
  digitalWrite(yellowLEDPin, LOW);
  startMotor();
}

void loop() {
  // Check if black marker is detected
  if (digitalRead(irSensorPin) == LOW && !isStopped) {
    // Black marker detected
    isStopped = true;
    stopTime = millis();       // Start timer
    stopMotor();               // Stop the train

    // Update station count based on direction
    if (isForward) {
      currentStation++;
      if (currentStation >= stationCount - 1) {
        isForward = false;     // Reverse direction at last station
        updateLEDs();
      }
    } else {
      currentStation--;
      if (currentStation <= 0) {
        isForward = true;      // Forward direction at first station
        updateLEDs();
      }
    }
  }

  // Wait for 10 seconds and then resume
  if (isStopped && millis() - stopTime >= 10000) {
    isStopped = false;
    startMotor();              // Resume the train
  }
}

void startMotor() {
  if (isForward) {
    // Forward direction
    digitalWrite(motorPin1, HIGH);
    digitalWrite(motorPin2, LOW);
  } else {
    // Reverse direction
    digitalWrite(motorPin1, LOW);
    digitalWrite(motorPin2, HIGH);
  }
  analogWrite(motorPWM, 200);  // Set speed (0-255)
}

void stopMotor() {
  digitalWrite(motorPin1, LOW);
  digitalWrite(motorPin2, LOW);
  analogWrite(motorPWM, 0);    // Stop motor
}

void updateLEDs() {
  if (isForward) {
    digitalWrite(greenLEDPin, HIGH);  // Green LED ON
    digitalWrite(yellowLEDPin, LOW); // Yellow LED OFF
  } else {
    digitalWrite(greenLEDPin, LOW);  // Green LED OFF
    digitalWrite(yellowLEDPin, HIGH); // Yellow LED ON
  }
}
This code controls the motor and LEDs based on the IR sensor input. The train stops when a black marker is detected, changes direction at the last station, and resumes after a 10-second stop.