
Circuit Documentation
Summary of the Circuit
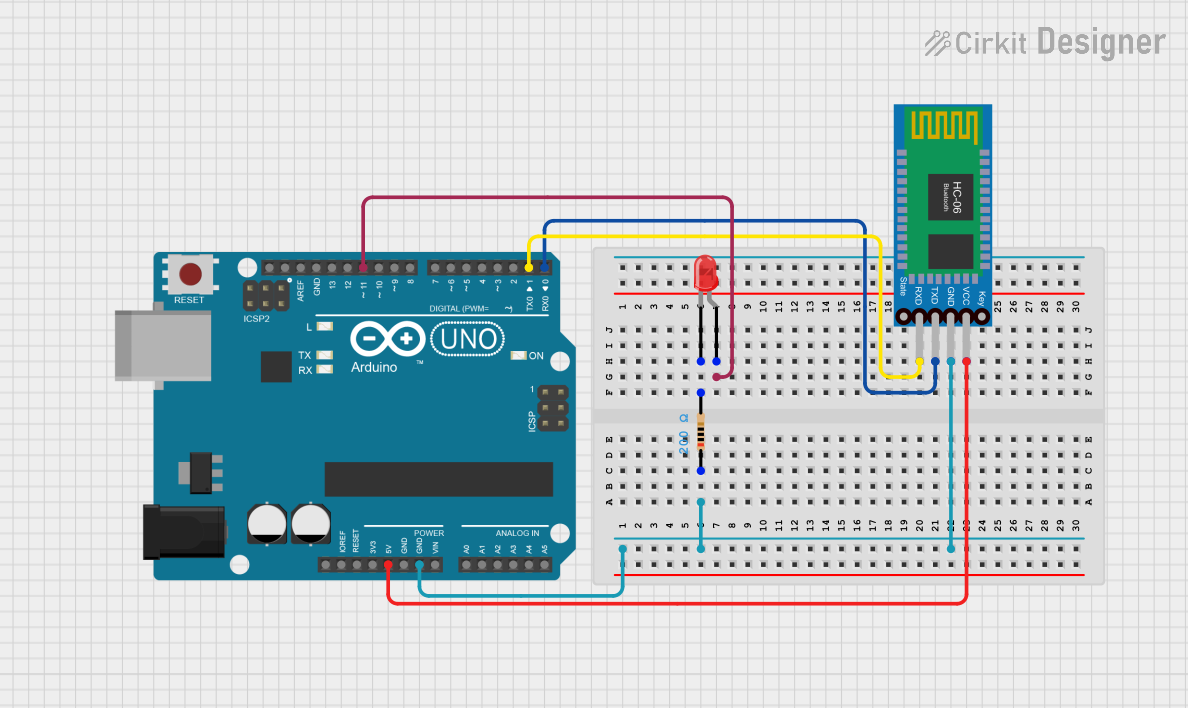
This circuit is designed to interface an Arduino UNO with a Bluetooth HC-06 module and control an LED. The Arduino UNO serves as the central processing unit, managing the Bluetooth communication through its serial pins and controlling the LED state via one of its digital pins. The Bluetooth module enables wireless communication, and the LED indicates status or responses to Bluetooth commands. A resistor is included in series with the LED to limit the current and protect the LED from damage.
Component List
Arduino UNO
- Description: A microcontroller board based on the ATmega328P.
- Pins: UNUSED, IOREF, Reset, 3.3V, 5V, GND, Vin, A0-A5, SCL, SDA, AREF, D0-D13.
- Purpose: Acts as the main controller for the circuit, managing Bluetooth communication and LED control.
Bluetooth HC-06
- Description: A Bluetooth module for serial communication.
- Pins: VCC, GND, TXD, RXD.
- Purpose: Provides wireless communication capabilities to the Arduino UNO.
LED: Two Pin (red)
- Description: A basic red LED with an anode and cathode.
- Pins: anode, cathode.
- Purpose: Serves as a visual indicator controlled by the Arduino UNO.
Resistor
- Description: A passive two-terminal electrical component that implements electrical resistance.
- Pins: pin1, pin2.
- Properties: Resistance - 200 Ohms.
- Purpose: Limits the current flowing through the LED to prevent damage.
Wiring Details
Arduino UNO
- 5V connected to Bluetooth HC-06 VCC.
- GND connected to Bluetooth HC-06 GND and one end of the Resistor (pin1).
- D11 connected to the anode of the LED.
- D1 (TX) connected to Bluetooth HC-06 RXD.
- D0 (RX) connected to Bluetooth HC-06 TXD.
Bluetooth HC-06
- VCC connected to Arduino UNO 5V.
- GND connected to Arduino UNO GND.
- TXD connected to Arduino UNO D0 (RX).
- RXD connected to Arduino UNO D1 (TX).
LED: Two Pin (red)
- anode connected to Arduino UNO D11.
- cathode connected to one end of the Resistor (pin2).
Resistor
- pin1 connected to Arduino UNO GND.
- pin2 connected to the cathode of the LED.
Documented Code
Arduino UNO Code (sketch.ino)
void setup() {
  // put your setup code here, to run once:

}

void loop() {
  // put your main code here, to run repeatedly:

}
Note: The provided code is a template and does not include specific functionality. It should be populated with the setup and loop code required to control the LED and manage Bluetooth communication.