
Arduino Mega 2560 RFID Access Control with Servo Lock and Buzzer Feedback
View and Edit Project In Cirkit Designer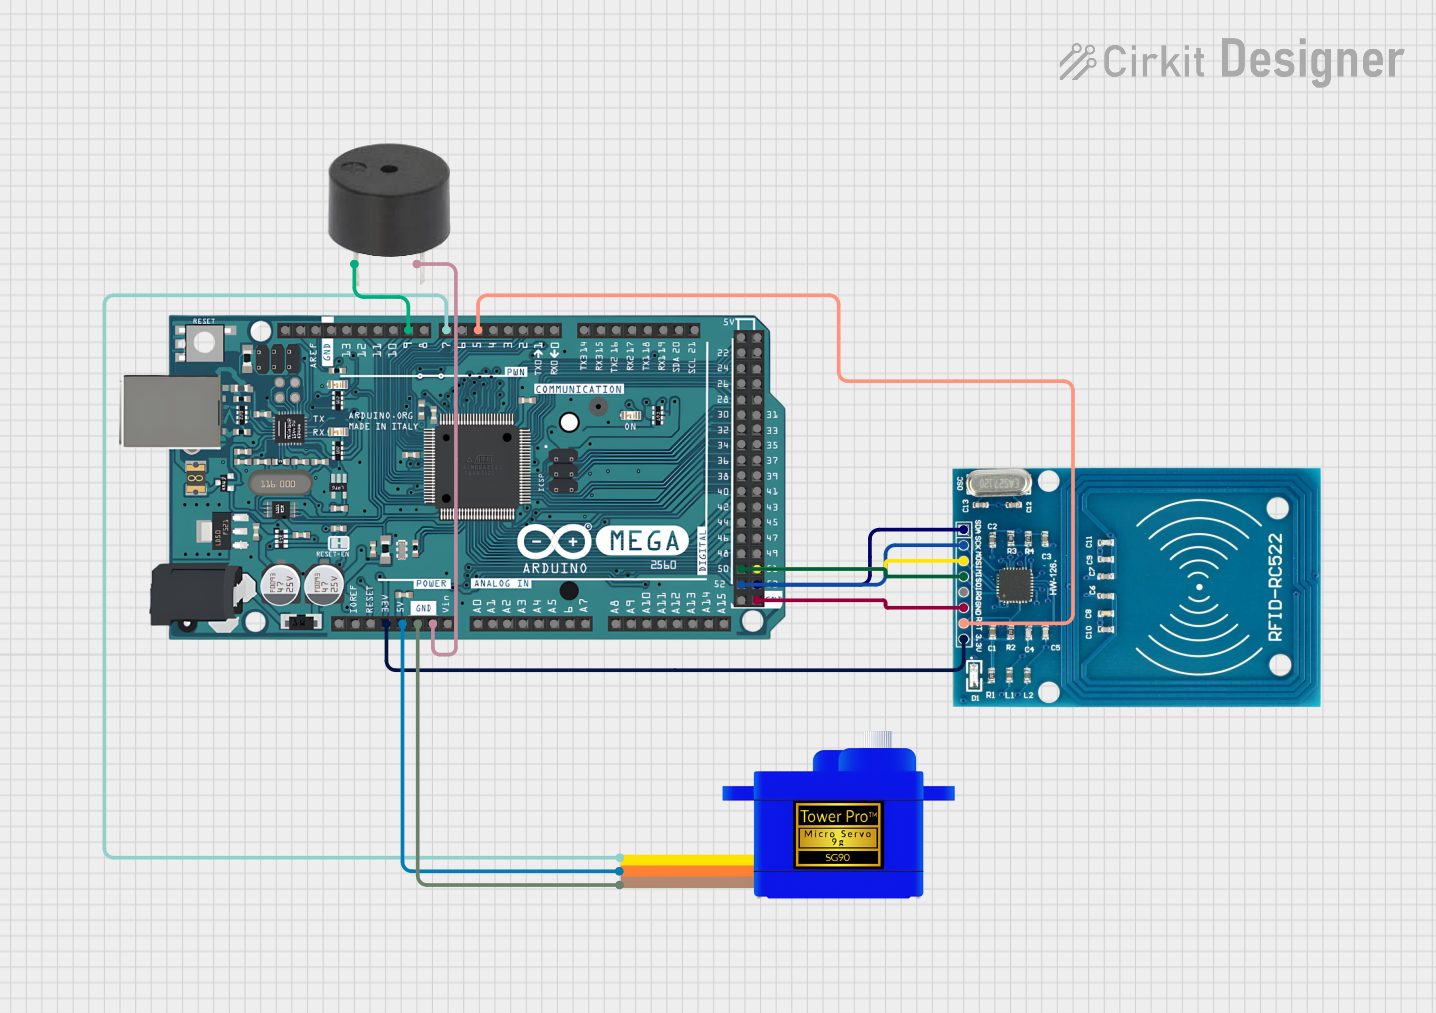
Circuit Documentation
Summary
This circuit is designed to interface an Arduino Mega 2560 with an RFID-RC522 module, a Servomotor SG90, and a passive buzzer. The purpose of the circuit is to create a security system that unlocks a mechanism (controlled by the servo) when an authorized RFID card is detected. The buzzer provides audio feedback for access granted or denied.
Component List
Arduino Mega 2560
- Description: A microcontroller board based on the ATmega2560.
- Pins: IOREF, RESET, 3V3, 5V, GND, VIN, Analog Pins (A0-A15), Digital Pins (D0-D53), PWM Pins (D2-D13), Communication Pins (SCL, SDA, TX, RX), SPI Pins (MISO, MOSI, SCK), AREF.
Servomotor SG90
- Description: A small and lightweight servo motor for RC vehicles and small robotics projects.
- Pins: SIG (Signal), VCC (Power), GND (Ground).
Buzzer
- Description: A passive buzzer for generating simple tones.
- Pins: PIN (Signal), GND (Ground).
RFID-RC522
- Description: An RFID reader/writer module for contactless communication using 13.56MHz.
- Pins: VCC (3.3V), RST (Reset), GND (Ground), IRQ (Interrupt Request), MISO (Master In Slave Out), MOSI (Master Out Slave In), SCK (Serial Clock), SDA (Serial Data).
Wiring Details
Arduino Mega 2560
- 3V3: Connected to RFID-RC522 VCC (3.3V)
- 5V: Connected to Servomotor SG90 VCC
- GND: Common ground with Servomotor SG90, Buzzer, and RFID-RC522
- D5 PWM: Connected to RFID-RC522 RST
- D7 PWM: Connected to Servomotor SG90 SIG
- D9 PWM: Connected to Buzzer PIN
- D52: Connected to RFID-RC522 SCK
- D50: Connected to RFID-RC522 MISO
- D53: Connected to RFID-RC522 SDA
- D51: Connected to RFID-RC522 MOSI
Servomotor SG90
- SIG: Connected to Arduino Mega 2560 D7 PWM
- VCC: Connected to Arduino Mega 2560 5V
- GND: Connected to Arduino Mega 2560 GND
Buzzer
- PIN: Connected to Arduino Mega 2560 D9 PWM
- GND: Connected to Arduino Mega 2560 GND
RFID-RC522
- VCC (3.3V): Connected to Arduino Mega 2560 3V3
- RST: Connected to Arduino Mega 2560 D5 PWM
- GND: Connected to Arduino Mega 2560 GND
- SCK: Connected to Arduino Mega 2560 D52
- MISO: Connected to Arduino Mega 2560 D50
- SDA: Connected to Arduino Mega 2560 D53
- MOSI: Connected to Arduino Mega 2560 D51
Documented Code
#include <SPI.h>
#include <MFRC522.h>
#include <Servo.h>

#define SS_PIN 53  // Pin for SDA
#define RST_PIN 5  // Pin for Reset
#define SERVO_PIN 7  // Pin for servo
#define BUZZER_PIN 9  // Pin for passive buzzer

MFRC522 rfid(SS_PIN, RST_PIN);  // Create MFRC522 instance
Servo myServo;  // Create servo object

// Replace the UID with your card's UID (7-byte UID)
byte allowedUID[] = {0x04, 0xFA, 0x6A, 0xFC, 0x10, 0x15, 0x89};  // Your card's UID (7 bytes)

bool isLocked = true;  // Variable to track if the safe is locked or unlocked

void setup() {
  Serial.begin(9600);  // Initialize serial communications
  SPI.begin();         // Init SPI bus
  rfid.PCD_Init();     // Init MFRC522
  myServo.attach(SERVO_PIN);  // Attach servo to the correct pin
  myServo.write(0);    // Servo in locked position (0 degrees)
  pinMode(BUZZER_PIN, OUTPUT); // Set buzzer pin as output
  Serial.println("Place your card on the reader...");
}

void loop() {
  // Look for new cards
  if ( !rfid.PICC_IsNewCardPresent() || !rfid.PICC_ReadCardSerial() ) {
    return;
  }

  // Print the UID of the card
  Serial.print("Card UID: ");
  for (byte i = 0; i < rfid.uid.size; i++) {
    Serial.print(rfid.uid.uidByte[i] < 0x10 ? " 0" : " ");
    Serial.print(rfid.uid.uidByte[i], HEX);
  }
  Serial.println();

  // Check if the scanned card matches the allowed card
  if (compareUID(rfid.uid.uidByte, rfid.uid.size, allowedUID)) {
    if (isLocked) {
      // Unlock the safe
      Serial.println("Access granted! Unlocking...");
      correctTone();  // Play "access granted" tone
      myServo.write(180);  // Unlock the safe (move servo to 180 degrees)
      isLocked = false;  // Set state to unlocked
    } else {
      // Lock the safe
      Serial.println("Access granted! Locking...");
      correctTone();  // Play "access granted" tone
      myServo.write(0);  // Lock the safe (move servo to 0 degrees)
      isLocked = true;  // Set state to locked
    }
  } else {
    Serial.println("Access denied!");
    incorrectTone();  // Play "access denied" tone
  }

  // Halt PICC
  rfid.PICC_HaltA();
  rfid.PCD_StopCrypto1();
}

// Helper function to compare scanned card UID with the allowed UID
bool compareUID(byte *uid, byte uidSize, byte *allowedUID) {
  if (uidSize != 7) { // Check if the card has a 7-byte UID
    return false;
  }
  for (byte i = 0; i < uidSize; i++) {
    if (uid[i] != allowedUID[i]) {
      return false;
    }
  }
  return true;
}

// Function to play a short "access granted" tone
void correctTone() {
  tone(BUZZER_PIN, 1000, 100);  // High tone (1000 Hz) for 100 ms
  delay(150);  // Short delay between beeps
  tone(BUZZER_PIN, 1000, 100);  // Another beep for a movie-style sound
  delay(200);
}

// Function to play a short "access denied" tone
void incorrectTone() {
  tone(BUZZER_PIN, 200, 500);  // Low tone (200 Hz) for 500 ms
  delay(500);  // Wait for the tone to finish
}
This code is responsible for initializing the RFID reader and the servo motor, reading RFID cards, and controlling the servo and buzzer based on the card's UID. The setup() function initializes the components, and the loop() function continuously checks for new RFID cards. If an authorized card is detected, the servo is moved to unlock or lock the mechanism, and the buzzer plays a corresponding tone. The compareUID() function checks if the scanned UID matches the authorized UID, and the correctTone() and incorrectTone() functions control the buzzer's output.