
Circuit Documentation
Summary
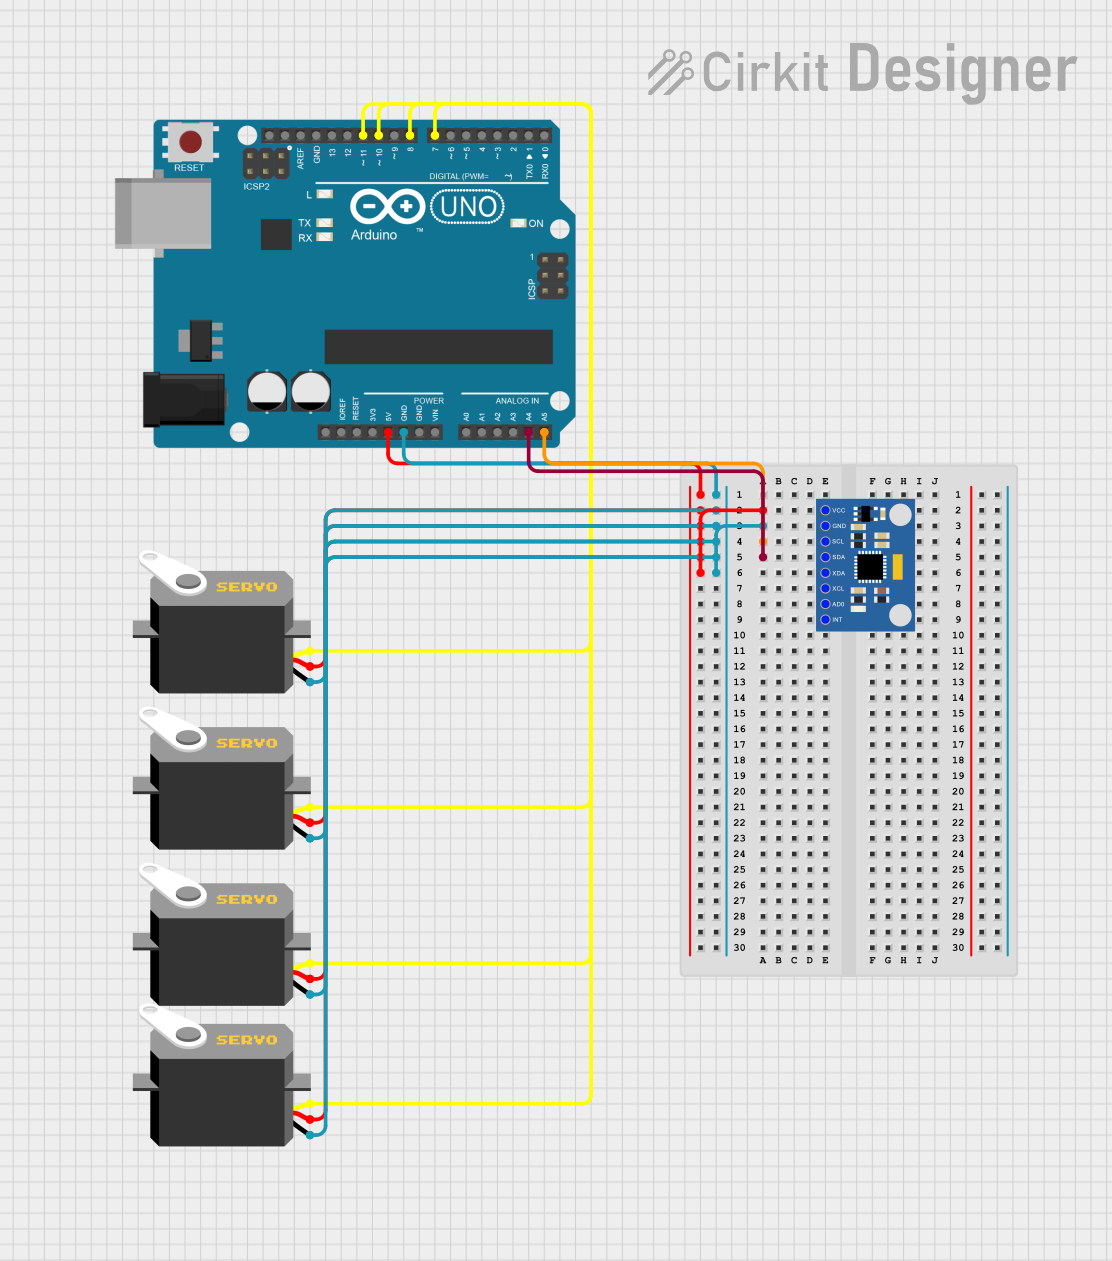
This circuit consists of an Arduino UNO microcontroller, four servo motors, and an MPU6050 accelerometer and gyroscope module. The Arduino UNO serves as the central controller, interfacing with the servos and the MPU6050 to control their operations. The servos are used for mechanical movements, while the MPU6050 provides motion sensing capabilities.
Component List
Arduino UNO
- Description: A microcontroller board based on the ATmega328P.
- Pins: UNUSED, IOREF, Reset, 3.3V, 5V, GND, Vin, A0, A1, A2, A3, A4, A5, SCL, SDA, AREF, D13, D12, D11, D10, D9, D8, D7, D6, D5, D4, D3, D2, D1, D0
Servo (x4)
- Description: A standard servo motor used for precise control of angular position.
- Pins: gnd, vcc, pulse
MPU6050 Accelerometer + Gyroscope (Wokwi Compatible)
- Description: A sensor module that combines a 3-axis gyroscope and a 3-axis accelerometer.
- Pins: INT, AD0, XCL, XDA, SDA, SCL, GND, VCC
Wiring Details
Arduino UNO
- 5V: Connected to VCC of MPU6050 and VCC of all four servos.
- GND: Connected to GND of MPU6050 and GND of all four servos.
- A4: Connected to SDA of MPU6050.
- A5: Connected to SCL of MPU6050.
- D7: Connected to pulse of Servo 4.
- D8: Connected to pulse of Servo 1.
- D10: Connected to pulse of Servo 3.
- D11: Connected to pulse of Servo 2.
Servo 1
- gnd: Connected to GND of Arduino UNO.
- vcc: Connected to 5V of Arduino UNO.
- pulse: Connected to D8 of Arduino UNO.
Servo 2
- gnd: Connected to GND of Arduino UNO.
- vcc: Connected to 5V of Arduino UNO.
- pulse: Connected to D11 of Arduino UNO.
Servo 3
- gnd: Connected to GND of Arduino UNO.
- vcc: Connected to 5V of Arduino UNO.
- pulse: Connected to D10 of Arduino UNO.
Servo 4
- gnd: Connected to GND of Arduino UNO.
- vcc: Connected to 5V of Arduino UNO.
- pulse: Connected to D7 of Arduino UNO.
MPU6050 Accelerometer + Gyroscope
- GND: Connected to GND of Arduino UNO.
- VCC: Connected to 5V of Arduino UNO.
- SDA: Connected to A4 of Arduino UNO.
- SCL: Connected to A5 of Arduino UNO.
Documented Code
Arduino UNO Code (sketch.ino)
void setup() {
  // put your setup code here, to run once:

}

void loop() {
  // put your main code here, to run repeatedly:

}
Documentation (documentation.txt)
This documentation provides a comprehensive overview of the circuit, including a summary, detailed component list, wiring details, and the code used in the Arduino UNO microcontroller.