Cirkit Designer
Your all-in-one circuit design IDE
Home /
Project Documentation
Arduino-Controlled Automated Irrigation System with Bluetooth Interface

Circuit Documentation
Summary
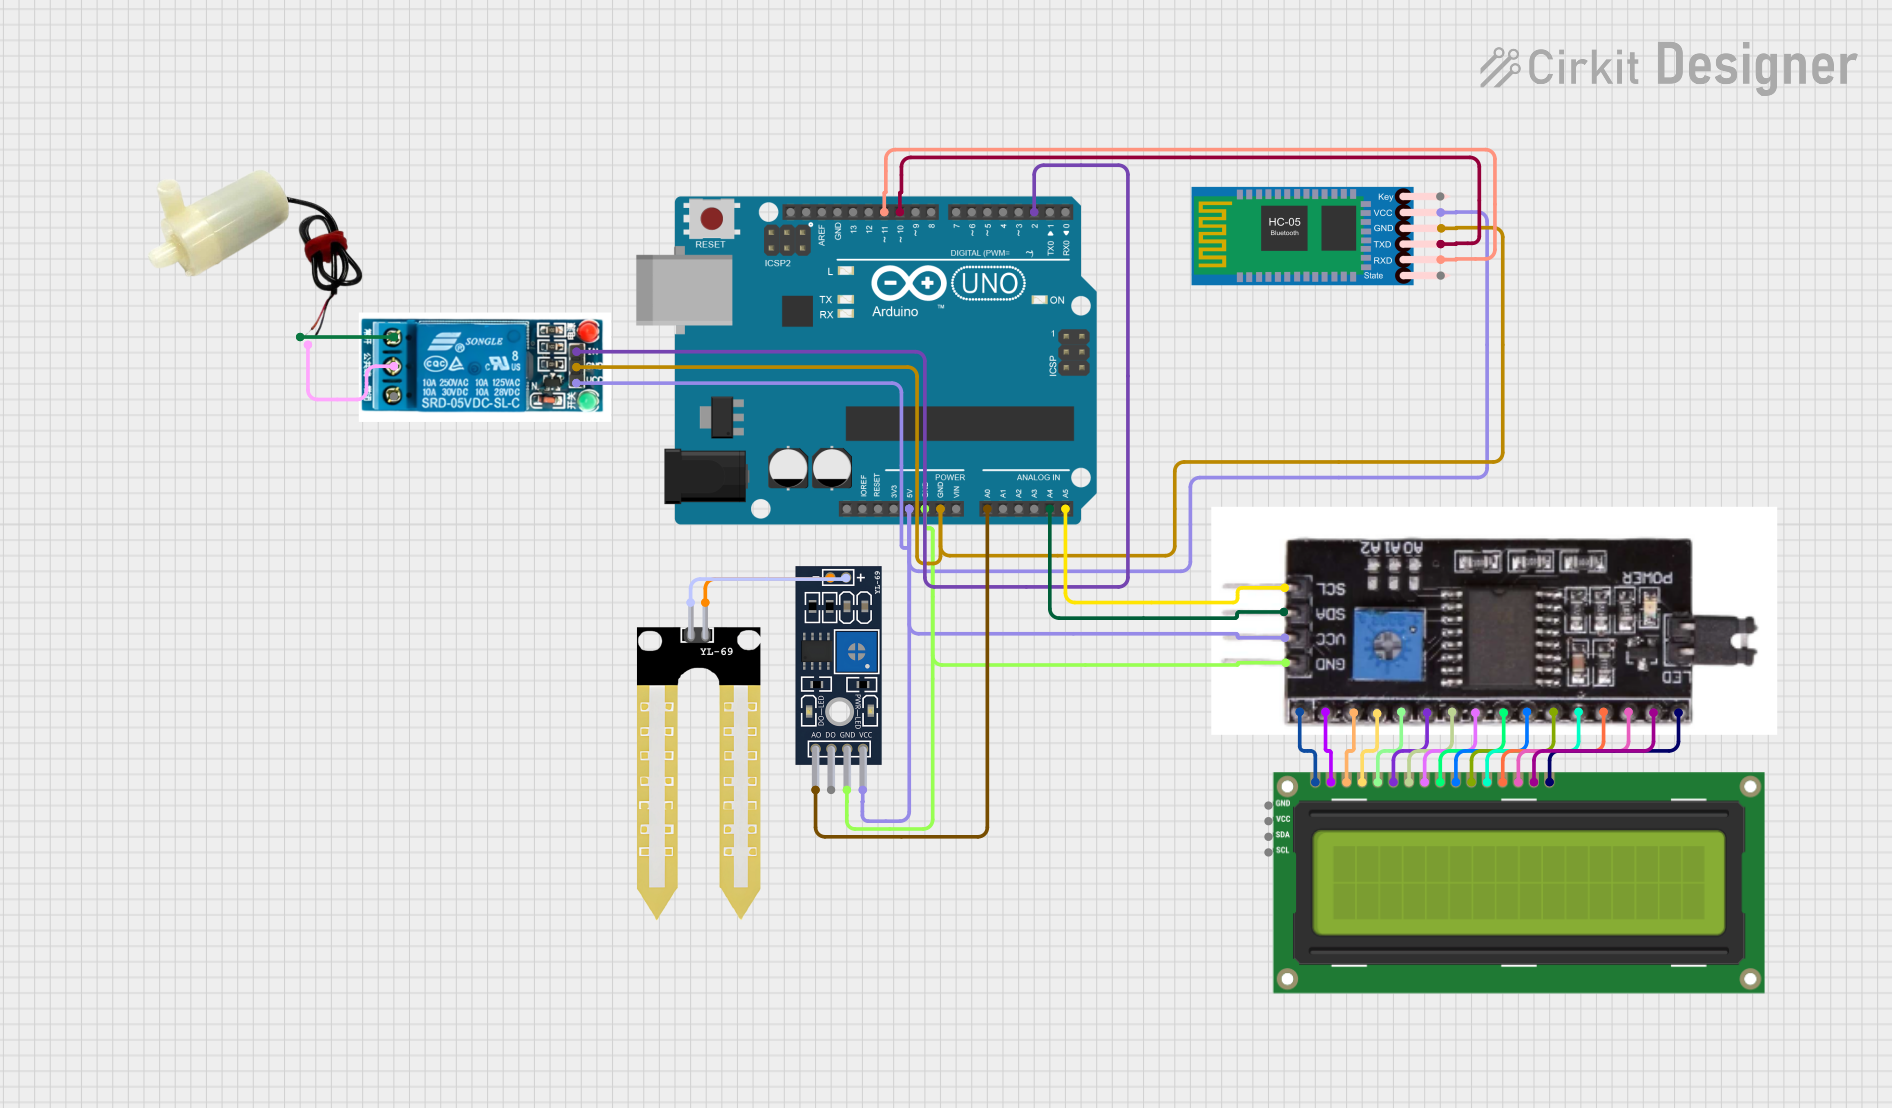
This circuit is designed to control a 5V mini water pump using an Arduino UNO microcontroller. The system includes a 5V relay to switch the pump on and off, a YL-69 soil moisture sensor to monitor soil moisture levels, an HC-05 Bluetooth module for wireless communication, and an I2C LCD 16x2 screen to display information. The components are interconnected to form a control system that can be potentially used for automated plant watering.
Component List
5V Relay
- Pins: Normally Open, Common terminal, Normally Closed, In, GND, VCC
- Description: A relay is an electrically operated switch that allows you to control a high-power circuit with a low-power signal.
Arduino UNO
- Pins: UNUSED, IOREF, Reset, 3.3V, 5V, GND, Vin, A0-A5, SCL, SDA, AREF, D0-D13
- Description: A microcontroller board based on the ATmega328P, widely used for building digital devices and interactive objects.
YL-69 Sonda
- Pins: +, -
- Description: A soil moisture probe that measures the volumetric content of water in the soil.
YL-69 Module LM393
- Pins: A0, DO, GND, VCC, -, +
- Description: A module that interfaces with the YL-69 Sonda and provides both analog and digital outputs.
5V Mini Water Pump
- Pins: Positive pin, Negative pin
- Description: A small pump that operates at 5V, suitable for pumping water in small-scale projects.
HC-05 Bluetooth Module
- Pins: Key, VCC, TXD, RXD, State, GND
- Description: A wireless communication module that allows for Bluetooth connectivity.
I2C LCD 16x2 Screen
- Pins: SCL, SDA, VCC (5V), GND, VDD, VO, RS, RW, E, D0-D7, BLA, BLK
- Description: A liquid crystal display that can show 16 characters per line and has 2 lines.
I2C Module
- Pins: VSS, VO, RS, RW, E, DB0-DB7, LEDA, LEDK, GND, VCC, SDA, SCL, VDD
- Description: A module that provides an I2C interface for the LCD screen.
Wiring Details
5V Relay
- Normally Open connected to 5V mini water pump positive pin
- Common terminal connected to 5V mini water pump negative pin
- In connected to Arduino UNO D2
- GND connected to system ground
- VCC connected to 5V power supply
Arduino UNO
- D2 connected to 5V relay In
- A0 connected to YL-69 Module LM393 A0
- A4 (SDA) connected to I2C Module SDA
- A5 (SCL) connected to I2C Module SCL
- D10 (TX) connected to HC-05 Bluetooth Module RXD
- D11 (RX) connected to HC-05 Bluetooth Module TXD
- GND connected to system ground
- 5V connected to 5V power supply
YL-69 Sonda
- connected to YL-69 Module LM393 +
- connected to YL-69 Module LM393 -
YL-69 Module LM393
- A0 connected to Arduino UNO A0
- DO not used in this configuration
- GND connected to system ground
- VCC connected to 5V power supply
- connected to YL-69 Sonda +
- connected to YL-69 Sonda -
5V Mini Water Pump
- Positive pin connected to 5V relay Normally Open
- Negative pin connected to 5V relay Common terminal
HC-05 Bluetooth Module
- Key not used in this configuration
- VCC connected to 5V power supply
- TXD connected to Arduino UNO D11
- RXD connected to Arduino UNO D10
- State not used in this configuration
- GND connected to system ground
I2C LCD 16x2 Screen
- SCL connected to I2C Module SCL
- SDA connected to I2C Module SDA
- VCC (5V) connected to I2C Module VCC
- GND connected to I2C Module VSS
- Other pins connected to corresponding pins on I2C Module
I2C Module
- SDA connected to Arduino UNO A4
- SCL connected to Arduino UNO A5
- VCC connected to 5V power supply
- GND connected to system ground
- Other pins connected to corresponding pins on I2C LCD 16x2 Screen
Documented Code
Arduino UNO Code (sketch.ino)
void setup() {
  // put your setup code here, to run once:

}

void loop() {
  // put your main code here, to run repeatedly:

}
Note: The provided code is a template and does not include any functional code. It needs to be populated with the logic to read the soil moisture sensor, control the relay, and communicate with the Bluetooth module and LCD screen.