
Arduino UNO-Based LED Control System with Potentiometer and Pushbutton
View and Edit Project In Cirkit Designer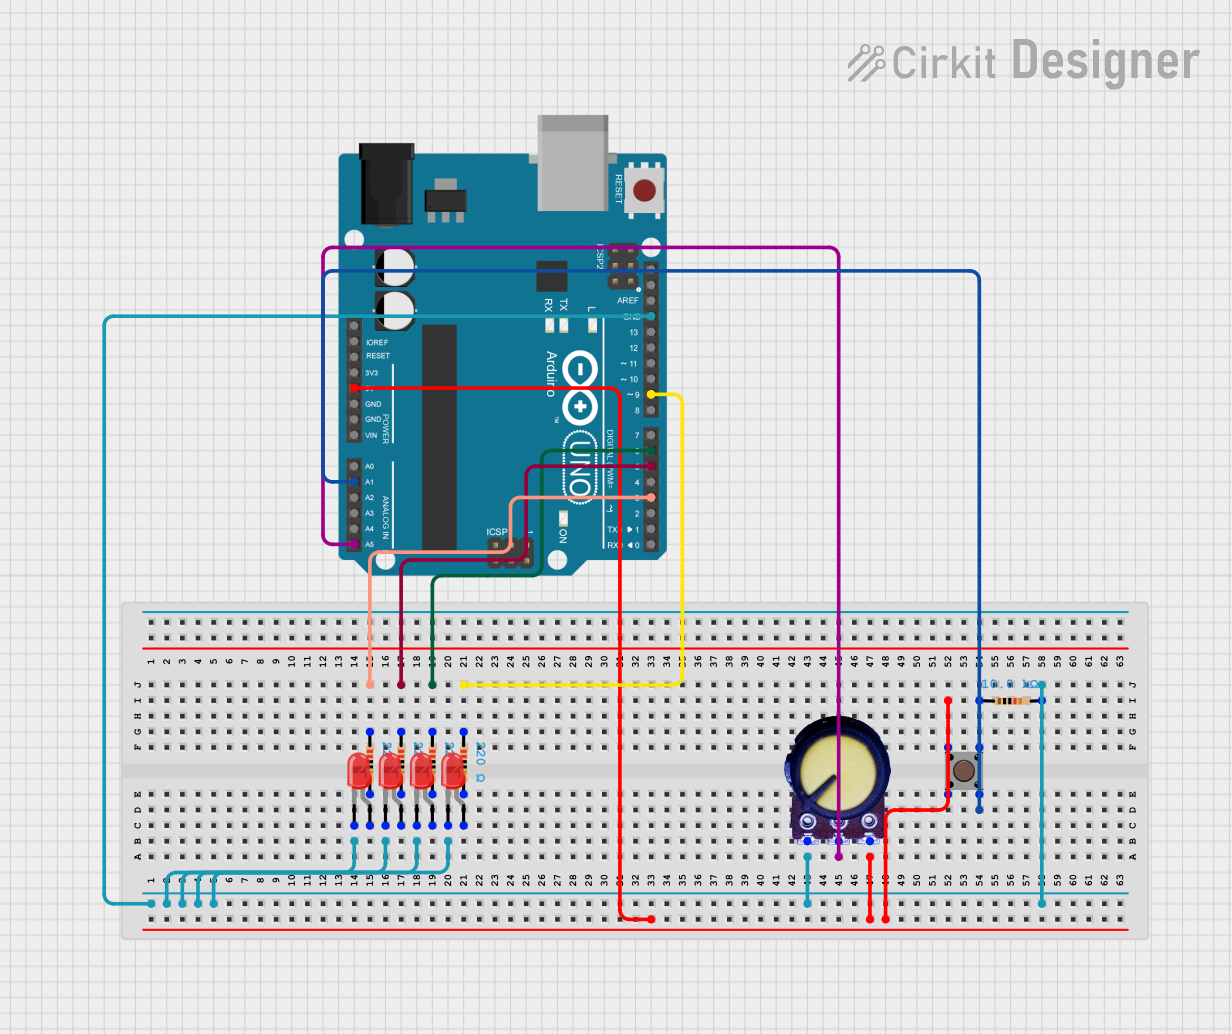
Circuit Documentation
Summary
This circuit involves an Arduino UNO microcontroller, several resistors, a potentiometer, a pushbutton, and multiple LEDs. The circuit is designed to interface with the Arduino UNO, allowing for control and interaction with the LEDs and other components through the microcontroller.
Component List
Arduino UNO
- Description: A microcontroller board based on the ATmega328P.
- Pins: UNUSED, IOREF, Reset, 3.3V, 5V, GND, Vin, A0, A1, A2, A3, A4, A5, SCL, SDA, AREF, D13, D12, D11, D10, D9, D8, D7, D6, D5, D4, D3, D2, D1, D0
Resistor (10k Ohms)
- Description: A resistor with a resistance of 10k Ohms.
- Pins: pin1, pin2
Potentiometer
- Description: A variable resistor with three terminals.
- Pins: GND, Output, VCC
Pushbutton
- Description: A simple pushbutton switch.
- Pins: Pin 3 (out), Pin 4 (out), Pin 1 (in), Pin 2 (in)
Resistor (220 Ohms)
- Description: A resistor with a resistance of 220 Ohms.
- Pins: pin1, pin2
LED: Two Pin (red)
- Description: A red LED with two pins.
- Pins: cathode, anode
Wiring Details
Arduino UNO
GND is connected to:
- Cathode of all LEDs
- GND of the Potentiometer
- pin2 of the 10k Ohm Resistor
D3 is connected to:
- pin1 of a 220 Ohm Resistor
D5 is connected to:
- pin1 of a 220 Ohm Resistor
D6 is connected to:
- pin1 of a 220 Ohm Resistor
D9 is connected to:
- pin1 of a 220 Ohm Resistor
A5 is connected to:
- Output of the Potentiometer
5V is connected to:
- VCC of the Potentiometer
- Pin 1 (in) of the Pushbutton
A1 is connected to:
- Pin 4 (out) of the Pushbutton
Resistor (10k Ohms)
pin1 is connected to:
- Pin 3 (out) of the Pushbutton
pin2 is connected to:
- GND of the Arduino UNO
Potentiometer
GND is connected to:
- GND of the Arduino UNO
Output is connected to:
- A5 of the Arduino UNO
VCC is connected to:
- 5V of the Arduino UNO
- Pin 1 (in) of the Pushbutton
Pushbutton
Pin 3 (out) is connected to:
- pin1 of the 10k Ohm Resistor
Pin 4 (out) is connected to:
- A1 of the Arduino UNO
Pin 1 (in) is connected to:
- VCC of the Potentiometer
- 5V of the Arduino UNO
Resistor (220 Ohms)
pin1 is connected to:
- D3 of the Arduino UNO
- D5 of the Arduino UNO
- D6 of the Arduino UNO
- D9 of the Arduino UNO
pin2 is connected to:
- Anode of the corresponding LED
LED: Two Pin (red)
cathode is connected to:
- GND of the Arduino UNO
anode is connected to:
- pin2 of the corresponding 220 Ohm Resistor
Documented Code
Arduino UNO Code (sketch.ino)
void setup() {
  // put your setup code here, to run once:

}

void loop() {
  // put your main code here, to run repeatedly:

}
Additional Documentation (documentation.txt)
This documentation provides a comprehensive overview of the circuit, including a detailed list of components, their connections, and the code used in the microcontroller.