
Arduino UNO Based Temperature Monitoring and LED Indicator System
View and Edit Project In Cirkit Designer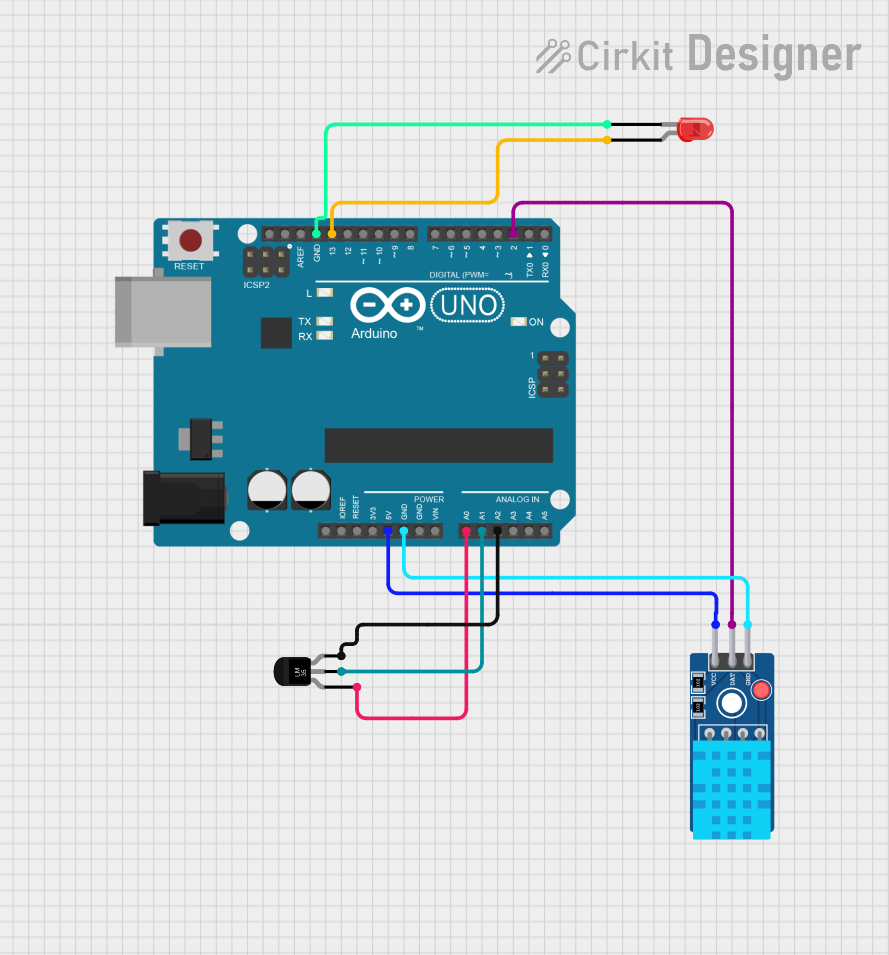
Circuit Documentation
Summary of the Circuit
This circuit integrates an Arduino UNO microcontroller with a temperature sensor (LM35), a DHT11 humidity and temperature sensor, and a red LED. The Arduino UNO serves as the central processing unit, interfacing with the sensors to collect temperature and humidity data, and controlling the LED based on predefined conditions. The LM35 sensor provides analog temperature readings, while the DHT11 sensor offers digital output for both temperature and humidity. The LED acts as a simple indicator, which can be used to signal specific events or statuses as determined by the embedded code running on the Arduino.
Component List
Arduino UNO
- Description: A microcontroller board based on the ATmega328P. It has 14 digital input/output pins, 6 analog inputs, a 16 MHz quartz crystal, a USB connection, a power jack, an ICSP header, and a reset button.
- Purpose: Acts as the central controller for the circuit, interfacing with sensors and controlling the LED.
Temperature Sensor (LM35)
- Description: A precision integrated-circuit temperature sensor, whose output voltage is linearly proportional to the Celsius temperature.
- Purpose: Provides analog temperature readings to the Arduino UNO.
LED: Two Pin (red)
- Description: A basic red light-emitting diode with two pins: an anode and a cathode.
- Purpose: Serves as an indicator light, controlled by the Arduino UNO.
DHT11 Sensor V2
- Description: A digital humidity and temperature sensor that provides calibrated digital output.
- Purpose: Measures ambient humidity and temperature, providing digital data to the Arduino UNO.
Wiring Details
Arduino UNO
- 5V connected to DHT11 Sensor V2 VCC
- GND connected to DHT11 Sensor V2 GND, LED cathode, and LM35 GND
- A0 connected to LM35 +Vs
- A1 connected to LM35 Vout
- A2 connected to LM35 GND
- D13 connected to LED anode
- D2 connected to DHT11 Sensor V2 DAT
Temperature Sensor (LM35)
- +Vs connected to Arduino UNO A0
- Vout connected to Arduino UNO A1
- GND connected to Arduino UNO A2
LED: Two Pin (red)
- cathode connected to Arduino UNO GND
- anode connected to Arduino UNO D13
DHT11 Sensor V2
- VCC connected to Arduino UNO 5V
- GND connected to Arduino UNO GND
- DAT connected to Arduino UNO D2
Documented Code
Arduino UNO Code (sketch.ino)
void setup() {
  // put your setup code here, to run once:

}

void loop() {
  // put your main code here, to run repeatedly:

}
Note: The provided code is a template and does not include specific functionality. It should be populated with setup configurations and operational logic to interface with the LM35 and DHT11 sensors, as well as to control the LED based on sensor readings.