
Arduino and ESP8266 Based Environmental Monitoring System with LoRa Communication
View and Edit Project In Cirkit Designer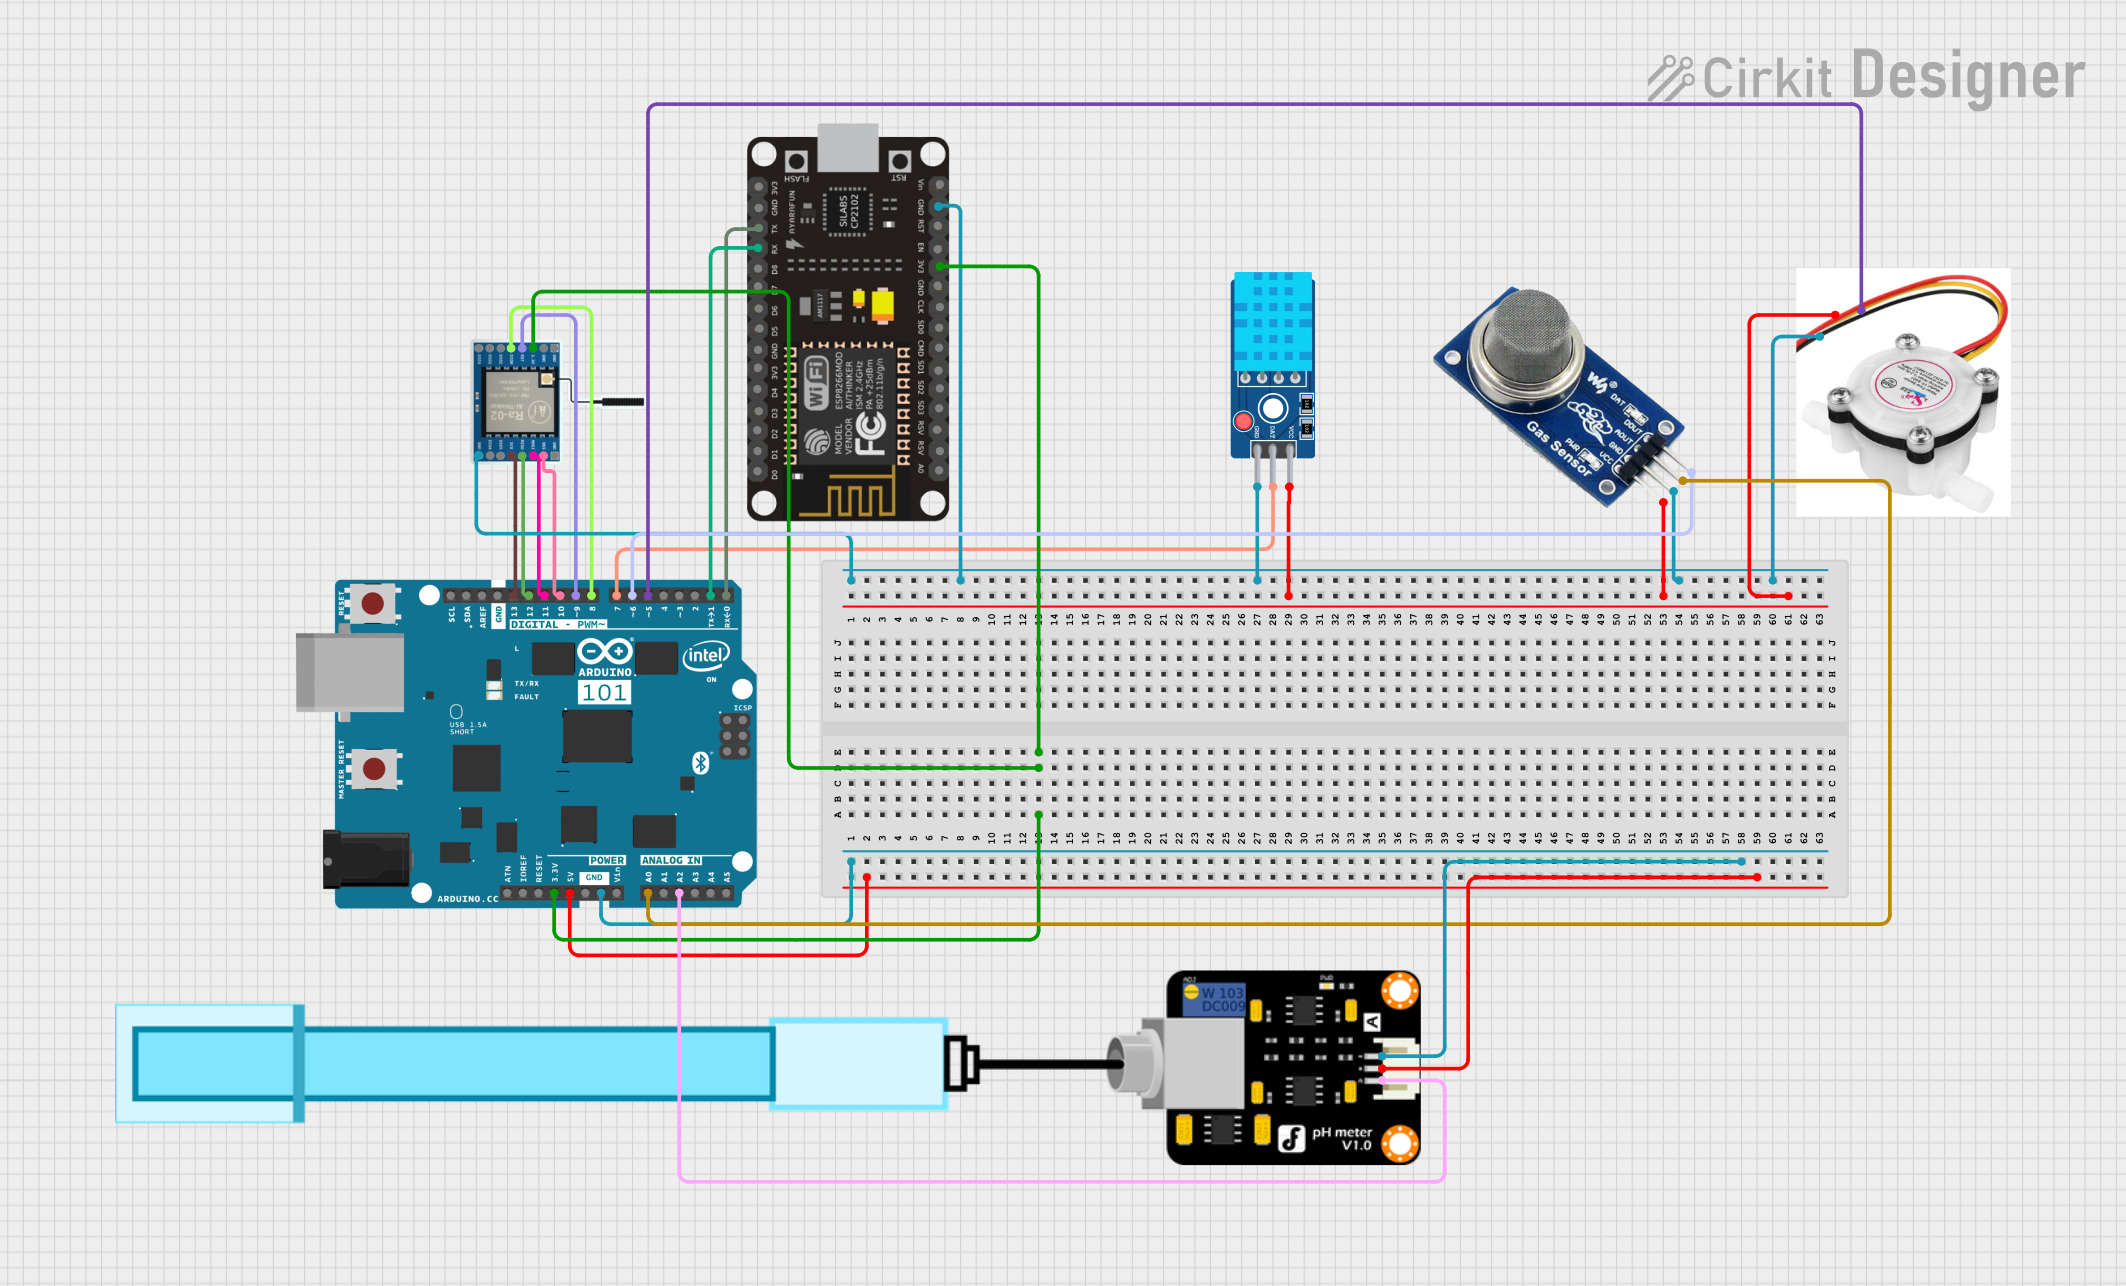
Circuit Documentation
Summary
The circuit in question is a multifunctional sensor and communication system that utilizes an Arduino 101 as the central processing unit. It interfaces with various sensors including a DHT11 temperature and humidity sensor, an MQ2 gas sensor, a flow rate sensor, and a PH meter. For wireless communication, it employs an ESP8266 NodeMCU and a LoRa Ra-02 SX1278 module. The circuit is designed to collect environmental data and transmit it over LoRa and ESP8266 networks.
Component List
Arduino 101
- Microcontroller board based on the Intel Curie
- Provides a wide range of I/O pins for interfacing with various sensors and modules
DHT11 Sensor V2
- A basic, ultra low-cost digital temperature and humidity sensor
- Uses a capacitive humidity sensor and a thermistor to measure the surrounding air
LoRa Ra-02 SX1278
- A long-range transceiver module based on the SX1278
- Operates at 433MHz and capable of transmitting data over long distances
ESP8266 NodeMCU
- A low-cost Wi-Fi microchip with full TCP/IP stack and microcontroller capability
- Used for Wi-Fi communication and internet connectivity
MQ2
- A gas sensor used for detecting a variety of gases including LPG, smoke, and alcohol vapor
- Has both digital and analog outputs
Flow Rate Sensor
- Measures the rate of fluid flow
- Typically used in irrigation systems, water conservation systems, etc.
PH Meter
- Measures the acidity or alkalinity of a solution
- Important for environmental monitoring and chemical analysis
Wiring Details
Arduino 101
3V3connected to ESP8266 NodeMCU3V3and LoRa Ra-02 SX12783.3VGNDconnected to PH MeterGND5Vconnected to PH MeterVCCD7connected to DHT11 Sensor V2DATD13/SCK,D12/MISO,D11 PWM/MOSI,D10 PWM/SSconnected to corresponding SPI pins on LoRa Ra-02 SX1278D9 PWMconnected to LoRa Ra-02 SX1278RSTD8connected to LoRa Ra-02 SX1278DI00D6 PWMconnected to MQ2DOUTD5 PWMconnected to Flow Rate SensorDigital pinD1/TXconnected to ESP8266 NodeMCURXD0/RXconnected to ESP8266 NodeMCUTXA0connected to MQ2AOUTA2connected to PH MeterSignal
DHT11 Sensor V2
GNDconnected to common ground netVCCconnected to common VCC net
LoRa Ra-02 SX1278
GNDconnected to common ground net- SPI pins connected to corresponding Arduino 101 pins
ESP8266 NodeMCU
GNDconnected to common ground net3V3connected to Arduino 1013V3
MQ2
GNDconnected to common ground netVCCconnected to common VCC netAOUTconnected to Arduino 101A0DOUTconnected to Arduino 101D6 PWM
Flow Rate Sensor
GNDconnected to common ground netPositiveconnected to common VCC netDigital pinconnected to Arduino 101D5 PWM
PH Meter
GNDconnected to common ground netVCCconnected to Arduino 1015VSignalconnected to Arduino 101A2
Documented Code
Arduino 101 Code
#include <Wire.h>
#include <LiquidCrystal_I2C.h>
#include <Adafruit_Sensor.h>
#include <DHT.h>
#include <RTClib.h>
#include <SPI.h>
#include <LoRa.h>
#include <SoftwareSerial.h>

// LCD Setup
LiquidCrystal_I2C lcd(0x27, 16, 2);

// DHT Sensor Setup
#define DHTPIN 7
#define DHTTYPE DHT11
DHT dht(DHTPIN, DHTTYPE);

// Dust Sensor Setup
#define measurePin A0
#define ledPower 7
int samplingTime = 280;
int deltaTime = 40;
int sleepTime = 9680;
float voMeasured = 0;
float calcVoltage = 0;
float dustDensity = 0;

// RTC Setup
RTC_DS1307 rtc;

// LoRa and ESP8266 Setup
#define NSS  10
#define RST  9
#define DIO0 8
SoftwareSerial espSerial(0, 1);  // RX, TX for ESP8266

// Buzzer Setup
const int buzzer = 9;

// Variables
int num = 0;

void setup() {
  Serial.begin(115200);

  // LCD Init
  lcd.init();
  lcd.backlight();

  // DHT Init
  dht.begin();

  // RTC Init
  if (!rtc.begin()) {
    Serial.println("Couldn't find RTC");
    while (1);
  }

  // LoRa Init
  LoRa.setPins(NSS, RST, DIO0);
  if (!LoRa.begin(433E6)) {
    Serial.println("Starting LoRa failed!");
    while (1);
  }

  // ESP8266 Init
  espSerial.begin(9600);

  // Buzzer Init
  pinMode(buzzer, OUTPUT);

  // Dust Sensor Init
  pinMode(ledPower, OUTPUT);

  // Initial Display on LCD
  lcd.setCursor(0, 0);
  lcd.print("System Starting");
  delay(2000);
}

void loop() {
  // Time from RTC
  DateTime now = rtc.now();

  // Temperature and Humidity from DHT
  float h = dht.readHumidity();
  float t = dht.readTemperature();

  // Dust Sensor Reading
  digitalWrite(ledPower, LOW);
  delayMicroseconds(samplingTime);
  voMeasured = analogRead(measurePin);
  delayMicroseconds(deltaTime);
  digitalWrite(ledPower, HIGH);
  delayMicroseconds(sleepTime);
  calcVoltage = voMeasured * (5.0 / 1024.0);
  dustDensity = 170 * calcVoltage - 0.1;

  // Buzzer Alert
  tone(buzzer, 1000);
  delay(1000);
  noTone(buzzer);
  delay(1000);

  // Display on LCD
  lcd.clear();
  lcd.setCursor(0, 0);
  lcd.print("Time: ");
  lcd.print(now.hour());
  lcd.print(":");
  lcd.print(now.minute());
  lcd.print(":");
  lcd.print(now.second());

  lcd.setCursor(0, 1);
  lcd.print("Temp: ");
  lcd.print(t);
  lcd.print(" C");

  lcd.setCursor(0, 2);
  lcd.print("Humidity: ");
  lcd.print(h);
  lcd.print(" %");

  lcd.setCursor(0, 3);
  lcd.print("Dust: ");
  lcd.print(dustDensity);

  // LoRa Communication
  LoRa.beginPacket();
  LoRa.print("Data: Temp=");
  LoRa.print(t);
  LoRa.print(", Humidity=");
  LoRa.print(h);
  LoRa.print(", Dust=");
  LoRa.print(dustDensity);
  LoRa.endPacket();

  // ESP8266 Data Reception
  if (espSerial.available()) {
    String data = espSerial.readString();
    Serial.println("Data from ESP8266: " + data);
  }

  // Update every 2 seconds
  delay(2000);
}
DHT11 Sensor V2 Code
void setup() {
  // put your setup code here, to run once:

}

void loop() {
  // put your main code here, to run repeatedly:

}
(Note: The code for the DHT11 Sensor V2 is a placeholder and does not contain any functional code. It is likely that the actual sensor code is integrated within the Arduino 101 code.)