
Arduino UNO Based Flex Sensor Monitoring System with Bluetooth and I2C LCD Display
View and Edit Project In Cirkit Designer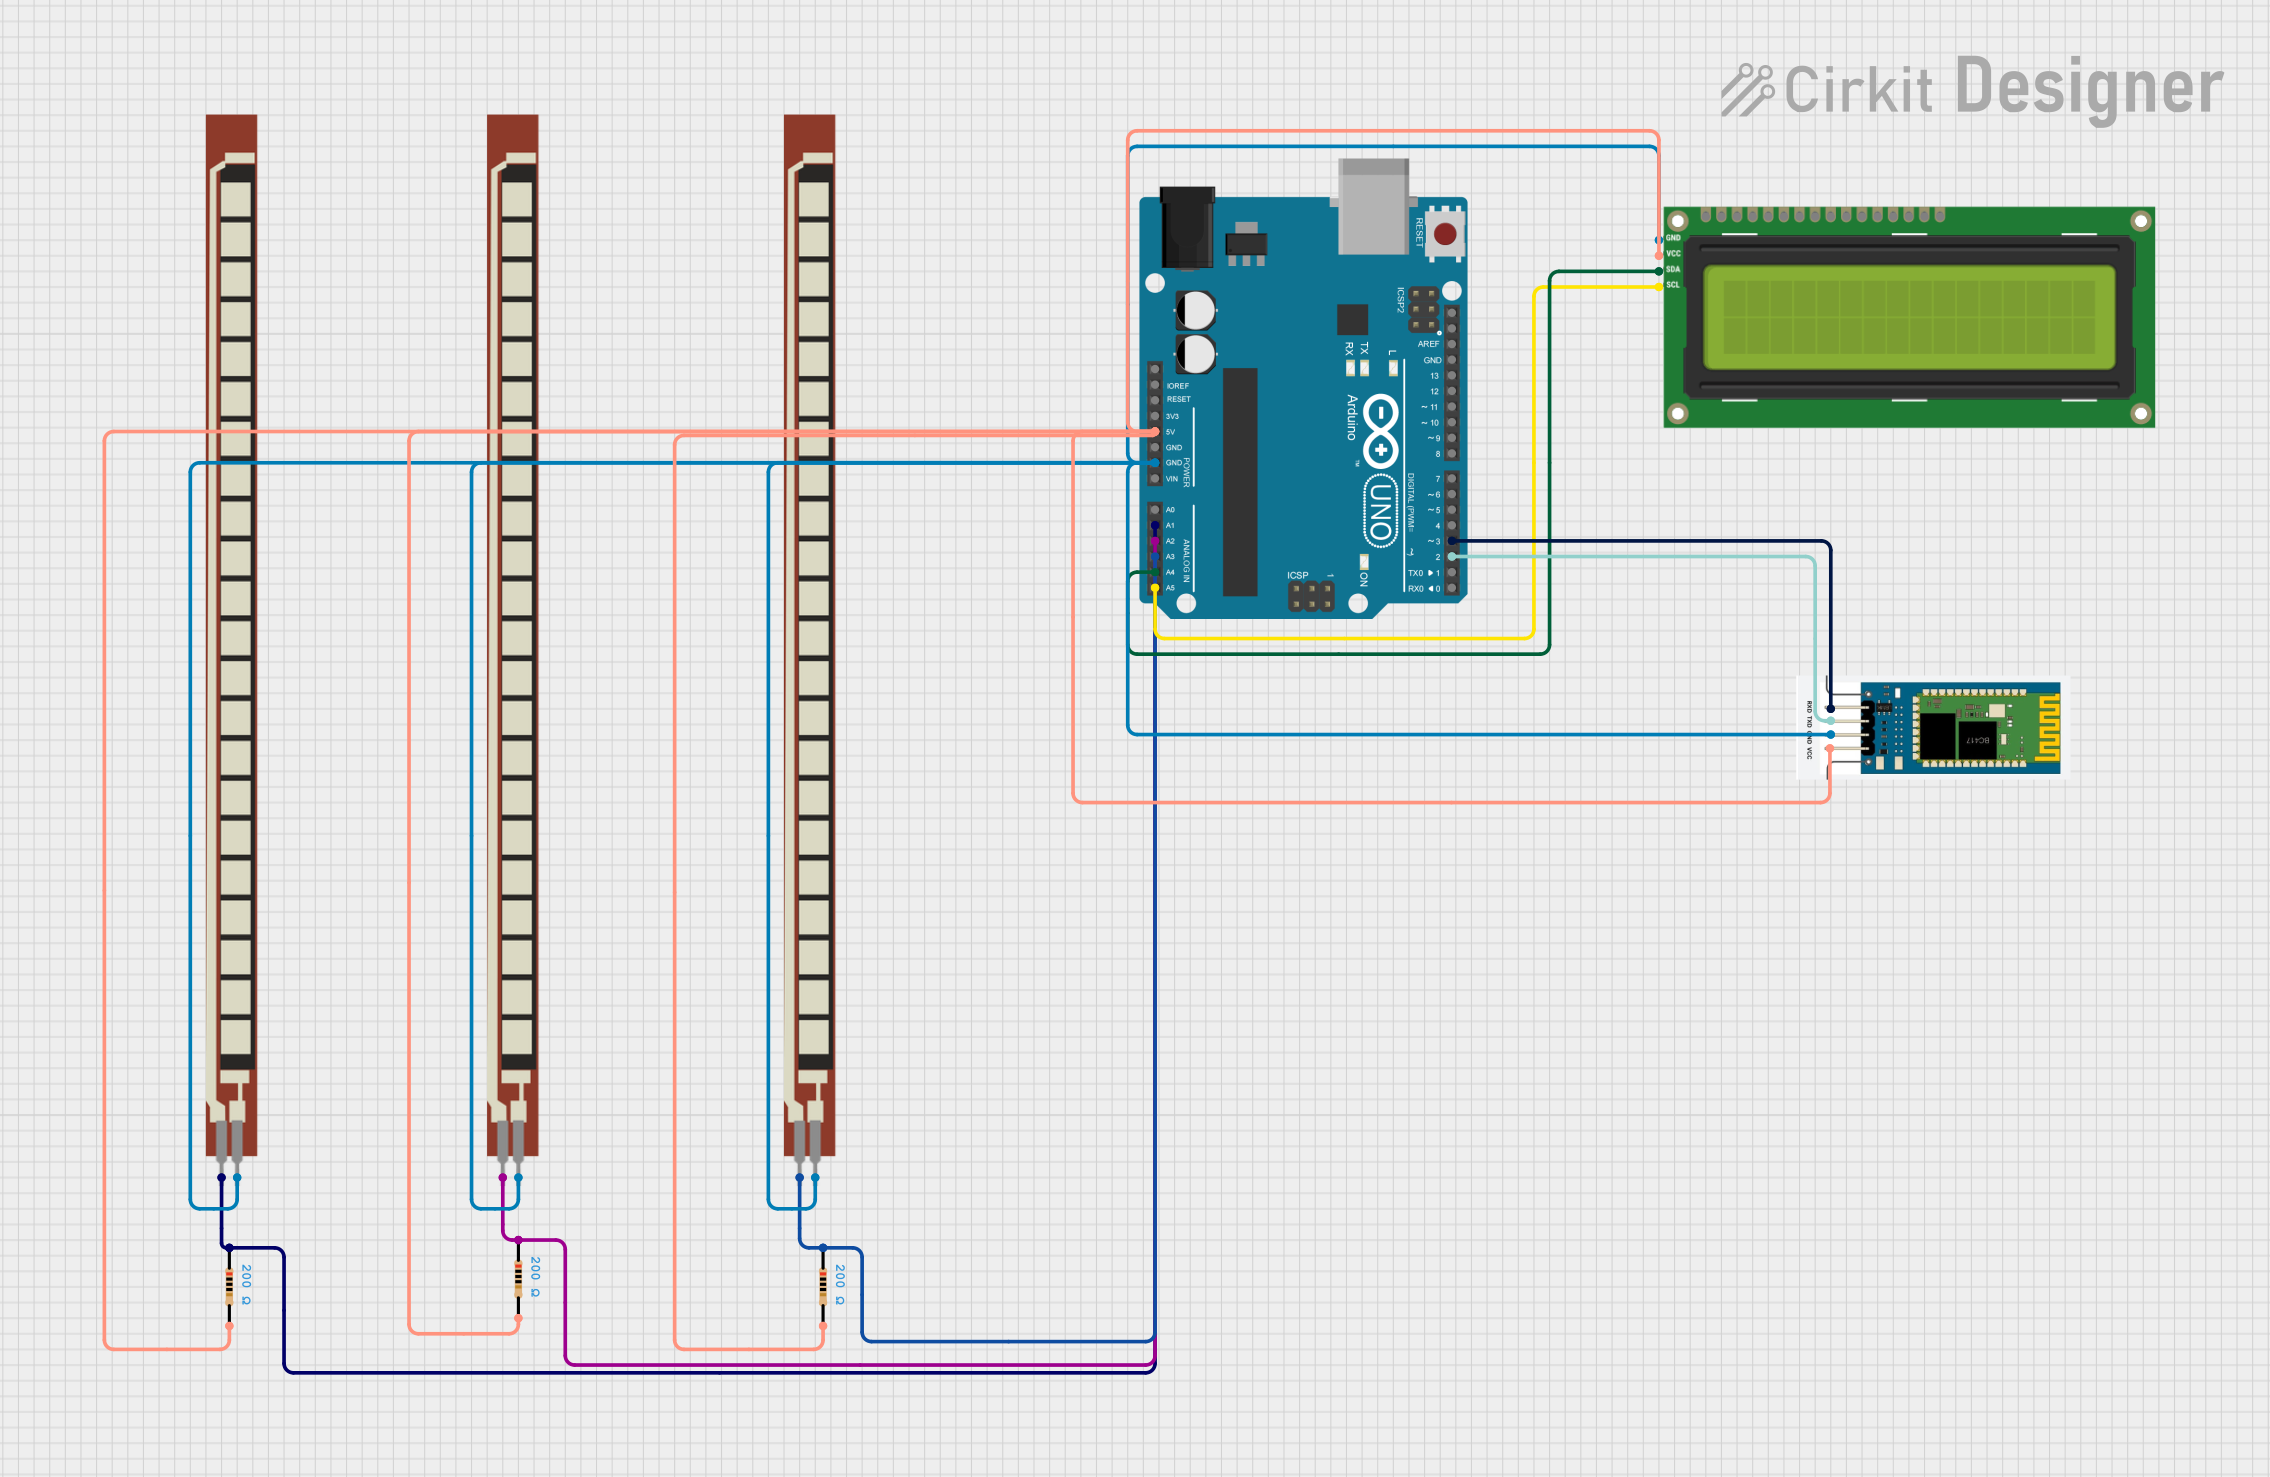
Circuit Documentation
Summary
The circuit in question is designed around an Arduino UNO microcontroller, which interfaces with various components including a Bluetooth module (HC-06), an I2C LCD 16x2 screen, and multiple resistors including three Basic Flex Resistors and three standard resistors. The Arduino UNO is programmed to read analog inputs and control outputs based on these readings, displaying messages on the LCD and communicating via Bluetooth.
Component List
Arduino UNO
- Microcontroller board based on the ATmega328P
- It has 14 digital input/output pins, 6 analog inputs, a USB connection, a power jack, an ICSP header, and a reset button.
Basic Flex Resistor
- A flexible sensor that changes resistance as it is bent.
HC-06
- A Bluetooth module that allows for wireless communication.
Resistor (200 Ohms)
- A passive two-terminal electrical component that implements electrical resistance as a circuit element.
I2C LCD 16x2 Screen
- A liquid crystal display capable of displaying 16 characters per line across 2 lines, with an I2C interface for communication.
Wiring Details
Arduino UNO
- 5V: Connected to the VCC of HC-06, VCC of I2C LCD, and pin 2 of a 200 Ohm resistor.
- GND: Connected to the GND of HC-06, GND of I2C LCD, and Pin 2 of all Basic Flex Resistors.
- A1: Connected to pin 1 of a Basic Flex Resistor and pin 1 of a 200 Ohm resistor.
- A2: Connected to pin 1 of a Basic Flex Resistor and pin 1 of a 200 Ohm resistor.
- A3: Connected to pin 1 of a Basic Flex Resistor and pin 1 of a 200 Ohm resistor.
- A4: Connected to SDA of I2C LCD 16x2 Screen.
- A5: Connected to SCL of I2C LCD 16x2 Screen.
- D2: Connected to TXD of HC-06.
- D3: Connected to RXD of HC-06.
Basic Flex Resistor
- Pin 1: Connected to an analog input on the Arduino UNO (A1, A2, or A3).
- Pin 2: Connected to GND on the Arduino UNO.
HC-06
- VCC: Connected to 5V on the Arduino UNO.
- GND: Connected to GND on the Arduino UNO.
- TXD: Connected to D2 on the Arduino UNO.
- RXD: Connected to D3 on the Arduino UNO.
Resistor (200 Ohms)
- Pin 1: Connected to an analog input on the Arduino UNO (A1, A2, or A3).
- Pin 2: Connected to 5V on the Arduino UNO.
I2C LCD 16x2 Screen
- SDA: Connected to A4 on the Arduino UNO.
- SCL: Connected to A5 on the Arduino UNO.
- VCC (5V): Connected to 5V on the Arduino UNO.
- GND: Connected to GND on the Arduino UNO.
Documented Code
#include "SoftwareSerial.h"
#include <LiquidCrystal_I2C.h>
#include <SoftwareSerial.h>
SoftwareSerial mySerial(3, 2); // RX, TX
LiquidCrystal_I2C lcd(0x27, 16, 2); // I2C address, 16 columns, 2 rows

// Define LED pins
#define blue 2
#define green 3
#define red 4

// Variables for sensor readings
unsigned int f;
unsigned int g;
unsigned int h;

void setup() {
  // Set LED pins as outputs
  pinMode(blue, OUTPUT);
  pinMode(green, OUTPUT);
  pinMode(red, OUTPUT);

  // Initialize serial communication
  Serial.begin(9600);
  mySerial.begin(9600);

  // Initialize LCD
  lcd.init();
  lcd.backlight();
  lcd.setCursor(0, 0);
  lcd.print("  Welcome To");
  lcd.setCursor(0, 1);
  lcd.print("JustDoElectronic");
  lcd.clear();
  delay(3000);
}

void loop() {
  // Read analog values from flex sensors
  f = analogRead(1);
  g = analogRead(2);
  h = analogRead(3);

  // Check sensor values and act accordingly
  if (f <= 722) {
    digitalWrite(blue, HIGH);
    digitalWrite(green, LOW);
    digitalWrite(red, LOW);
    mySerial.println("Plz Give Me Water");
    lcd.clear();
    lcd.setCursor(0, 0);
    lcd.print("  Plz Give Me");
    lcd.setCursor(0, 1);
    lcd.print("     Water   ");
    delay(3000);
    lcd.clear();
    lcd.setCursor(0, 0);
    lcd.print(" If Anything");
    lcd.setCursor(0, 1);
    lcd.print("  You Want ");
  }
  else if (g <= 670) {
    digitalWrite(green, HIGH);
    digitalWrite(blue, LOW);
    digitalWrite(red, LOW);
    mySerial.println("Plz Give Me Food");
    lcd.clear();
    lcd.setCursor(0, 0);
    lcd.print("  Plz Give Me ");
    lcd.setCursor(0, 1);
    lcd.print("     Food   ");
    delay(3000);
    lcd.clear();
    lcd.setCursor(0, 0);
    lcd.print(" If Anything");
    lcd.setCursor(0, 1);
    lcd.print("  You Want ");
  }
  else if (h <= 675) {
    digitalWrite(green, HIGH);
    digitalWrite(blue, LOW);
    digitalWrite(red, LOW);
    mySerial.println("Plz Give Me Tea");
    lcd.clear();
    lcd.setCursor(0, 0);
    lcd.print("  Plz Give Me");
    lcd.setCursor(0, 1);
    lcd.print("     Tea   ");
    delay(3000);
    lcd.clear();
    lcd.setCursor(0, 0);
    lcd.print(" If Anything");
    lcd.setCursor(0, 1);
    lcd.print("  You Want ");
  }
  else {
    // No action required
  }
  delay(200);
}
This code is designed to read sensor inputs and display messages on the LCD screen as well as send messages via Bluetooth depending on the sensor values. It also controls three LEDs, presumably for visual indication.