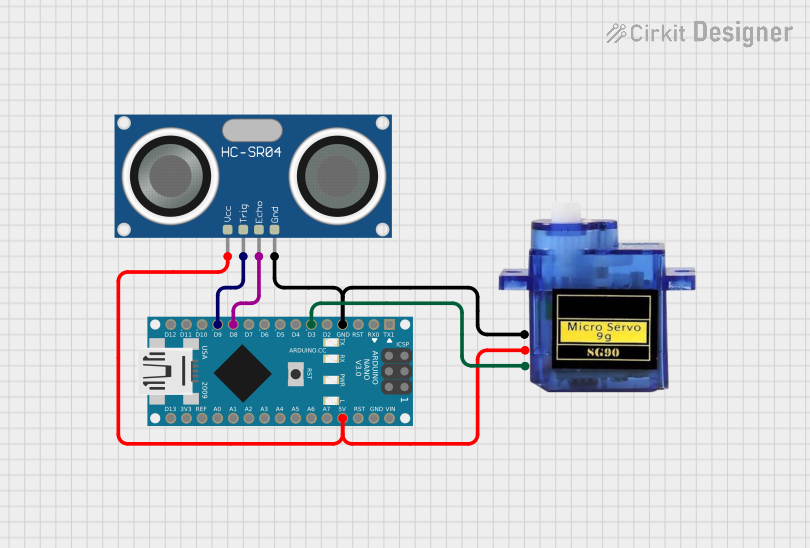
Arduino Nano-Controlled Servo with Ultrasonic Distance Sensing

Circuit Documentation
Summary of the Circuit
This circuit integrates an Arduino Nano microcontroller with a Micro servo 9G and an HC-SR04 Ultrasonic Sensor. The Arduino Nano serves as the central processing unit, controlling the servo's position based on input from the ultrasonic sensor. The ultrasonic sensor is used to measure distance by emitting ultrasonic waves and measuring the time it takes for the echo to return. The servo motor is controlled via PWM (Pulse Width Modulation) signals from the Arduino Nano, which allows for precise control over the servo's position.
Component List
Arduino Nano
- Description: A compact microcontroller board based on the ATmega328P.
- Pins: D1/TX, D0/RX, RESET, GND, D2, D3, D4, D5, D6, D7, D8, D9, D10, D11/MOSI, D12/MISO, VIN, 5V, A7, A6, A5, A4, A3, A2, A1, A0, AREF, 3V3, D13/SCK.
Micro servo 9G
- Description: A small and lightweight servo motor suitable for projects requiring simple motion.
- Pins: GND, +5V, PWM.
HC-SR04 Ultrasonic Sensor
- Description: An ultrasonic distance sensor capable of measuring distances from 2cm to 400cm.
- Pins: VCC, TRIG, ECHO, GND.
Wiring Details
Arduino Nano
- GND: Connected to GND of Micro servo 9G and HC-SR04 Ultrasonic Sensor.
- D3: Connected to PWM of Micro servo 9G.
- D8: Connected to ECHO of HC-SR04 Ultrasonic Sensor.
- D9: Connected to TRIG of HC-SR04 Ultrasonic Sensor.
- 5V: Connected to +5V of Micro servo 9G and VCC of HC-SR04 Ultrasonic Sensor.
Micro servo 9G
- GND: Connected to GND of Arduino Nano.
- +5V: Connected to 5V of Arduino Nano.
- PWM: Connected to D3 of Arduino Nano.
HC-SR04 Ultrasonic Sensor
- GND: Connected to GND of Arduino Nano.
- VCC: Connected to 5V of Arduino Nano.
- TRIG: Connected to D9 of Arduino Nano.
- ECHO: Connected to D8 of Arduino Nano.
Documented Code
Arduino Nano Code (sketch.ino)
void setup() {
  // put your setup code here, to run once:

}

void loop() {
  // put your main code here, to run repeatedly:

}
Note: The provided code is a template and does not contain any functional code to control the servo or read from the ultrasonic sensor. This will need to be implemented based on the specific requirements of the project.
End of documentation