
Arduino UNO Based Methane Gas Detector with LCD Alert and UV Sanitization Control
View and Edit Project In Cirkit Designer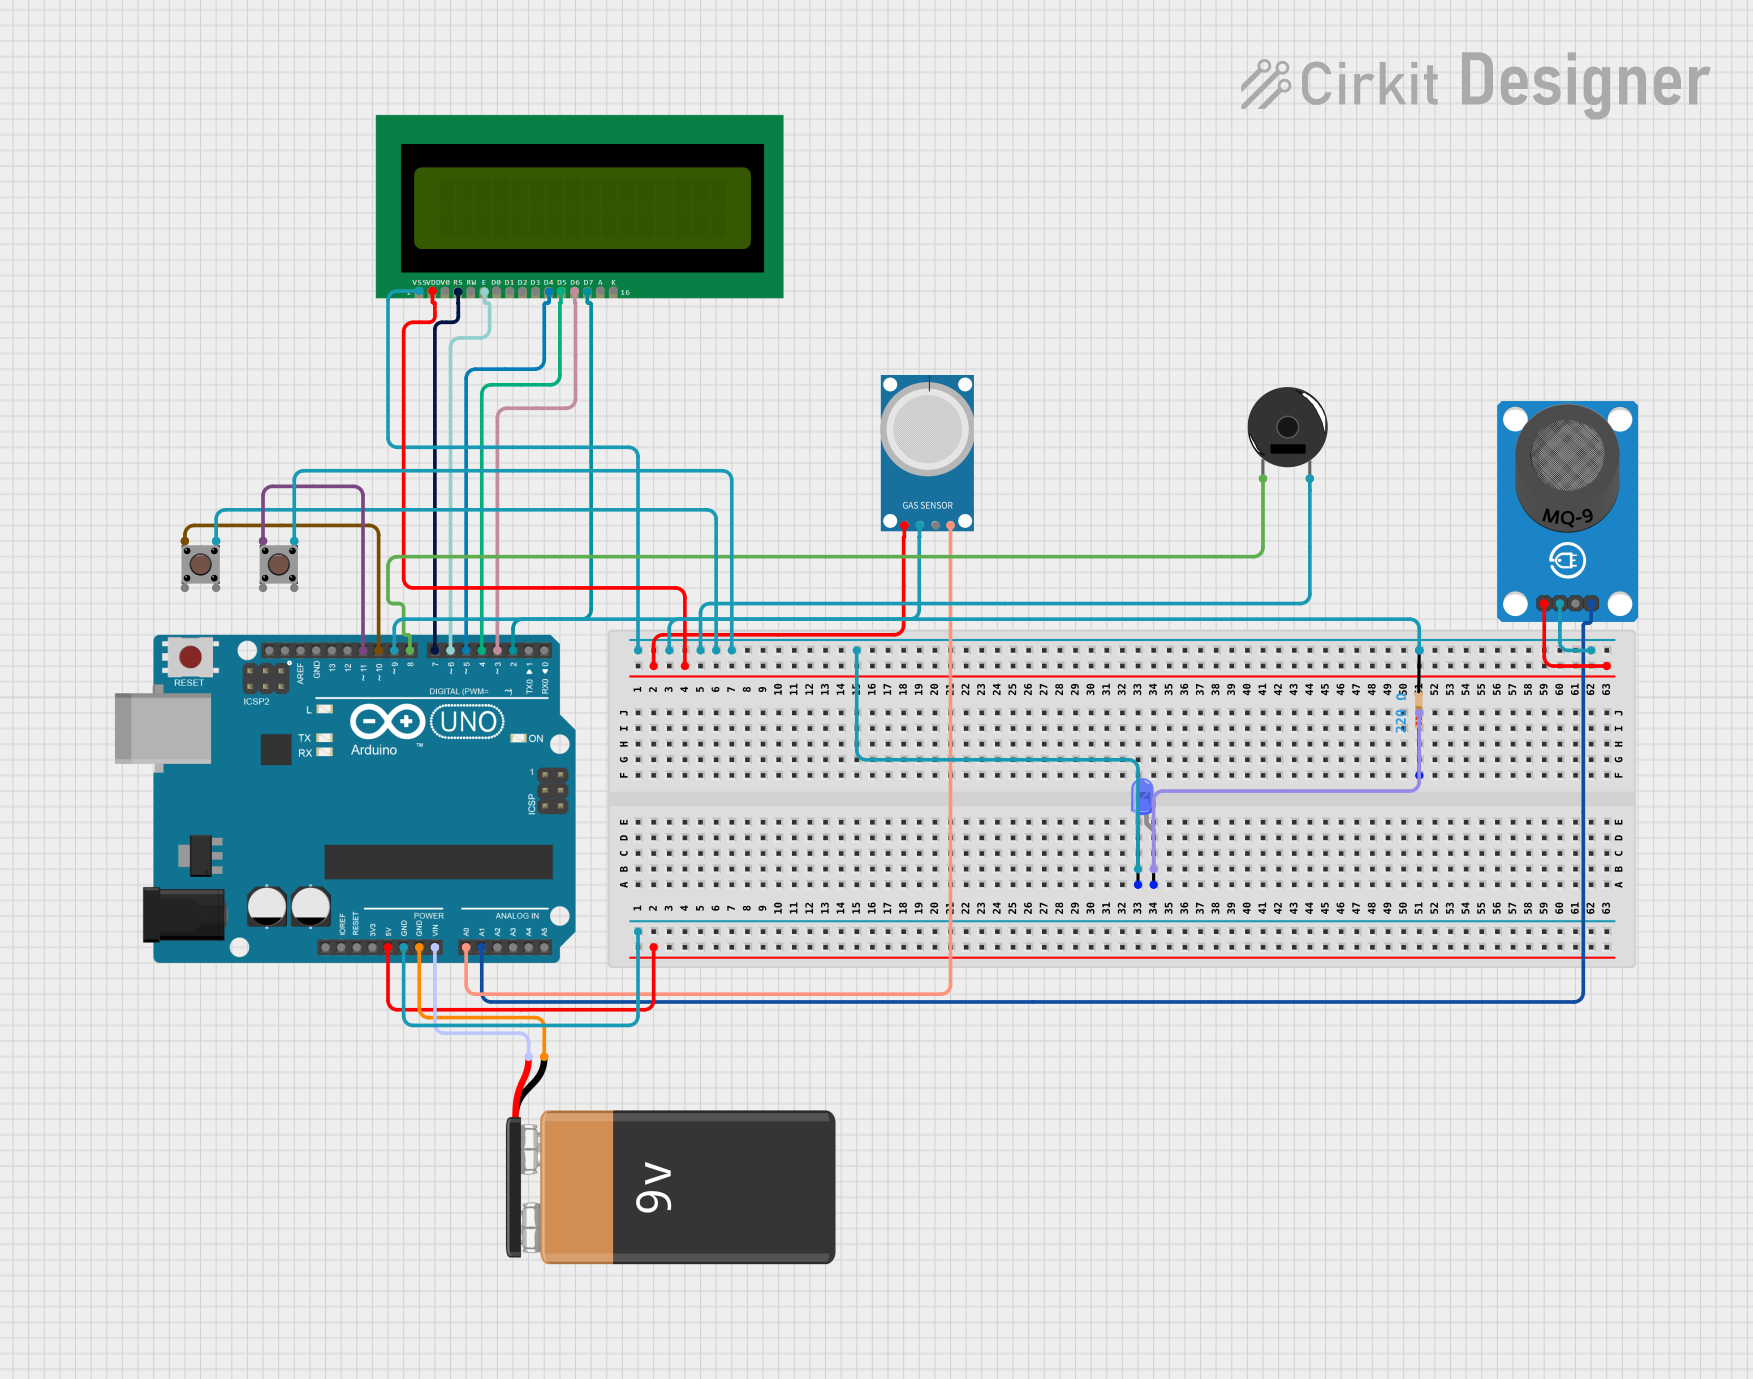
Circuit Documentation
Summary
This circuit is designed to monitor methane gas levels using MQ-4 and MQ-9 sensors. It features an Arduino UNO microcontroller, a piezo buzzer for alarms, a blue LED for indication, two pushbuttons for user interaction, and a 16x2 LCD for displaying messages. The circuit is powered by a 9V battery and includes a resistor for current limiting to the LED. The purpose of the circuit is to detect spoiled food by sensing gas levels and to provide a user interface for activating a UV LED and displaying gas levels.
Component List
Piezo Buzzer
- Description: A buzzer that emits sound when powered.
- Purpose: To alarm when gas levels exceed a certain threshold.
LED: Two Pin (blue)
- Description: A blue light-emitting diode.
- Purpose: To indicate when the UV LED is activated for sanitization.
Pushbutton
- Description: A momentary switch that closes the circuit when pressed.
- Purpose: One button is used to activate the UV LED, and the other to display gas levels on the LCD.
MQ-4 Gas Sensor
- Description: A sensor for detecting methane gas concentrations.
- Purpose: To monitor gas levels that could indicate spoiled food.
MQ-9 Gas Sensor
- Description: A sensor for detecting carbon monoxide and flammable gases.
- Purpose: To assist in monitoring gas levels alongside the MQ-4 sensor.
Arduino UNO
- Description: A microcontroller board based on the ATmega328P.
- Purpose: To control the sensors, buzzer, LED, and LCD based on the programmed logic.
16X2 LCD
- Description: A liquid crystal display capable of showing 16 characters per 2 lines.
- Purpose: To display messages such as "SAFE" or "Spoiled Food" and gas levels.
9V Battery
- Description: A standard 9V battery.
- Purpose: To provide power to the circuit.
Resistor
- Description: A passive two-terminal electrical component that implements electrical resistance.
- Value: 220 Ohms
- Purpose: To limit the current flowing through the blue LED.
Wiring Details
Piezo Buzzer
- Pin 1: Connected to Arduino UNO pin D8.
- Pin 2: Connected to the ground net.
LED: Two Pin (blue)
- Anode: Connected to the resistor (220 Ohms).
- Cathode: Connected to the ground net.
Pushbutton (Button1)
- Pin 1 (in): Connected to Arduino UNO pin D10.
- Pin 3 (out): Connected to the ground net.
Pushbutton (Button2)
- Pin 1 (in): Connected to Arduino UNO pin D11.
- Pin 3 (out): Connected to the ground net.
MQ-4 Gas Sensor
- A0: Connected to Arduino UNO pin A0.
- D0: Not connected.
- GND: Connected to the ground net.
- VCC: Connected to the 5V net.
MQ-9 Gas Sensor
- AO: Connected to Arduino UNO pin A1.
- DO: Not connected.
- GND: Connected to the ground net.
- VCC: Connected to the 5V net.
Arduino UNO
- A0: Connected to MQ-4 pin A0.
- A1: Connected to MQ-9 pin AO.
- D2-D7: Connected to 16X2 LCD pins D7-D2 respectively.
- D8: Connected to Piezo Buzzer pin 1.
- D10: Connected to Pushbutton (Button1) pin 1 (in).
- D11: Connected to Pushbutton (Button2) pin 1 (in).
- 5V: Connected to the 5V net.
- GND: Connected to the ground net.
- Vin: Connected to the 9V battery positive terminal.
16X2 LCD
- VSS: Connected to the ground net.
- VDD: Connected to the 5V net.
- RS: Connected to Arduino UNO pin D7.
- RW: Not connected.
- E: Connected to Arduino UNO pin D6.
- D0-D7: Connected to Arduino UNO pins D2-D5 respectively.
- A: Not connected.
- K: Not connected.
9V Battery
- +: Connected to Arduino UNO Vin.
- -: Connected to the ground net.
Resistor (220 Ohms)
- Pin 1: Connected to LED anode.
- Pin 2: Connected to the ground net.
Documented Code
Arduino UNO Code (sketch.ino)
#include <LiquidCrystal.h>

/*
 * This Arduino sketch monitors methane gas levels using MQ-4 and MQ-9 sensors.
 * If gas levels exceed a threshold, a buzzer alarms and the LCD displays
 * "Spoiled Food". Two buttons are used: one to activate a UV LED for 10
 * seconds to sanitize the food, and another to display gas levels on the LCD.
 * The LCD initially displays "SAFE" when either button is pressed.
 */

// Pin definitions
const int MQ4_Pin = A0;
const int MQ9_Pin = A1;
const int Buzzer_Pin = 8;
const int UVLED_Pin = 9;
const int Button1_Pin = 10;
const int Button2_Pin = 11;
const int threshold = 300; // Example threshold value

LiquidCrystal lcd(7, 6, 5, 4, 3, 2);

void setup() {
  // Initialize the LCD and print "SAFE"
  lcd.begin(16, 2);
  lcd.print("SAFE");

  // Set pin modes
  pinMode(MQ4_Pin, INPUT);
  pinMode(MQ9_Pin, INPUT);
  pinMode(Buzzer_Pin, OUTPUT);
  pinMode(UVLED_Pin, OUTPUT);
  pinMode(Button1_Pin, INPUT_PULLUP);
  pinMode(Button2_Pin, INPUT_PULLUP);
}

void loop() {
  // Read gas levels
  int gasLevel_MQ4 = analogRead(MQ4_Pin);
  int gasLevel_MQ9 = analogRead(MQ9_Pin);

  // Check for spoiled food
  if (gasLevel_MQ4 > threshold || gasLevel_MQ9 > threshold) {
    digitalWrite(Buzzer_Pin, HIGH);
    lcd.clear();
    lcd.print("Spoiled Food");
  } else {
    digitalWrite(Buzzer_Pin, LOW);
  }

  // Check if Button1 is pressed for UV LED
  if (digitalRead(Button1_Pin) == LOW) {
    lcd.clear();
    lcd.print("SAFE");
    delay(2000);
    lcd.clear();
    lcd.print("Sanitizing...");
    digitalWrite(UVLED_Pin, HIGH);
    delay(10000);  // UV LED on for 10 seconds
    digitalWrite(UVLED_Pin, LOW);
    lcd.clear();
  }

  // Check if Button2 is pressed for gas level display
  if (digitalRead(Button2_Pin) == LOW) {
    lcd.clear();
    lcd.print("SAFE");
    delay(2000);
    lcd.clear();
    lcd.print("Gas Level:");
    lcd.setCursor(0, 1);
    lcd.print("MQ4: ");
    lcd.print(gasLevel_MQ4);
    lcd.print(" MQ9: ");
    lcd.print(gasLevel_MQ9);

    if (gasLevel_MQ4 <= threshold && gasLevel_MQ9 <= threshold) {
      lcd.setCursor(0, 1);
      lcd.print("Food appears to be fresh");
    }
    delay(5000);  // Display the gas levels for 5 seconds
    lcd.clear();
  }
}
16X2 LCD Code (sketch.ino)
void setup() {
  // put your setup code here, to run once:

}

void loop() {
  // put your main code here, to run repeatedly:

}
Note: The code for the 16X2 LCD is minimal and does not include any specific functionality. It is likely that the LCD is controlled entirely by the Arduino UNO.
Additional Documentation (documentation.txt)
No additional documentation provided.