
Circuit Documentation
Summary
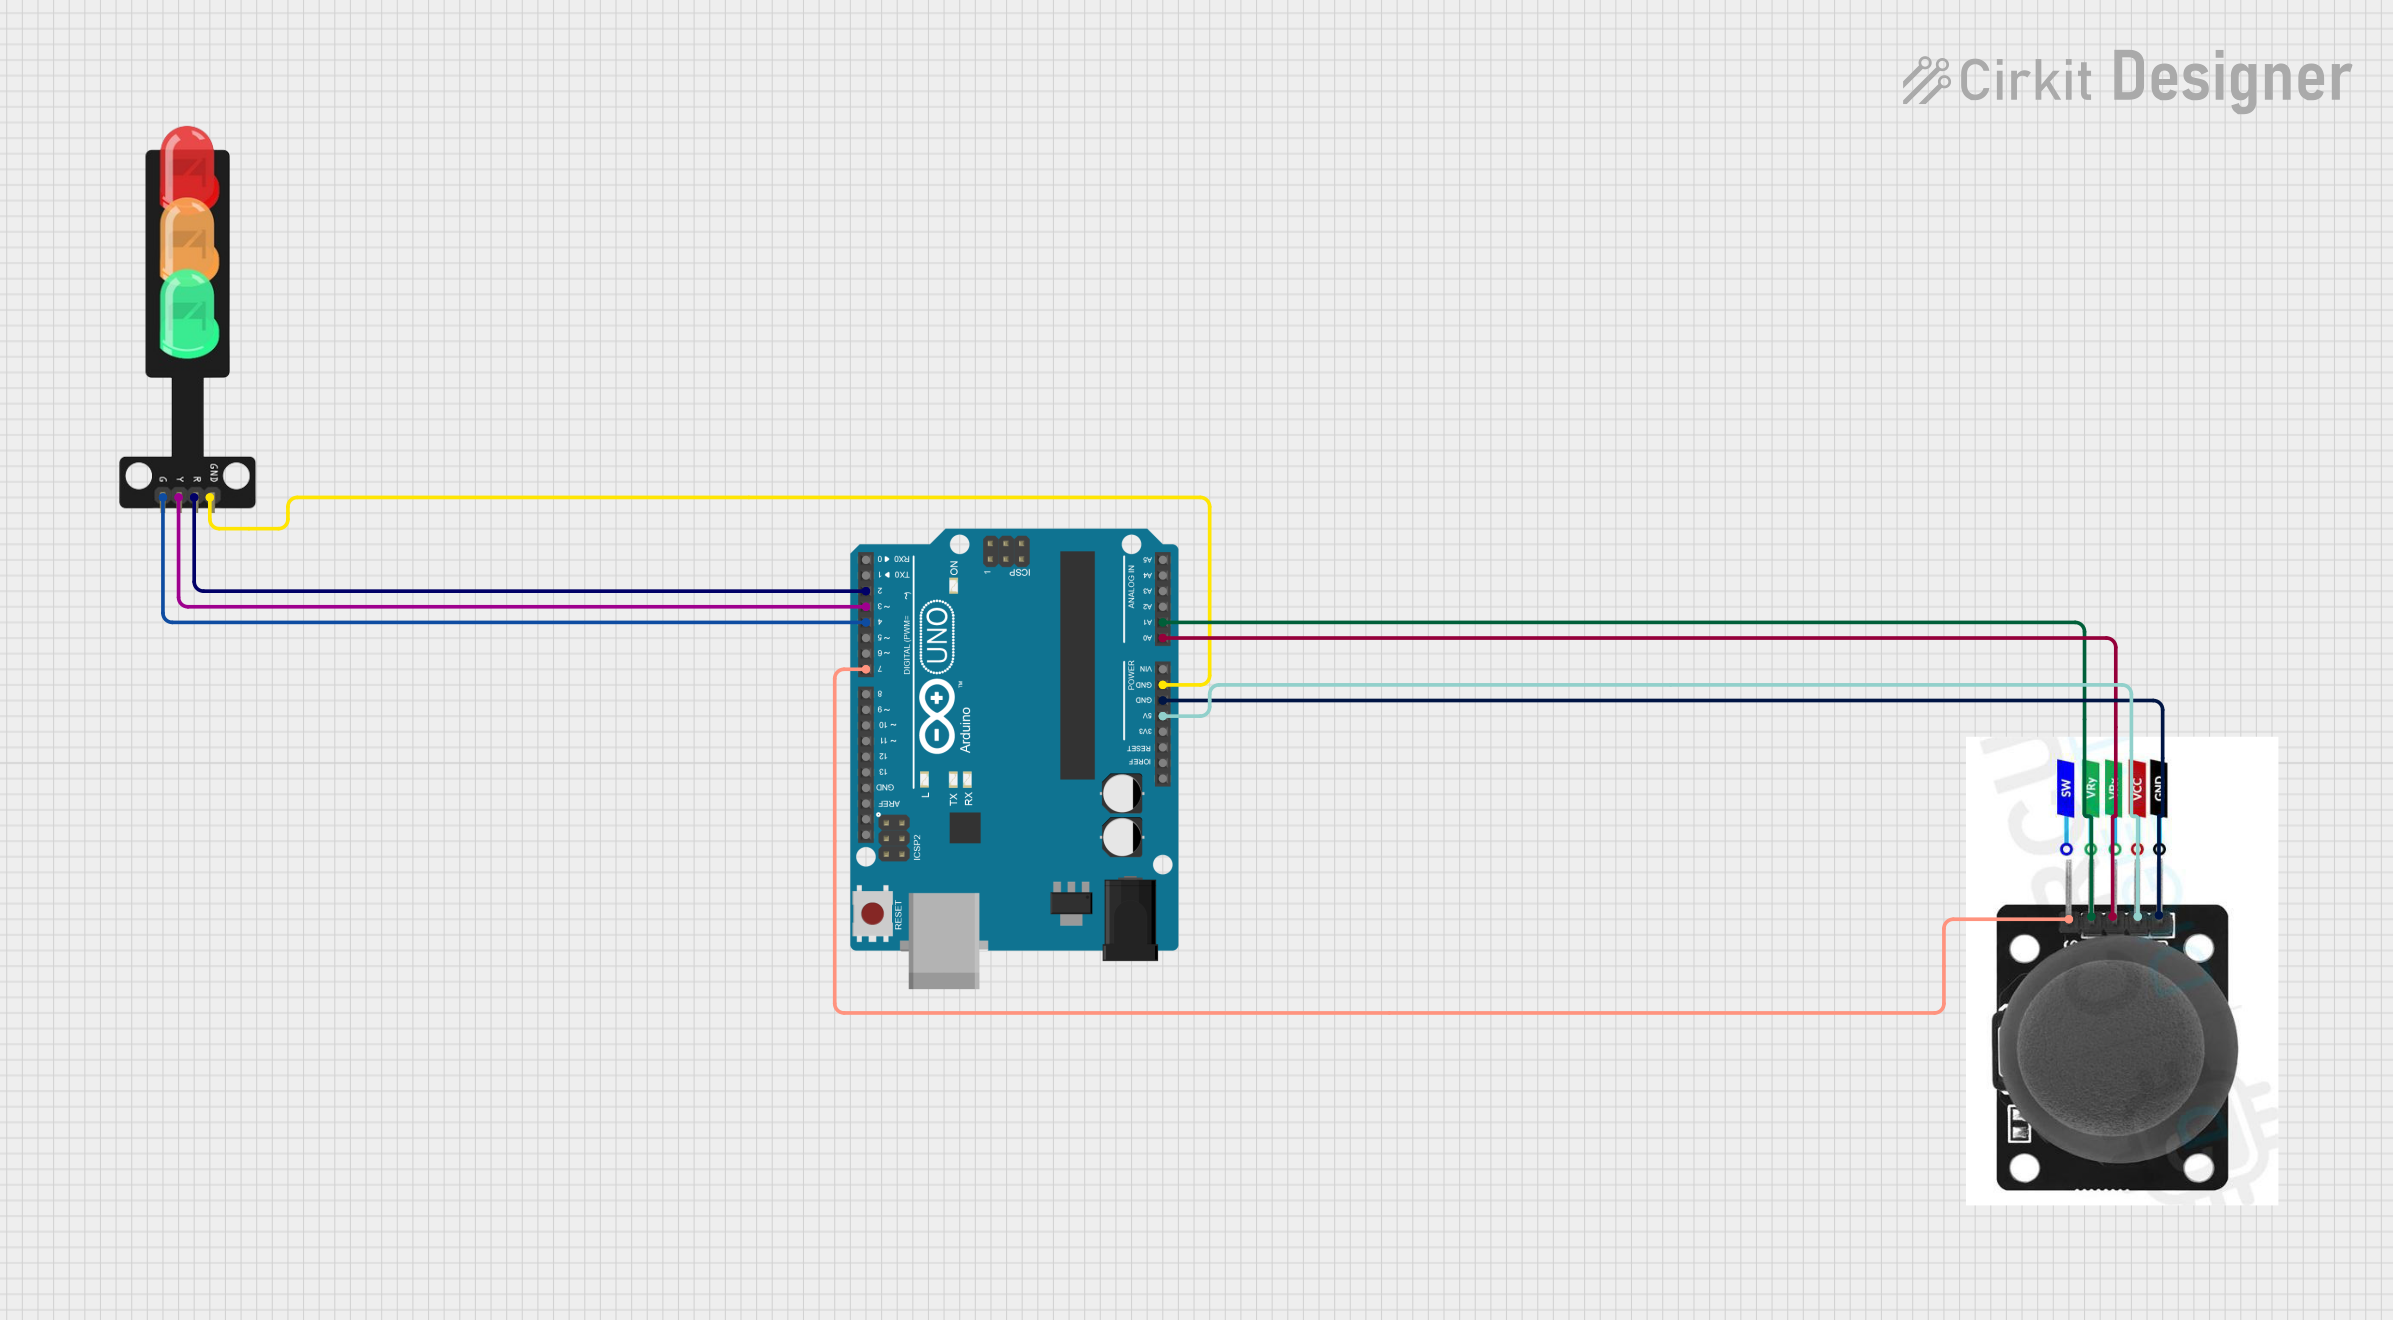
This circuit is designed to control a traffic light using an Arduino UNO microcontroller and a joystick module. The traffic light has three LEDs (red, yellow, and green) that are controlled by the joystick's position. The joystick's vertical and horizontal movements are used to switch between the LEDs, simulating a traffic light system.
Component List
Arduino UNO
- Description: A microcontroller board based on the ATmega328P.
- Pins: UNUSED, IOREF, Reset, 3.3V, 5V, GND, Vin, A0-A5, SCL, SDA, AREF, D0-D13.
- Purpose: Acts as the central processing unit for the circuit, reading joystick inputs and controlling the traffic light LEDs.
Joystick Module
- Description: An input device that provides two analog signals (VRX and VRY) and one digital signal (SW) corresponding to the X and Y positions and the press status of the joystick.
- Pins: SW, VRY, VRX, VCC, GND.
- Purpose: To provide user input for controlling the traffic light LEDs.
Traffic Light
- Description: A module with three LEDs representing a traffic light.
- Pins: Green, Yellow, Red, GND.
- Purpose: To display the traffic light status based on the joystick input.
Wiring Details
Arduino UNO
- 5V connected to Joystick Module VCC.
- GND connected to Joystick Module GND and Traffic Light GND.
- A0 connected to Joystick Module VRX.
- A1 connected to Joystick Module VRY.
- D2 connected to Traffic Light Red.
- D3 connected to Traffic Light Yellow.
- D4 connected to Traffic Light Green.
- D7 connected to Joystick Module SW (not used in the current code).
Joystick Module
- VCC connected to Arduino UNO 5V.
- GND connected to Arduino UNO GND.
- VRX connected to Arduino UNO A0.
- VRY connected to Arduino UNO A1.
- SW connected to Arduino UNO D7 (not used in the current code).
Traffic Light
- Green connected to Arduino UNO D4.
- Yellow connected to Arduino UNO D3.
- Red connected to Arduino UNO D2.
- GND connected to Arduino UNO GND.
Documented Code
/*
 * This Arduino sketch controls a traffic light using a joystick module.
 * - Moving the joystick up turns on the red LED.
 * - Moving the joystick left turns on the yellow LED.
 * - Moving the joystick right turns on the green LED.
 * - Moving the joystick down turns on all LEDs.
 */

const int redLED = 2;      // Pin connected to the red LED of the traffic light
const int yellowLED = 3;   // Pin connected to the yellow LED of the traffic light
const int greenLED = 4;    // Pin connected to the green LED of the traffic light
const int joyX = A0;       // Analog pin connected to the X-axis of the joystick
const int joyY = A1;       // Analog pin connected to the Y-axis of the joystick

void setup() {
  pinMode(redLED, OUTPUT);    // Set the red LED pin as an output
  pinMode(yellowLED, OUTPUT); // Set the yellow LED pin as an output
  pinMode(greenLED, OUTPUT);  // Set the green LED pin as an output
  pinMode(joyX, INPUT);       // Set the joystick X-axis pin as an input
  pinMode(joyY, INPUT);       // Set the joystick Y-axis pin as an input
}

void loop() {
  int xValue = analogRead(joyX); // Read the value from the joystick X-axis
  int yValue = analogRead(joyY); // Read the value from the joystick Y-axis

  if (yValue < 300) { // Joystick moved up
    digitalWrite(redLED, HIGH);    // Turn on the red LED
    digitalWrite(yellowLED, LOW);  // Turn off the yellow LED
    digitalWrite(greenLED, LOW);   // Turn off the green LED
  } else if (xValue < 300) { // Joystick moved left
    digitalWrite(redLED, LOW);     // Turn off the red LED
    digitalWrite(yellowLED, HIGH); // Turn on the yellow LED
    digitalWrite(greenLED, LOW);   // Turn off the green LED
  } else if (xValue > 700) { // Joystick moved right
    digitalWrite(redLED, LOW);     // Turn off the red LED
    digitalWrite(yellowLED, LOW);  // Turn off the yellow LED
    digitalWrite(greenLED, HIGH);  // Turn on the green LED
  } else if (yValue > 700) { // Joystick moved down
    digitalWrite(redLED, HIGH);    // Turn on the red LED
    digitalWrite(yellowLED, HIGH); // Turn on the yellow LED
    digitalWrite(greenLED, HIGH);  // Turn on the green LED
  } else { // Joystick in neutral position
    digitalWrite(redLED, LOW);     // Turn off the red LED
    digitalWrite(yellowLED, LOW);  // Turn off the yellow LED
    digitalWrite(greenLED, LOW);   // Turn off the green LED
  }
  delay(100); // Small delay for debounce
}
This code is designed to be uploaded to the Arduino UNO microcontroller. It reads the analog values from the joystick module and controls the traffic light LEDs accordingly. The joystick's vertical and horizontal movements are mapped to specific traffic light states, with a debounce delay to ensure stable operation.