
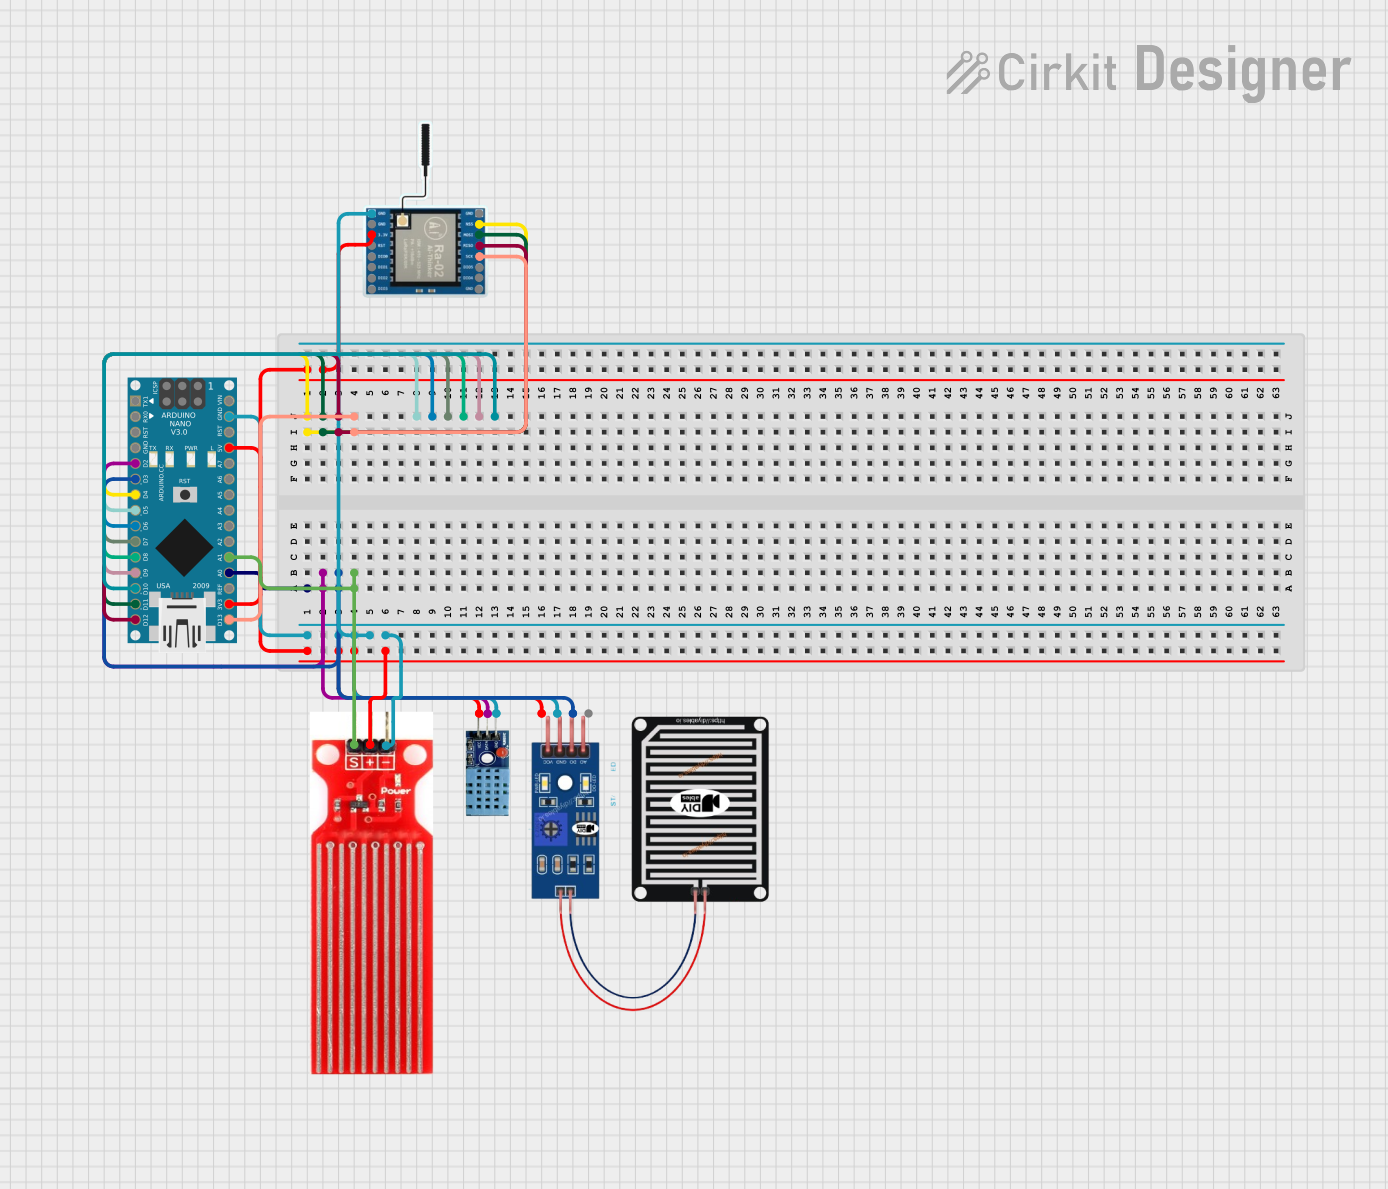
Circuit Documentation
Summary
This document provides a detailed overview of a sensor-based circuit utilizing an Arduino Nano microcontroller. The circuit integrates various sensors including a DHT11 temperature and humidity sensor, a rain sensor, a water sensor, and a LoRa Ra-02 SX1278 module for wireless communication. The Arduino Nano reads data from the sensors and displays it on an LCD screen, while also transmitting the data via LoRa.
Component List
Arduino Nano
- Description: A small, complete, and breadboard-friendly board based on the ATmega328P.
- Pins: D1/TX, D0/RX, RESET, GND, D2, D3, D4, D5, D6, D7, D8, D9, D10, D11/MOSI, D12/MISO, VIN, 5V, A7, A6, A5, A4, A3, A2, A1, A0, AREF, 3V3, D13/SCK
DHT11
- Description: A basic, low-cost digital temperature and humidity sensor.
- Pins: VCC, GND, DATA
Rain Sensor
- Description: A sensor used to detect the presence of rain.
- Pins: AO, DO, GRD, VCC
LoRa Ra-02 SX1278
- Description: A long-range transceiver module for wireless communication.
- Pins: GND, NSS, MOSI, MISO, SCK, D105, DI04, 3.3V, RST, DI00, DI01, D102, DI03
Water Sensor
- Description: A sensor used to detect the presence of water.
- Pins: Signal, VCC, GND
Wiring Details
Arduino Nano
- A0: Connected to nothing.
- D4: Connected to NSS pin of LoRa Ra-02 SX1278.
- D2: Connected to DATA pin of DHT11.
- D11/MOSI: Connected to MOSI pin of LoRa Ra-02 SX1278.
- D3: Connected to DO pin of Rain Sensor.
- D12/MISO: Connected to MISO pin of LoRa Ra-02 SX1278.
- A1: Connected to Signal pin of Water Sensor.
- D13/SCK: Connected to SCK pin of LoRa Ra-02 SX1278.
- 5V: Connected to VCC pins of DHT11, Rain Sensor, and Water Sensor.
- GND: Connected to GND pins of DHT11, Rain Sensor, LoRa Ra-02 SX1278, and Water Sensor.
- 3V3: Connected to 3.3V pin of LoRa Ra-02 SX1278.
DHT11
- VCC: Connected to 5V pin of Arduino Nano.
- GND: Connected to GND pin of Arduino Nano.
- DATA: Connected to D2 pin of Arduino Nano.
Rain Sensor
- DO: Connected to D3 pin of Arduino Nano.
- GRD: Connected to GND pin of Arduino Nano.
- VCC: Connected to 5V pin of Arduino Nano.
LoRa Ra-02 SX1278
- NSS: Connected to D4 pin of Arduino Nano.
- MOSI: Connected to D11/MOSI pin of Arduino Nano.
- MISO: Connected to D12/MISO pin of Arduino Nano.
- SCK: Connected to D13/SCK pin of Arduino Nano.
- GND: Connected to GND pin of Arduino Nano.
- 3.3V: Connected to 3V3 pin of Arduino Nano.
Water Sensor
- Signal: Connected to A1 pin of Arduino Nano.
- VCC: Connected to 5V pin of Arduino Nano.
- GND: Connected to GND pin of Arduino Nano.
Documented Code
#include <LiquidCrystal.h>
#include <DHT.h>
#include <LoRa.h>

// Initialize the LCD library with the numbers of the interface pins
LiquidCrystal lcd(5, 6, 7, 8, 9, 10);

// Define the DHT11 sensor
#define DHTPIN 2     // Pin which is connected to the DHT11 sensor
#define DHTTYPE DHT11   // DHT 11
DHT dht(DHTPIN, DHTTYPE);

// Define the pins for the other sensors
#define SOIL_MOISTURE_PIN A0
#define RAIN_SENSOR_PIN 3

void setup() {
  // Initialize the LCD
  lcd.begin(16, 2);
  lcd.print("Initializing...");

  // Initialize the DHT11 sensor
  dht.begin();

  // Set the rain sensor pin as input
  pinMode(RAIN_SENSOR_PIN, INPUT);

  // Initialize LoRa
  if (!LoRa.begin(915E6)) { // Use the correct frequency for your region
    lcd.clear();
    lcd.print("LoRa init failed");
    while (1);
  }
  lcd.clear();
  lcd.print("LoRa init OK");

  // Initialize Serial Monitor
  Serial.begin(9600);
}

void loop() {
  // Read the soil moisture sensor
  int soilMoistureValue = analogRead(SOIL_MOISTURE_PIN);

  // Read the DHT11 sensor
  float humidity = dht.readHumidity();
  float temperature = dht.readTemperature();

  // Read the rain sensor
  int rainValue = digitalRead(RAIN_SENSOR_PIN);

  // Display the soil moisture value on LCD
  lcd.setCursor(0, 0);
  lcd.print("Soil: ");
  lcd.print(soilMoistureValue);

  // Display the temperature and humidity on LCD
  lcd.setCursor(0, 1);
  lcd.print("T:");
  lcd.print(temperature);
  lcd.print("C H:");
  lcd.print(humidity);
  lcd.print("%");

  // Display the soil moisture value on Serial Monitor
  Serial.print("Soil Moisture: ");
  Serial.println(soilMoistureValue);

  // Display the temperature and humidity on Serial Monitor
  Serial.print("Temperature: ");
  Serial.print(temperature);
  Serial.println(" C");
  Serial.print("Humidity: ");
  Serial.print(humidity);
  Serial.println(" %");

  // Wait for 2 seconds
  delay(2000);

  // Display the rain sensor value on LCD
  lcd.clear();
  lcd.setCursor(0, 0);
  lcd.print("Rain: ");
  if (rainValue == LOW) {
    lcd.print("Yes");
  } else {
    lcd.print("No");
  }

  // Display the rain sensor value on Serial Monitor
  Serial.print("Rain: ");
  if (rainValue == LOW) {
    Serial.println("Yes");
  } else {
    Serial.println("No");
  }

  // Wait for 2 seconds
  delay(2000);

  // Prepare data to send via LoRa
  String data = "Soil:" + String(soilMoistureValue) + ",Temp:" + String(temperature) + ",Hum:" + String(humidity) + ",Rain:" + (rainValue == LOW ? "Yes" : "No");

  // Send data via LoRa
  LoRa.beginPacket();
  LoRa.print(data);
  LoRa.endPacket();
}
This code initializes the sensors and the LoRa module, reads data from the sensors, displays the data on an LCD screen, and transmits the data via LoRa. The data includes soil moisture, temperature, humidity, and rain detection status.