
Arduino UNO-Based Access Control System with WiFi Connectivity and Motorized Gate Control
View and Edit Project In Cirkit Designer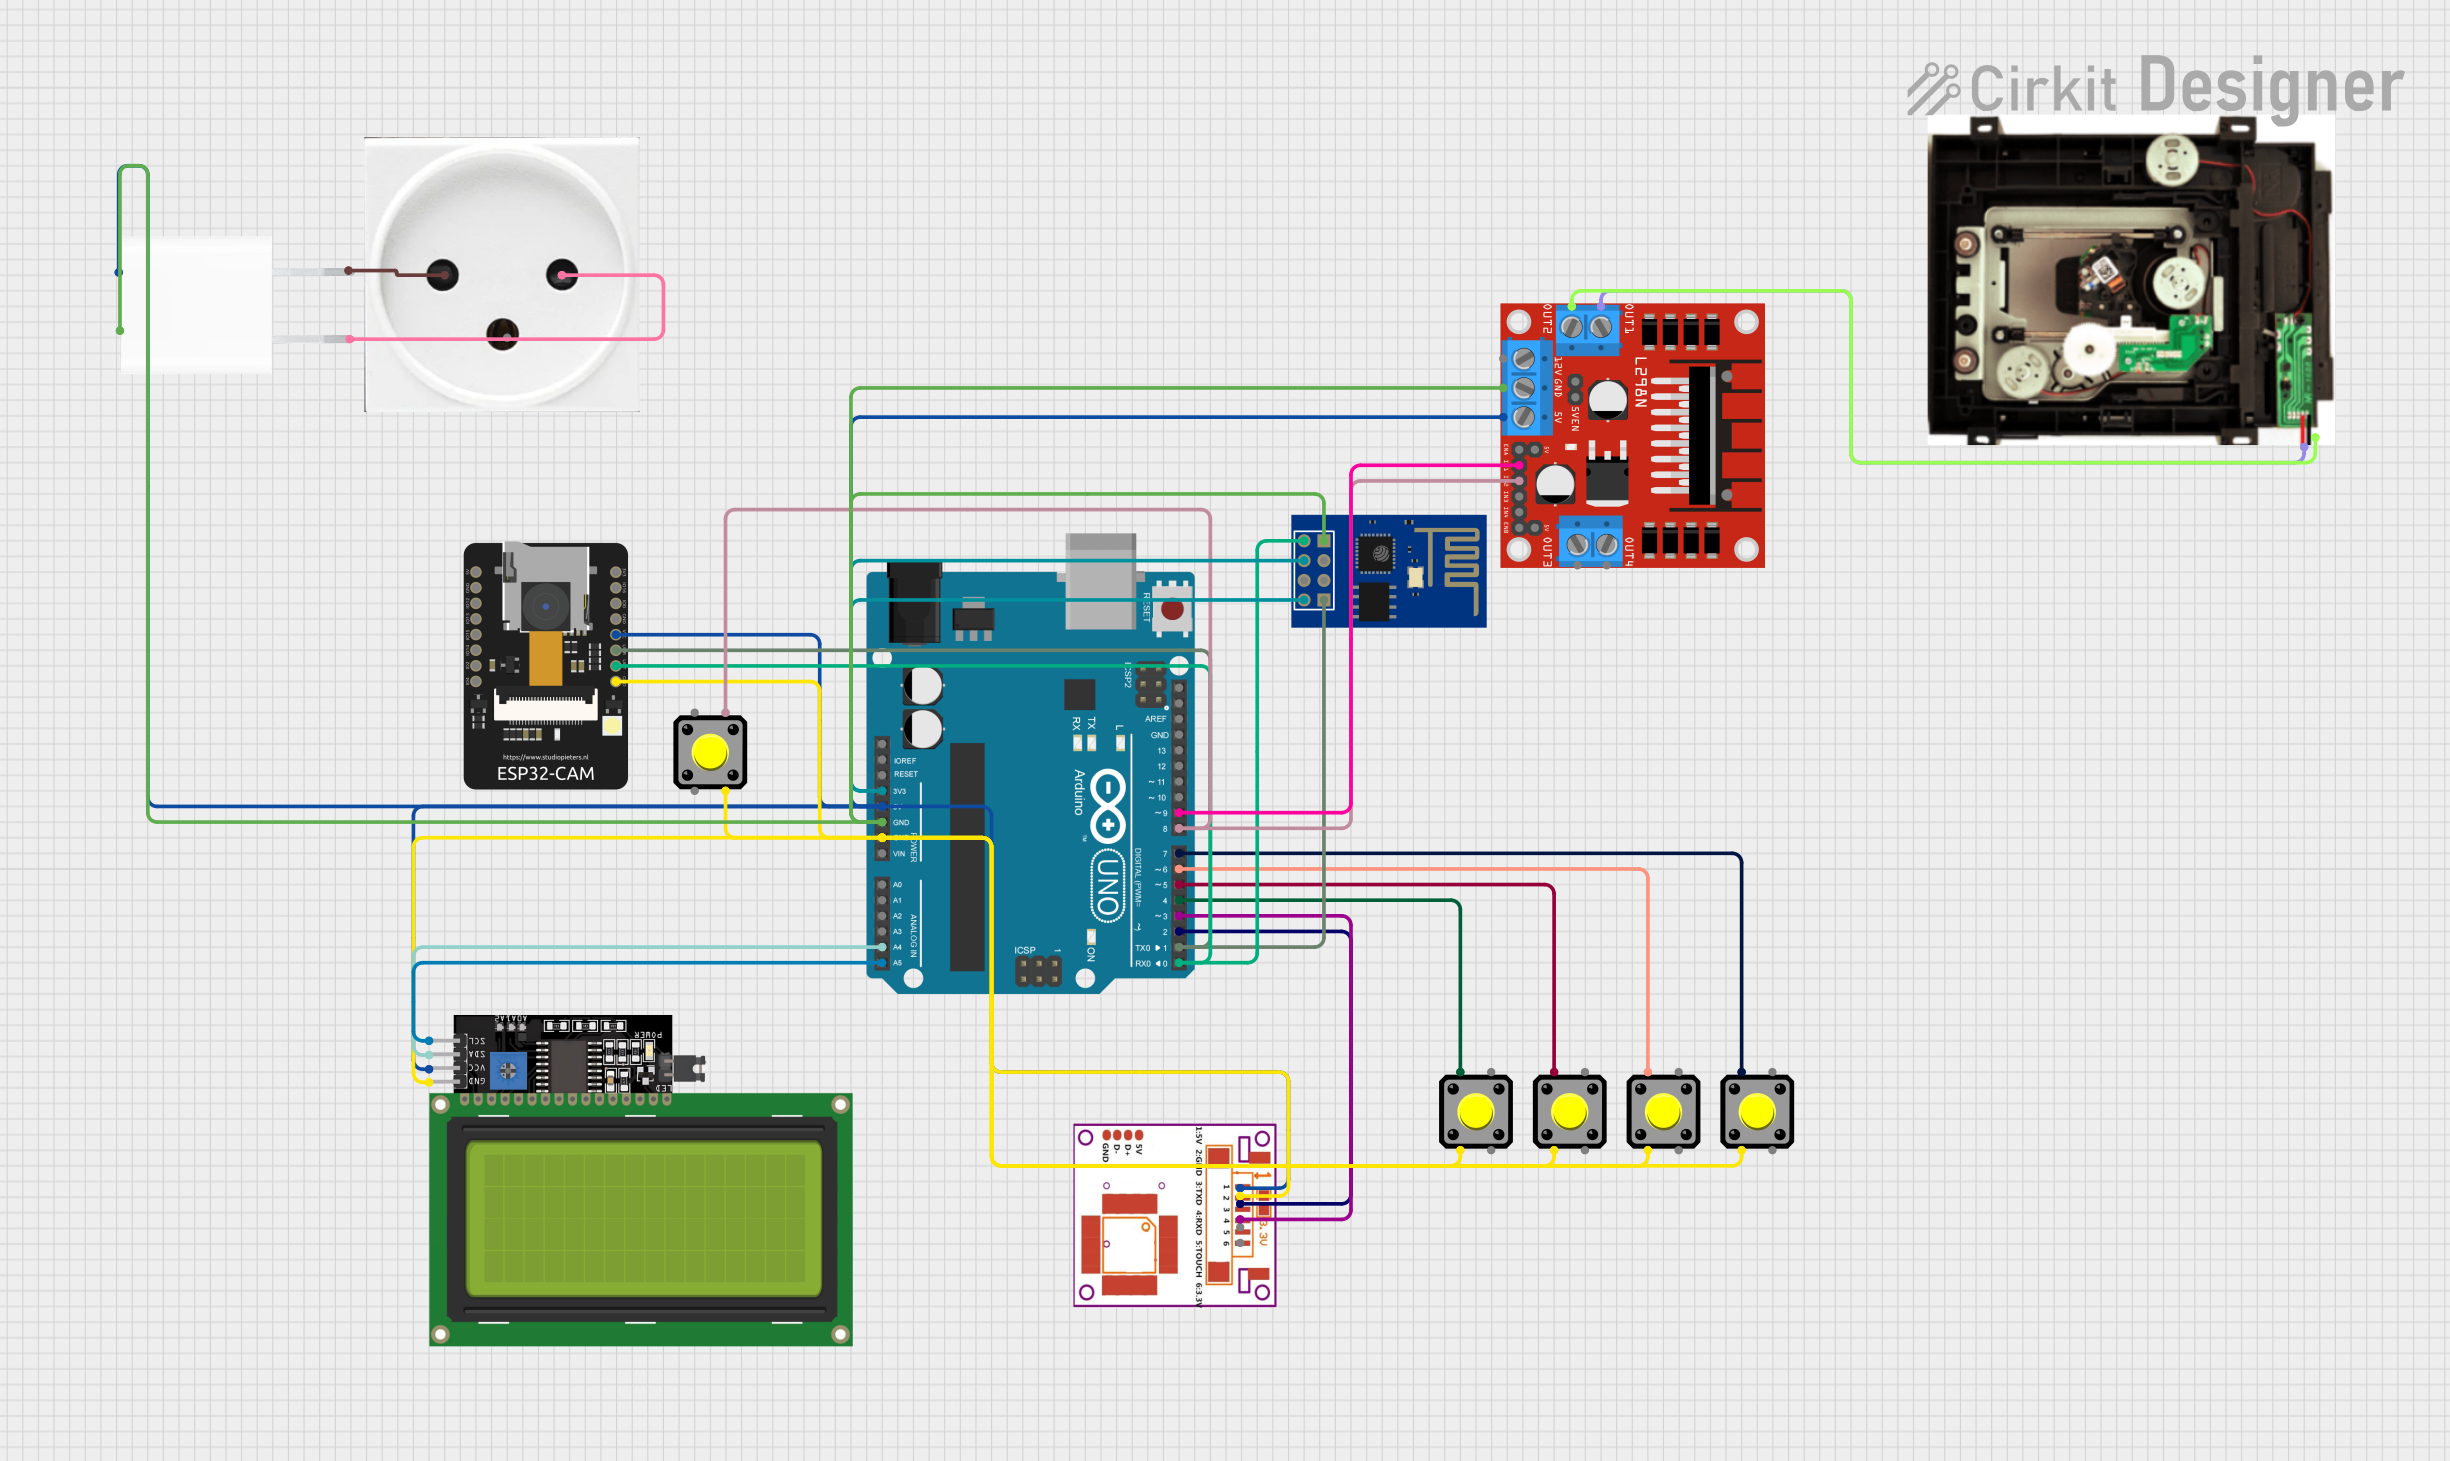
Circuit Documentation
Summary
This document provides a detailed overview of a circuit that includes a variety of components such as an Arduino UNO, R307 Fingerprint Sensor, multiple pushbuttons, an LCD Display 20x4 with I2C interface, an ESP32-CAM, an ESP8266 ESP-01 WiFi Module, an L298N DC motor driver, a 5V Adapter, a power outlet, and a DVD Room Gate. The circuit is designed to interface with various sensors and modules, allowing for a range of functionalities including fingerprint sensing, wireless communication, motor control, and display interfacing. The Arduino UNO serves as the central microcontroller unit, coordinating the interactions between different components.
Component List
- Arduino UNO: A microcontroller board based on the ATmega328P, featuring digital and analog I/O pins.
- R307 Fingerprint Sensor: A biometric sensor for fingerprint detection and recognition.
- Pushbuttons: Simple switch mechanisms for controlling a circuit.
- LCD Display 20x4 I2C: An alphanumeric liquid crystal display with an I2C interface for displaying text.
- ESP32-CAM: A small camera module with Wi-Fi capabilities.
- ESP8266 ESP-01 WiFi Module: A Wi-Fi module that offers internet connectivity to microcontroller projects.
- L298N DC Motor Driver: A module for controlling DC motors with direction and speed control.
- 5V Adapter: A power supply unit that converts AC to 5V DC output.
- Power Outlet (IL): An interface for AC power supply.
- DVD Room Gate: A component representing the gate mechanism of a DVD room.
Wiring Details
Arduino UNO
- 3.3V: Powers the ESP8266 ESP-01 WiFi Module.
- 5V: Connected to the VCC pins of the L298N DC motor driver, ESP32-CAM, R307 Fingerprint Sensor, and LCD Display 20x4 I2C.
- GND: Common ground for the ESP8266 ESP-01 WiFi Module, L298N DC motor driver, and various pushbuttons.
- A4 (SDA): I2C data line connected to the LCD Display 20x4 I2C.
- A5 (SCL): I2C clock line connected to the LCD Display 20x4 I2C.
- D9: Controls IN1 on the L298N DC motor driver.
- D8: Connected to IN2 on the L298N DC motor driver through a pushbutton.
- D7, D6, D5, D4: Connected to pushbuttons.
- D3: Receives RX from the R307 Fingerprint Sensor.
- D2: Receives TX from the R307 Fingerprint Sensor.
- D1 (TX): Transmits to RXD on the ESP8266 ESP-01 WiFi Module and VOR on the ESP32-CAM.
- D0 (RX): Receives from TXD on the ESP8266 ESP-01 WiFi Module and VOT on the ESP32-CAM.
R307 Fingerprint Sensor
- VCC: Powered by 5V from the Arduino UNO.
- GND: Common ground.
- TX: Transmits to D3 on the Arduino UNO.
- RX: Receives from D2 on the Arduino UNO.
Pushbuttons
- Pin 1: Connected to digital pins D4, D5, D6, and D7 on the Arduino UNO.
- Pin 2: Common ground.
- Pin 3: Common ground.
- Pin 4: Connected to D8 on the Arduino UNO.
LCD Display 20x4 I2C
- SCL: Connected to A5 on the Arduino UNO.
- SDA: Connected to A4 on the Arduino UNO.
- VCC: Powered by 5V from the Arduino UNO.
- GND: Common ground.
ESP32-CAM
- VCC: Powered by 5V from the L298N DC motor driver.
- GND: Common ground.
- VOR: Receives TXD from the ESP8266 ESP-01 WiFi Module.
- VOT: Transmits to RXD on the ESP8266 ESP-01 WiFi Module.
ESP8266 ESP-01 WiFi Module
- VCC: Powered by 3.3V from the Arduino UNO.
- CH_PD: Enabled by 3.3V from the Arduino UNO.
- GND: Common ground.
- TXD: Transmits to D0 on the Arduino UNO and VOT on the ESP32-CAM.
- RXD: Receives from D1 on the Arduino UNO and VOR on the ESP32-CAM.
L298N DC Motor Driver
- 5V: Powered by 5V from the 5V Adapter.
- GND: Common ground.
- IN1: Controlled by D9 on the Arduino UNO.
- IN2: Controlled by D8 on the Arduino UNO through a pushbutton.
- OUT1, OUT2: Connected to the DVD Room Gate.
5V Adapter
- 5V: Powers the L298N DC motor driver.
- GND: Common ground.
- AC In 1, AC In 2: Connected to the power outlet (IL).
Power Outlet (IL)
- N, L: Provides AC power to the 5V Adapter.
DVD Room Gate
- Terminal 1, Terminal 2: Connected to OUT1 and OUT2 on the L298N DC motor driver.
Documented Code
Arduino UNO Sketch (sketch.ino)
void setup() {
  // put your setup code here, to run once:

}

void loop() {
  // put your main code here, to run repeatedly:

}
Additional Documentation (documentation.txt)
No additional code documentation provided.