
ESP32-Based Temperature and Humidity Monitor with DHT11 Sensor
View and Edit Project In Cirkit Designer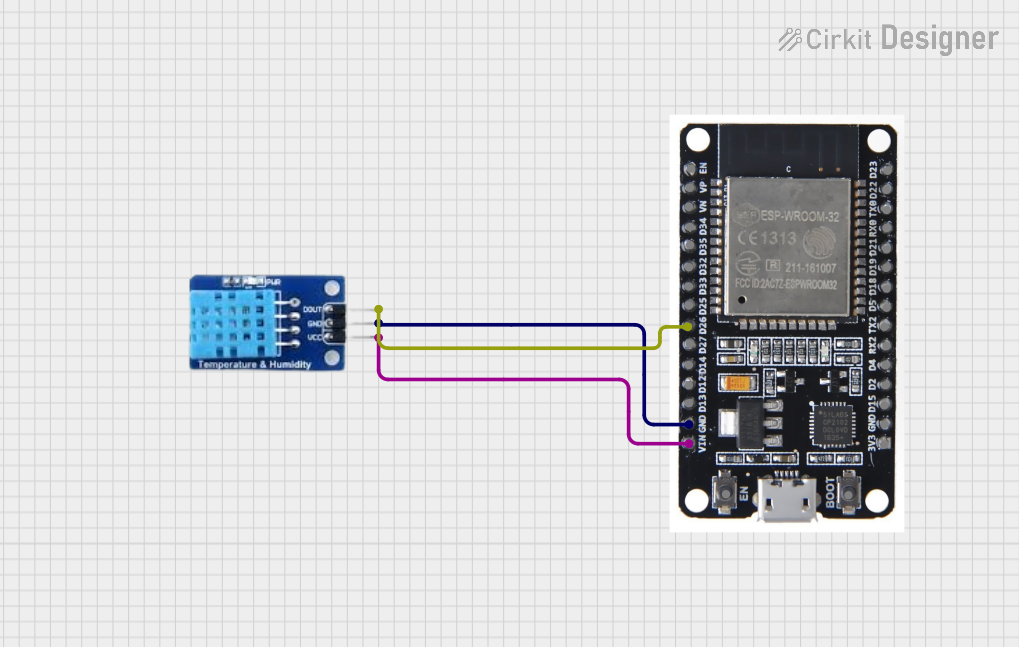
Circuit Documentation
Summary of the Circuit
This circuit consists of an ESP32 microcontroller interfaced with a DHT11 temperature and humidity sensor. The ESP32 reads data from the DHT11 sensor and outputs the temperature and humidity readings to the Serial Monitor. The DHT11 sensor's DATA pin is connected to one of the GPIO pins on the ESP32, and its power supply pins (VCC and GND) are connected to the corresponding power pins on the ESP32.
Component List
ESP32
- Description: A powerful microcontroller with Wi-Fi and Bluetooth capabilities, suitable for a wide range of IoT applications.
- Pins: EN, VP, VN, D34, D35, D32, D33, D25, D26, D27, D14, D12, D13, GND, VIN, 3V3, D15, D2, D4, RX2, TX2, D5, D18, D19, D21, RX0, TX0, D22, D23, BOOT
DHT11
- Description: A basic, low-cost digital temperature and humidity sensor.
- Pins: DATA, GND, VCC
Wiring Details
ESP32
- D26: Connected to the DATA pin of the DHT11 sensor.
- GND: Connected to the GND pin of the DHT11 sensor.
- VIN: Connected to the VCC pin of the DHT11 sensor.
DHT11
- DATA: Connected to GPIO 26 (D26) on the ESP32.
- GND: Connected to the GND pin on the ESP32.
- VCC: Connected to the VIN pin on the ESP32.
Documented Code
ESP32 Code
/*
 * This Arduino Sketch reads temperature and humidity data from a DHT11 sensor
 * connected to an ESP32 microcontroller. The DHT11 sensor's DATA pin is
 * connected to GPIO 26 of the ESP32. The sensor's VCC and GND are connected
 * to the ESP32's VIN and GND respectively.
 */

#include <DHT.h>

#define DHTPIN 26     // Pin where the DHT11 is connected
#define DHTTYPE DHT11 // DHT 11

DHT dht(DHTPIN, DHTTYPE);

void setup() {
  Serial.begin(9600);
  dht.begin();
}

void loop() {
  // Wait a few seconds between measurements.
  delay(2000);

  // Reading temperature or humidity takes about 250 milliseconds!
  float h = dht.readHumidity();
  float t = dht.readTemperature();

  // Check if any reads failed and exit early (to try again).
  if (isnan(h) || isnan(t)) {
    Serial.println("Failed to read from DHT sensor!");
    return;
  }

  // Print the results to the Serial Monitor.
  Serial.print("Humidity: ");
  Serial.print(h);
  Serial.print(" %\t");
  Serial.print("Temperature: ");
  Serial.print(t);
  Serial.println(" *C ");
}
Filename: sketch.ino
(Note: The second code input provided was identical to the first and seems to be a duplicate, so it has not been included in this documentation.)