
Arduino UNO-Based Smart Sensor System with Ultrasonic and Vibration Feedback
View and Edit Project In Cirkit Designer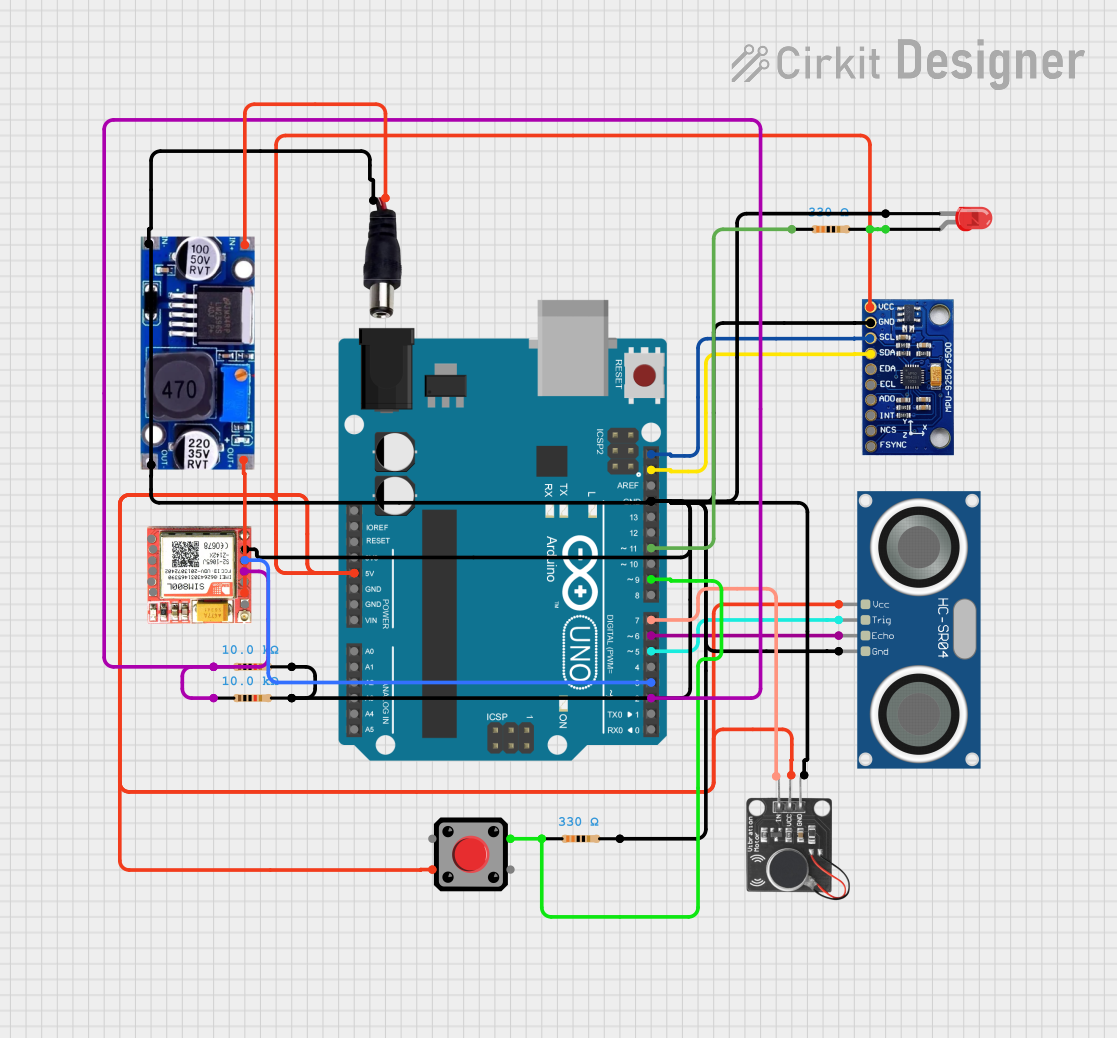
Circuit Documentation
Summary
This document provides a detailed overview of a circuit that includes an Arduino UNO microcontroller, various sensors, a vibration motor, a pushbutton, resistors, an LED, a power jack, and a voltage regulator. The circuit is designed to interface with multiple sensors and actuators, providing a comprehensive setup for various applications.
Component List
Arduino UNO
- Description: A microcontroller board based on the ATmega328P.
- Pins: UNUSED, IOREF, Reset, 3.3V, 5V, GND, Vin, A0, A1, A2, A3, A4, A5, SCL, SDA, AREF, D13, D12, D11, D10, D9, D8, D7, D6, D5, D4, D3, D2, D1, D0
HC-SR04 Ultrasonic Sensor
- Description: A sensor used for measuring distance using ultrasonic waves.
- Pins: VCC, TRIG, ECHO, GND
MPU-9250/6500/9255
- Description: A 9-axis motion tracking device.
- Pins: VCC, GND, SCL/SCLK, SDA/SDI, EDA, ECL, ADO/SDO, INT, NCS, FSYNC
PWM Vibration Motor Sensor Module Switch
- Description: A module used to control a vibration motor.
- Pins: Signal, Vcc, Ground
Pushbutton
- Description: A simple pushbutton switch.
- Pins: Pin 2, Pin 1, Pin 3, Pin 4
Resistor (330 Ohms)
- Description: A resistor with a resistance of 330 Ohms.
- Pins: pin1, pin2
Resistor (10k Ohms)
- Description: A resistor with a resistance of 10k Ohms.
- Pins: pin1, pin2
LED: Two Pin (red)
- Description: A red LED with two pins.
- Pins: cathode, anode
SIM 800L
- Description: A GSM/GPRS module.
- Pins: NFT, RING, VCC, DTR, RST, MIC +, RXD, MIC-, TXD, SPK+, GND, SPK-
Power Jack
- Description: A power jack for external power supply.
- Pins: POSITIF, NEGATIF
LM2596
- Description: A voltage regulator module.
- Pins: IN, OUT
Wiring Details
Arduino UNO
5V connected to:
- VCC of HC-SR04 Ultrasonic Sensor
- VCC of MPU-9250/6500/9255
- Vcc of PWM Vibration Motor Sensor Module Switch
- Pin 3 of Pushbutton
GND connected to:
- GND of HC-SR04 Ultrasonic Sensor
- GND of MPU-9250/6500/9255
- Ground of PWM Vibration Motor Sensor Module Switch
- GND of SIM 800L
- NEGATIF of Power Jack
- pin2 of 330 Ohms Resistor
- pin2 of 10k Ohms Resistor
- pin2 of 10k Ohms Resistor
- cathode of LED: Two Pin (red)
SCL connected to SCL/SCLK of MPU-9250/6500/9255
SDA connected to SDA/SDI of MPU-9250/6500/9255
D11 connected to pin1 of 330 Ohms Resistor
D9 connected to:
- pin1 of 330 Ohms Resistor
- Pin 1 of Pushbutton
D7 connected to Signal of PWM Vibration Motor Sensor Module Switch
D6 connected to ECHO of HC-SR04 Ultrasonic Sensor
D5 connected to TRIG of HC-SR04 Ultrasonic Sensor
D3 connected to TXD of SIM 800L
D2 connected to:
- RXD of SIM 800L
- pin1 of 10k Ohms Resistor
- pin1 of 10k Ohms Resistor
HC-SR04 Ultrasonic Sensor
- VCC connected to 5V of Arduino UNO
- GND connected to GND of Arduino UNO
- TRIG connected to D5 of Arduino UNO
- ECHO connected to D6 of Arduino UNO
MPU-9250/6500/9255
- VCC connected to 5V of Arduino UNO
- GND connected to GND of Arduino UNO
- SCL/SCLK connected to SCL of Arduino UNO
- SDA/SDI connected to SDA of Arduino UNO
PWM Vibration Motor Sensor Module Switch
- Vcc connected to 5V of Arduino UNO
- Ground connected to GND of Arduino UNO
- Signal connected to D7 of Arduino UNO
Pushbutton
- Pin 3 connected to 5V of Arduino UNO
- Pin 1 connected to D9 of Arduino UNO
Resistor (330 Ohms)
- pin1 connected to D11 of Arduino UNO
- pin2 connected to GND of Arduino UNO
Resistor (10k Ohms)
- pin1 connected to D2 of Arduino UNO
- pin2 connected to GND of Arduino UNO
LED: Two Pin (red)
- anode connected to pin2 of 330 Ohms Resistor
- cathode connected to GND of Arduino UNO
SIM 800L
- TXD connected to D3 of Arduino UNO
- RXD connected to D2 of Arduino UNO
- GND connected to GND of Arduino UNO
- VCC connected to OUT of LM2596
Power Jack
- POSITIF connected to IN of LM2596
- NEGATIF connected to GND of Arduino UNO
LM2596
- IN connected to POSITIF of Power Jack
- OUT connected to VCC of SIM 800L
- OUT connected to GND of Arduino UNO
Documented Code
Arduino UNO Code (sketch.ino)
void setup() {
  // put your setup code here, to run once:

}

void loop() {
  // put your main code here, to run repeatedly:

}
This code is a basic template for the Arduino UNO. The setup() function is used to initialize any settings or configurations, and the loop() function contains the main code that runs repeatedly.