
Arduino UNO Bluetooth Controlled Robotic Car with L298N Motor Driver
View and Edit Project In Cirkit Designer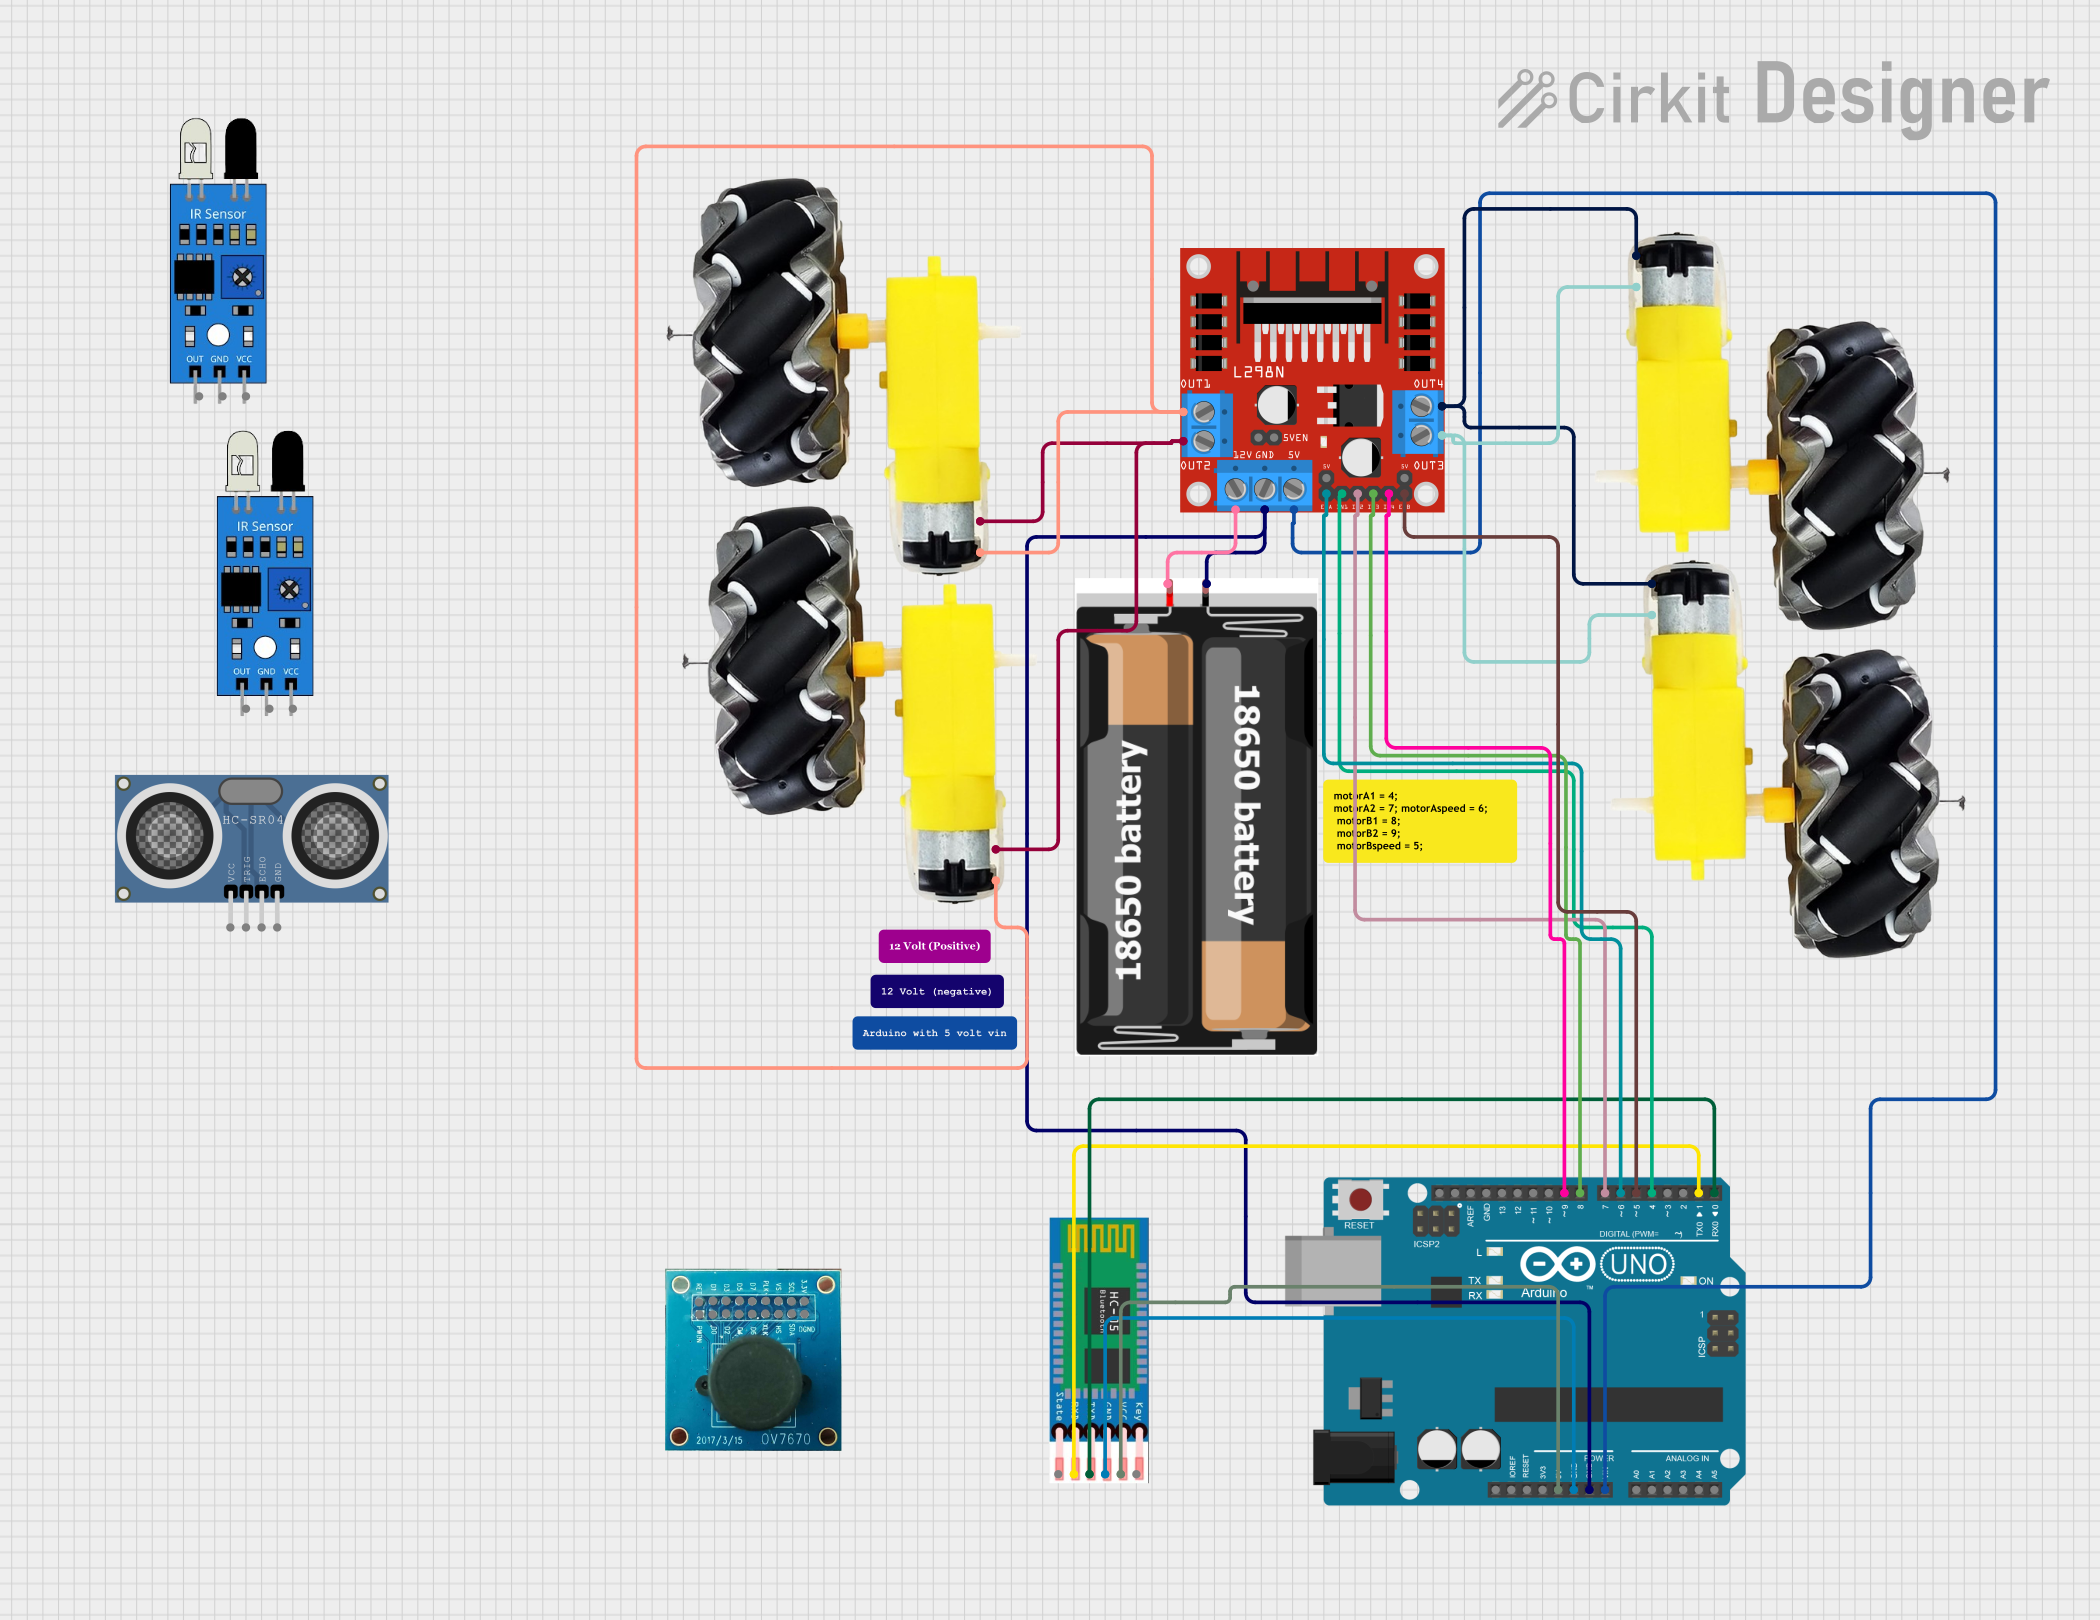
Circuit Documentation
Summary
This document provides a detailed overview of a Bluetooth-controlled car circuit. The circuit consists of an Arduino UNO microcontroller, an L298N DC motor driver, four motors with wheels, an HC-05 Bluetooth module, two IR sensors, an OV7670 camera, an HC-SR04 ultrasonic distance sensor, and a 2x 18650 battery pack. The Arduino UNO is programmed to control the motors based on commands received via Bluetooth.
Component List
L298N DC Motor Driver
- Description: Motor driver module used to control the speed and direction of DC motors.
- Pins: OUT1, OUT2, 12V, GND, 5V, OUT3, OUT4, 5V-ENA-JMP-I, 5V-ENA-JMP-O, +5V-J1, +5V-J2, ENA, IN1, IN2, IN3, IN4, ENB
Arduino UNO
- Description: Microcontroller board based on the ATmega328P.
- Pins: UNUSED, IOREF, Reset, 3.3V, 5V, GND, Vin, A0, A1, A2, A3, A4, A5, SCL, SDA, AREF, D13, D12, D11, D10, D9, D8, D7, D6, D5, D4, D3, D2, D1, D0
HC-05 Bluetooth Module
- Description: Bluetooth module used for wireless communication.
- Pins: EN, VCC, GND, TXD, RXD, STATE
Motor and Wheels (x4)
- Description: DC motors with attached wheels.
- Pins: vcc, GND
2x 18650 Battery Pack
- Description: Battery pack providing power to the circuit.
- Pins: vcc, gnd
IR Sensor (x2)
- Description: Infrared sensor used for obstacle detection.
- Pins: out, gnd, vcc
OV7670 Camera
- Description: Camera module for capturing images.
- Pins: RET, PWDN, D1, D0, D3, D2, D4, D5, D6, PLK, XLK, D7, VS, HS, SCL, SDA, 3.3V, DGND
HC-SR04 Ultrasonic Distance Sensor
- Description: Ultrasonic sensor used for measuring distance.
- Pins: VCC, TRIG, ECHO, GND
Wiring Details
L298N DC Motor Driver
- OUT1 connected to vcc of Motor and Wheels 1 and Motor and Wheels 2
- OUT2 connected to GND of Motor and Wheels 1 and Motor and Wheels 2
- 12V connected to vcc of 2x 18650 Battery Pack
- GND connected to gnd of 2x 18650 Battery Pack and GND of Arduino UNO
- 5V connected to Vin of Arduino UNO
- OUT3 connected to GND of Motor and Wheels 3 and Motor and Wheels 4
- OUT4 connected to vcc of Motor and Wheels 3 and Motor and Wheels 4
- ENA connected to D6 of Arduino UNO
- IN1 connected to D4 of Arduino UNO
- IN2 connected to D7 of Arduino UNO
- IN3 connected to D8 of Arduino UNO
- IN4 connected to D9 of Arduino UNO
- ENB connected to D5 of Arduino UNO
Arduino UNO
- GND connected to gnd of 2x 18650 Battery Pack and GND of L298N DC Motor Driver
- Vin connected to 5V of L298N DC Motor Driver
- D6 connected to ENA of L298N DC Motor Driver
- D4 connected to IN1 of L298N DC Motor Driver
- D7 connected to IN2 of L298N DC Motor Driver
- D8 connected to IN3 of L298N DC Motor Driver
- D9 connected to IN4 of L298N DC Motor Driver
- D5 connected to ENB of L298N DC Motor Driver
- 5V connected to VCC of HC-05 Bluetooth Module
- GND connected to GND of HC-05 Bluetooth Module
- D1 connected to RXD of HC-05 Bluetooth Module
- D0 connected to TXD of HC-05 Bluetooth Module
HC-05 Bluetooth Module
- VCC connected to 5V of Arduino UNO
- GND connected to GND of Arduino UNO
- RXD connected to D1 of Arduino UNO
- TXD connected to D0 of Arduino UNO
Motor and Wheels 1
- vcc connected to OUT1 of L298N DC Motor Driver
- GND connected to OUT2 of L298N DC Motor Driver
Motor and Wheels 2
- vcc connected to OUT1 of L298N DC Motor Driver
- GND connected to OUT2 of L298N DC Motor Driver
Motor and Wheels 3
- vcc connected to OUT4 of L298N DC Motor Driver
- GND connected to OUT3 of L298N DC Motor Driver
Motor and Wheels 4
- vcc connected to OUT4 of L298N DC Motor Driver
- GND connected to OUT3 of L298N DC Motor Driver
2x 18650 Battery Pack
- vcc connected to 12V of L298N DC Motor Driver
- gnd connected to GND of L298N DC Motor Driver and GND of Arduino UNO
Documented Code
//Arduino Bluetooth Controlled Car
//Before uploading the code you have to install the necessary library
//Note - Disconnect the Bluetooth Module before hitting the upload button otherwise you'll get a compilation error message.
//AFMotor Library https://learn.adafruit.com/adafruit-motor-shield/library-install
//After downloading the library open Arduino IDE >> go to sketch >> Include Library >> ADD. ZIP Library >> Select the downloaded
//ZIP File >> Open it >> Done
//Now You Can Upload the Code without any problem but make sure the bt module isn't connected with Arduino while uploading code

#include <AFMotor.h>

//initial motors pin
AF_DCMotor motor1(1, MOTOR12_1KHZ);
AF_DCMotor motor2(2, MOTOR12_1KHZ);
AF_DCMotor motor3(3, MOTOR34_1KHZ);
AF_DCMotor motor4(4, MOTOR34_1KHZ);

char command;

void setup()
{
  Serial.begin(9600);  //Set the baud rate to your Bluetooth module.
}

void loop(){
  if(Serial.available() > 0){
    command = Serial.read();
    Stop(); //initialize with motors stopped
    //Change pin mode only if new command is different from previous.
    //Serial.println(command);
    switch(command){
    case 'F':
      forward();
      break;
    case 'B':
       back();
      break;
    case 'L':
      left();
      break;
    case 'R':
      right();
      break;
    }
  }
}

void forward()
{
  motor1.setSpeed(255); //Define maximum velocity
  motor1.run(FORWARD); //rotate the motor clockwise
  motor2.setSpeed(255); //Define maximum velocity
  motor2.run(FORWARD); //rotate the motor clockwise
  motor3.setSpeed(255);//Define maximum velocity
  motor3.run(FORWARD); //rotate the motor clockwise
  motor4.setSpeed(255);//Define maximum velocity
  motor4.run(FORWARD); //rotate the motor clockwise
}

void back()
{
  motor1.setSpeed(255); //Define maximum velocity
  motor1.run(BACKWARD); //rotate the motor anti-clockwise
  motor2.setSpeed(255); //Define maximum velocity
  motor2.run(BACKWARD); //rotate the motor anti-clockwise
  motor3.setSpeed(255); //Define maximum velocity
  motor3.run(BACKWARD); //rotate the motor anti-clockwise
  motor4.setSpeed(255); //Define maximum velocity
  motor4.run(BACKWARD); //rotate the motor anti-clockwise
}

void left()
{
  motor1.setSpeed(255); //Define maximum velocity
  motor1.run(BACKWARD); //rotate the motor anti-clockwise
  motor2.setSpeed