
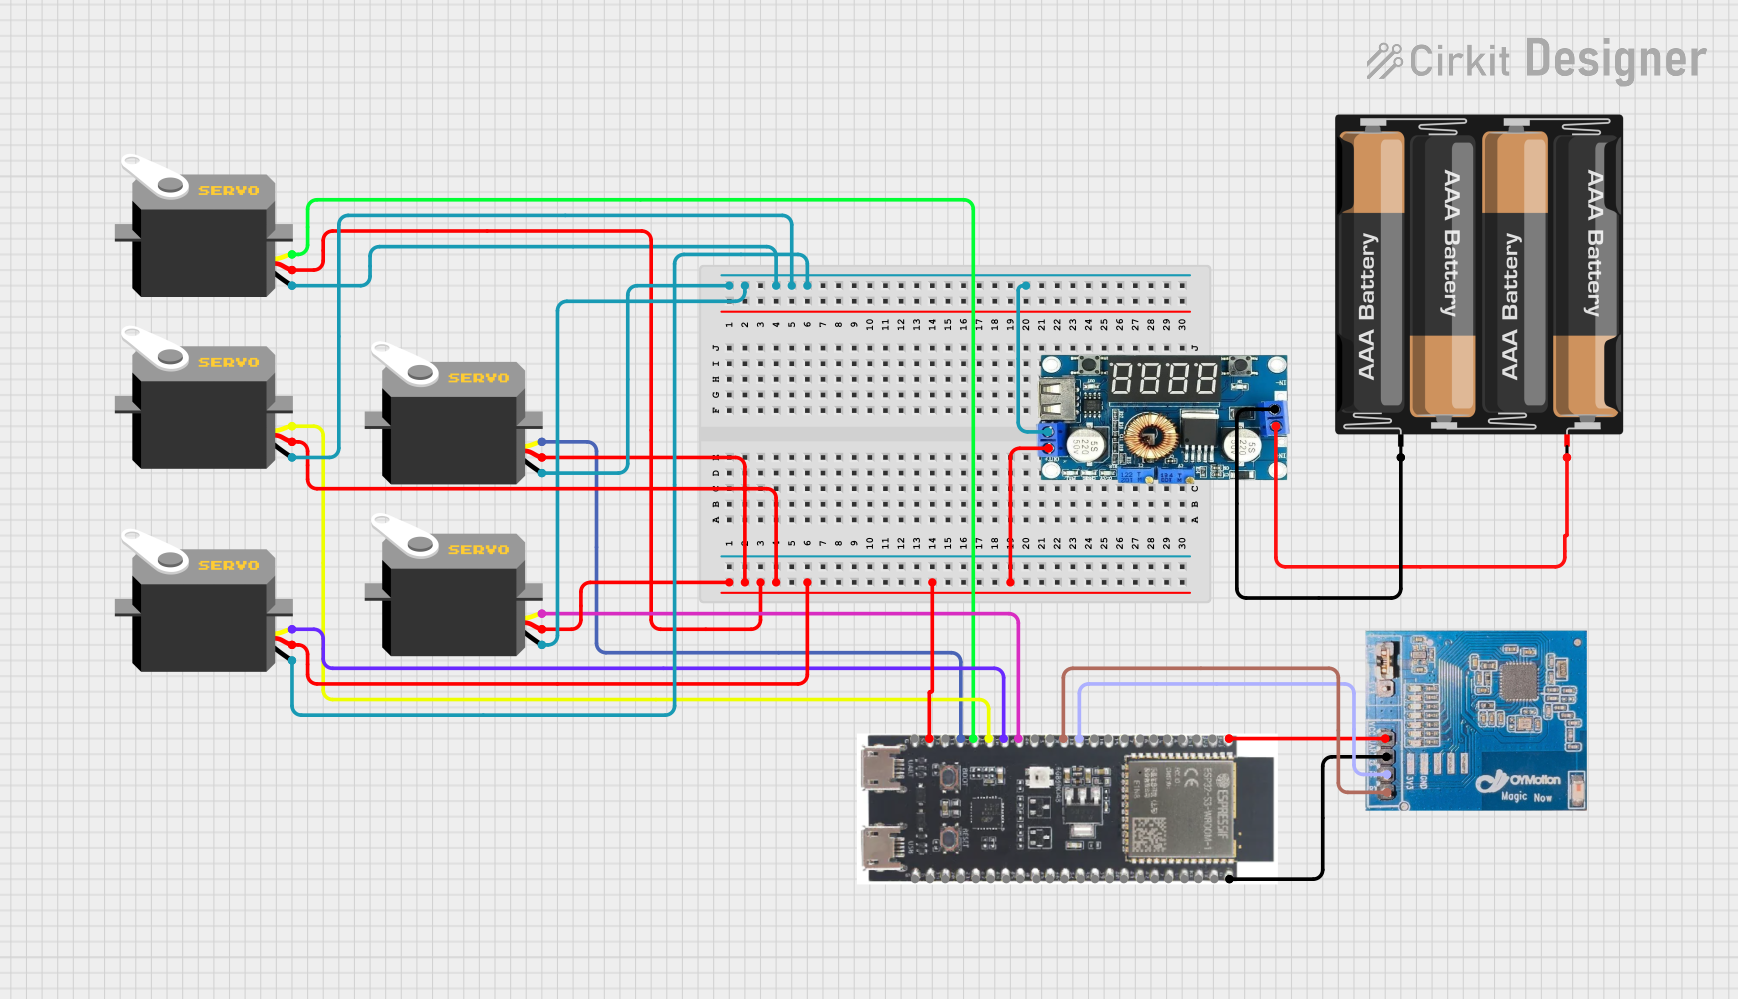
Circuit Documentation
Summary
This document provides a detailed overview of a circuit that includes a step-down DC regulator with an LCD display, multiple servos, an ESP32-S3 microcontroller, a gForceJoint UART module, and a 4 x AAA battery mount. The circuit is designed to power and control multiple servos using the ESP32-S3 microcontroller, which also interfaces with the gForceJoint UART module.
Component List
Regulator Stepdown DC with LCD Display
- Pins: IN +, IN -, OUT +, OUT -
- Description: A step-down DC regulator with an LCD display for voltage monitoring.
- Purpose: To regulate the voltage from the battery mount and provide a stable output to power the servos and the ESP32-S3 microcontroller.
Servo
- Pins: gnd, vcc, pulse
- Description: A standard servo motor.
- Purpose: To provide controlled rotational movement.
4 x AAA Battery Mount
- Pins: -, +
- Description: A battery holder for four AAA batteries.
- Purpose: To supply power to the circuit.
ESP32-S3
- Pins: 3v3, EN, GPIO4, GPIO5, GPIO6, GPIO7, GPIO15, GPIO16, GPIO17, GPIO18, GPIO8, GPIO46, GPIO9, GPIO10, GPIO11, GPIO12, GPIO13, GPIO14, 5V, GND, GPIO43, GPIO44, GPIO1, GPIO2, GPIO42, GPIO41, GPIO40, GPIO39, GPIO38, GPIO37, GPIO36, GPIO35, GPIO0, GPIO45, GPIO48, GPIO47, GPIO21, GPIO20, GPIO19
- Description: A powerful microcontroller with Wi-Fi and Bluetooth capabilities.
- Purpose: To control the servos and interface with the gForceJoint UART module.
gForceJoint UART 111
- Pins: uart, GN, TX, RX
- Description: A UART module for communication.
- Purpose: To provide UART communication capabilities.
Wiring Details
Regulator Stepdown DC with LCD Display
- IN +: Connected to the + pin of the 4 x AAA Battery Mount.
- IN -: Connected to the - pin of the 4 x AAA Battery Mount.
- OUT +: Connected to the vcc pins of all servos and the 5V pin of the ESP32-S3.
- OUT -: Connected to the gnd pins of all servos.
Servo (1)
- gnd: Connected to the OUT - pin of the Regulator Stepdown DC with LCD Display.
- vcc: Connected to the OUT + pin of the Regulator Stepdown DC with LCD Display.
- pulse: Connected to the GPIO9 pin of the ESP32-S3.
Servo (2)
- gnd: Connected to the OUT - pin of the Regulator Stepdown DC with LCD Display.
- vcc: Connected to the OUT + pin of the Regulator Stepdown DC with LCD Display.
- pulse: Connected to the GPIO11 pin of the ESP32-S3.
Servo (3)
- gnd: Connected to the OUT - pin of the Regulator Stepdown DC with LCD Display.
- vcc: Connected to the OUT + pin of the Regulator Stepdown DC with LCD Display.
- pulse: Connected to the GPIO10 pin of the ESP32-S3.
Servo (4)
- gnd: Connected to the OUT - pin of the Regulator Stepdown DC with LCD Display.
- vcc: Connected to the OUT + pin of the Regulator Stepdown DC with LCD Display.
- pulse: Connected to the GPIO12 pin of the ESP32-S3.
Servo (5)
- gnd: Connected to the OUT - pin of the Regulator Stepdown DC with LCD Display.
- vcc: Connected to the OUT + pin of the Regulator Stepdown DC with LCD Display.
- pulse: Connected to the GPIO13 pin of the ESP32-S3.
4 x AAA Battery Mount
- +: Connected to the IN + pin of the Regulator Stepdown DC with LCD Display.
- -: Connected to the IN - pin of the Regulator Stepdown DC with LCD Display.
ESP32-S3
- 5V: Connected to the OUT + pin of the Regulator Stepdown DC with LCD Display.
- GND: Connected to the OUT - pin of the Regulator Stepdown DC with LCD Display.
- GPIO9: Connected to the pulse pin of Servo (1).
- GPIO11: Connected to the pulse pin of Servo (2).
- GPIO10: Connected to the pulse pin of Servo (3).
- GPIO12: Connected to the pulse pin of Servo (4).
- GPIO13: Connected to the pulse pin of Servo (5).
- 3v3: Connected to the uart pin of the gForceJoint UART 111.
- GPIO17: Connected to the TX pin of the gForceJoint UART 111.
- GPIO18: Connected to the RX pin of the gForceJoint UART 111.
- GND: Connected to the GN pin of the gForceJoint UART 111.
gForceJoint UART 111
- uart: Connected to the 3v3 pin of the ESP32-S3.
- GN: Connected to the GND pin of the ESP32-S3.
- TX: Connected to the GPIO17 pin of the ESP32-S3.
- RX: Connected to the GPIO18 pin of the ESP32-S3.
Code
No code was provided for this circuit.
This document provides a comprehensive overview of the circuit, including a summary, component list, wiring details, and code documentation. Each component is described in detail, and the wiring connections are clearly outlined to ensure proper assembly and functionality of the circuit.