
Circuit Documentation
Summary
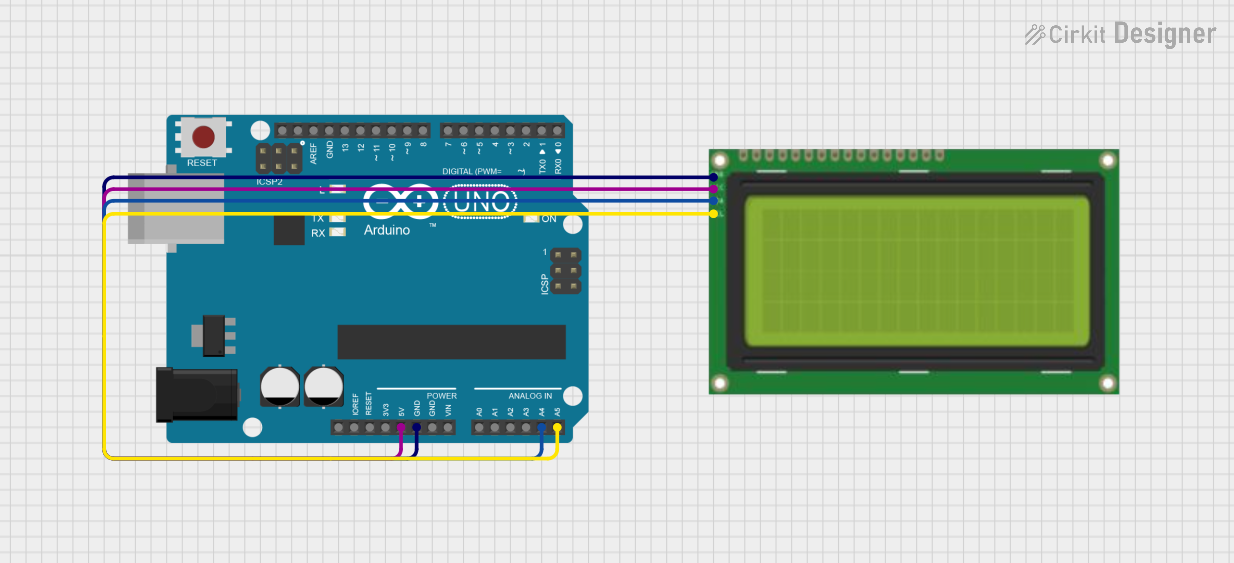
This circuit involves an Arduino UNO microcontroller connected to a 20x4 I2C LCD display. The Arduino UNO provides power and communication to the LCD display, allowing it to display messages.
Component List
Arduino UNO
- Description: A microcontroller board based on the ATmega328P. It has 14 digital input/output pins, 6 analog inputs, a 16 MHz quartz crystal, a USB connection, a power jack, an ICSP header, and a reset button.
- Pins: UNUSED, IOREF, Reset, 3.3V, 5V, GND, Vin, A0, A1, A2, A3, A4, A5, SCL, SDA, AREF, D13, D12, D11, D10, D9, D8, D7, D6, D5, D4, D3, D2, D1, D0
Lcd 20x4 I2C
- Description: A 20x4 character LCD display with I2C interface. It allows for easy connection to microcontrollers using only two data lines.
- Pins: GND, 5v, SCA, SCL
Wiring Details
Arduino UNO
- 5V: Connected to 5v of Lcd 20x4 I2C
- GND: Connected to GND of Lcd 20x4 I2C
- A4: Connected to SCA of Lcd 20x4 I2C
- A5: Connected to SCL of Lcd 20x4 I2C
Lcd 20x4 I2C
- 5v: Connected to 5V of Arduino UNO
- GND: Connected to GND of Arduino UNO
- SCA: Connected to A4 of Arduino UNO
- SCL: Connected to A5 of Arduino UNO
Code Documentation
Arduino UNO Code
#include <Wire.h>
#include <LiquidCrystal_I2C.h>

// Initialize the LCD with address 0x3F and 20x4 dimensions
LiquidCrystal_I2C lcd(0x3F, 20, 4);

void setup() {
  lcd.init();          // Initialize the LCD
  lcd.backlight();     // Turn on the LCD backlight
  lcd.setCursor(0, 0); // Set the cursor to column 0, row 0
  lcd.print("I2C Address: 0x3F");

  lcd.setCursor(0, 1); // Move to row 1
  lcd.print("20x4 LCD Display");

  lcd.setCursor(0, 2); // Move to row 2
  lcd.print("Row 3 Testing...");

  lcd.setCursor(0, 3); // Move to row 3
  lcd.print("Arduino Ready!");
}

void loop() {
  // No dynamic updates in this example
}
This code initializes the LCD display, turns on the backlight, and prints messages on each row of the 20x4 display. The setup function handles the initialization and printing, while the loop function is empty as there are no dynamic updates in this example.