Arduino-Controlled Soil Moisture Sensing with Automated Watering System
Circuit Documentation
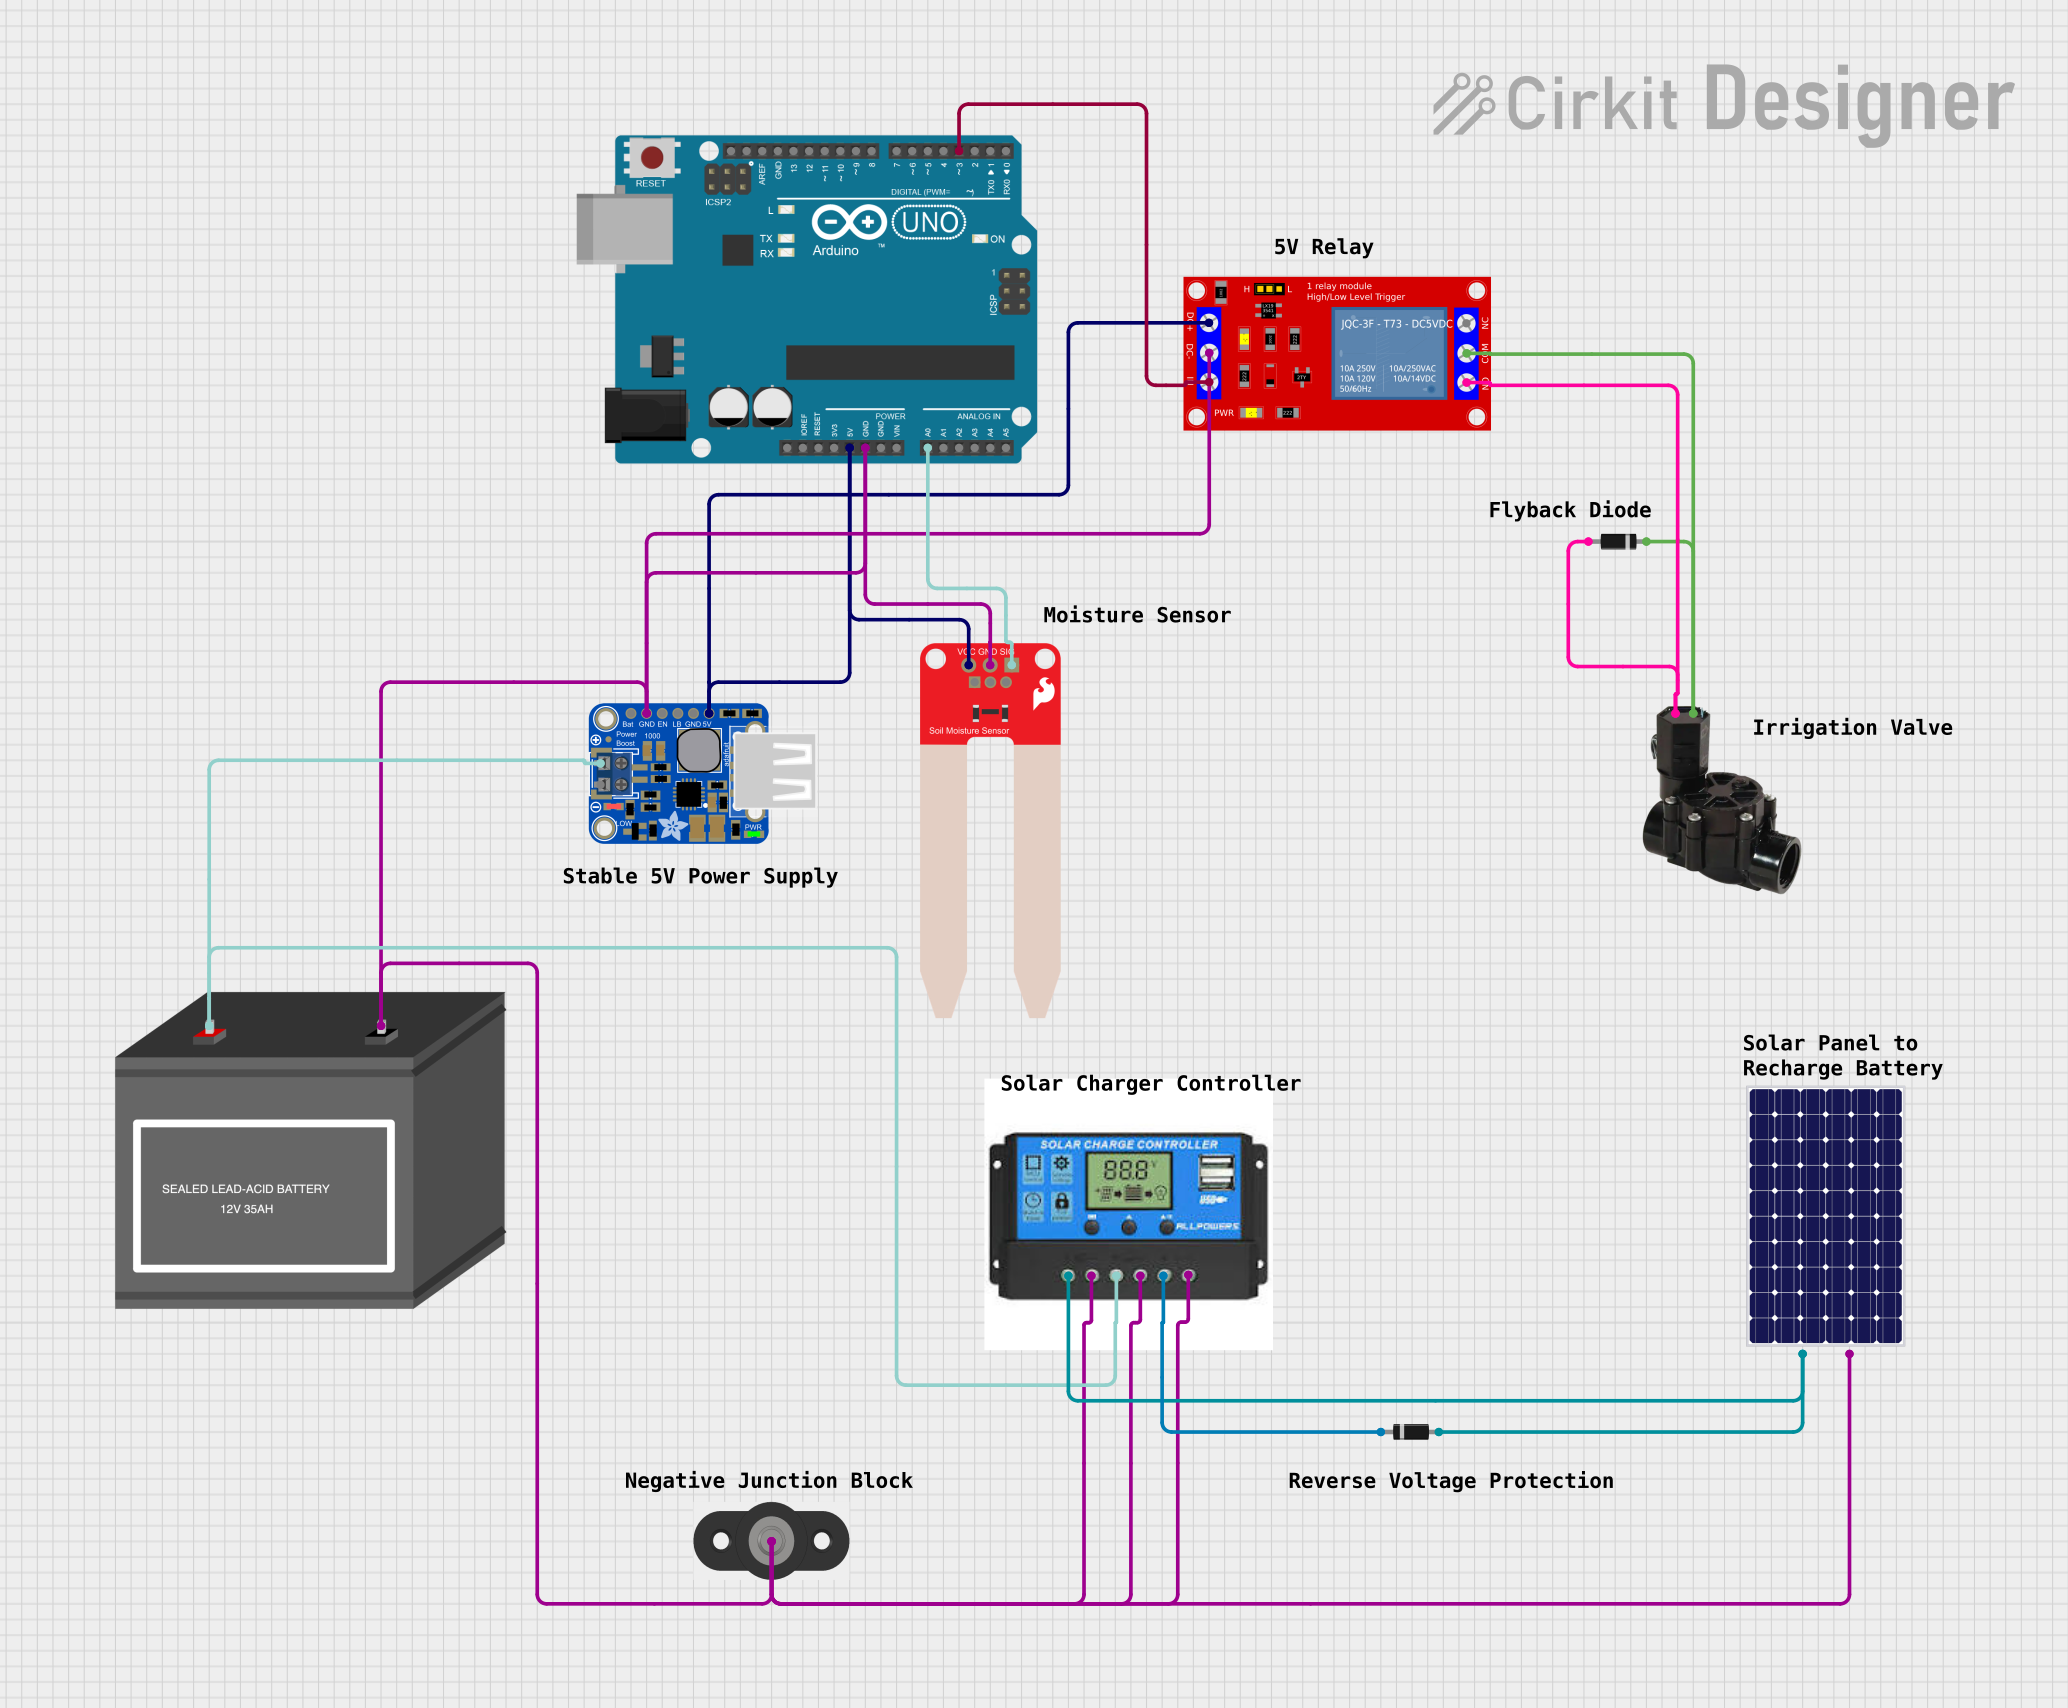
Summary
This circuit is designed to monitor soil moisture levels and control a solenoid valve based on the moisture content. The system uses an Arduino UNO as the central processing unit, interfaced with a SparkFun Soil Moisture Sensor to measure the moisture level. A 1 Channel 5V Relay Module is used to control the solenoid valve, which is powered by a 12V battery through a 7805 voltage regulator. The PowerBoost 1000 Basic Terminal USB provides a stable 5V supply to the Arduino and other 5V components. A diode is used in conjunction with the solenoid to prevent back EMF from damaging the circuit.
Component List
- Arduino UNO: A microcontroller board based on the ATmega328P, with digital and analog I/O pins.
- SparkFun Soil Moisture Sensor: A sensor that measures the volumetric content of water in the soil and outputs an analog signal.
- 1 Channel 5V Relay Module: An electromechanical switch used to control high power devices, such as the solenoid valve.
- PowerBoost 1000 Basic Terminal USB: A 5V USB power supply and battery charger.
- Solenoid: An electromechanical device used to control the flow of liquid or gas.
- Diode: A semiconductor device that allows current to flow in one direction only, used here to protect against reverse current.
- 12V Battery (mini): A power source for the circuit, providing 12V.
- 7805: A voltage regulator that outputs a stable 5V from a higher voltage input.
Wiring Details
Arduino UNO
5Vconnected to the 5V power rail.GNDconnected to the ground rail.D2connected to the SIG pin of the SparkFun Soil Moisture Sensor.D3connected to the IN pin of the 1 Channel 5V Relay Module.
SparkFun Soil Moisture Sensor
VCCconnected to the 5V power rail.GNDconnected to the ground rail.SIGconnected toD2on the Arduino UNO.
1 Channel 5V Relay Module
VCC+connected to the 5V power rail.VCC- (GND)connected to the ground rail.INconnected toD3on the Arduino UNO.N.O.connected to the anode of the Diode and pin2 of the Solenoid.COMconnected to the cathode of the Diode and pin1 of the Solenoid.
PowerBoost 1000 Basic Terminal USB
5.0Vconnected to the 5V power rail.GNDconnected to the ground rail.VBATconnected to the OUTPUT pin of the 7805 voltage regulator.
Solenoid
pin1connected to the COM pin of the 1 Channel 5V Relay Module and the cathode of the Diode.pin2connected to the N.O. pin of the 1 Channel 5V Relay Module and the anode of the Diode.
Diode
anodeconnected to the N.O. pin of the 1 Channel 5V Relay Module and pin2 of the Solenoid.cathodeconnected to the COM pin of the 1 Channel 5V Relay Module and pin1 of the Solenoid.
12V Battery (mini)
+connected to the INPUT pin of the 7805 voltage regulator.-connected to the ground rail.
7805
INPUTconnected to the+of the 12V Battery.OUTPUTconnected to the VBAT pin of the PowerBoost 1000 Basic Terminal USB.GNDconnected to the ground rail.
Documented Code
// sketch.ino
const int MOISTURE_SENSOR_PIN = 2; // Assuming the sensor SIG pin is connected to D2
const int RELAY_PIN = 3;            // Relay module is controlled by pin D3
const int MOISTURE_THRESHOLD = 40;  // Set the moisture threshold to 40%

void setup() {
  pinMode(MOISTURE_SENSOR_PIN, INPUT);
  pinMode(RELAY_PIN, OUTPUT);
  digitalWrite(RELAY_PIN, LOW); // Initialize the relay to be off
}

void loop() {
  int sensorValue = analogRead(MOISTURE_SENSOR_PIN); // Read the moisture sensor value
  int moisturePercentage = map(sensorValue, 0, 1023, 100, 0); // Map the value to a percentage (assuming 0 is wet and 1023 is dry)

  // Check if the moisture level is below the threshold
  if (moisturePercentage < MOISTURE_THRESHOLD) {
    // Soil is too dry, open the solenoid (activate the relay)
    digitalWrite(RELAY_PIN, HIGH);
  } else {
    // Soil is moist enough, close the solenoid (deactivate the relay)
    digitalWrite(RELAY_PIN, LOW);
  }

  // Wait for a bit before reading again
  delay(1000); // Delay in milliseconds (1 second)
}
This code is designed to read the moisture level from the soil moisture sensor and control the solenoid valve through the relay. If the soil moisture falls below the set threshold, the solenoid valve is opened to allow watering.