
Arduino UNO-Based Multi-Sensor Monitoring System with LCD Display and Buzzer
View and Edit Project In Cirkit Designer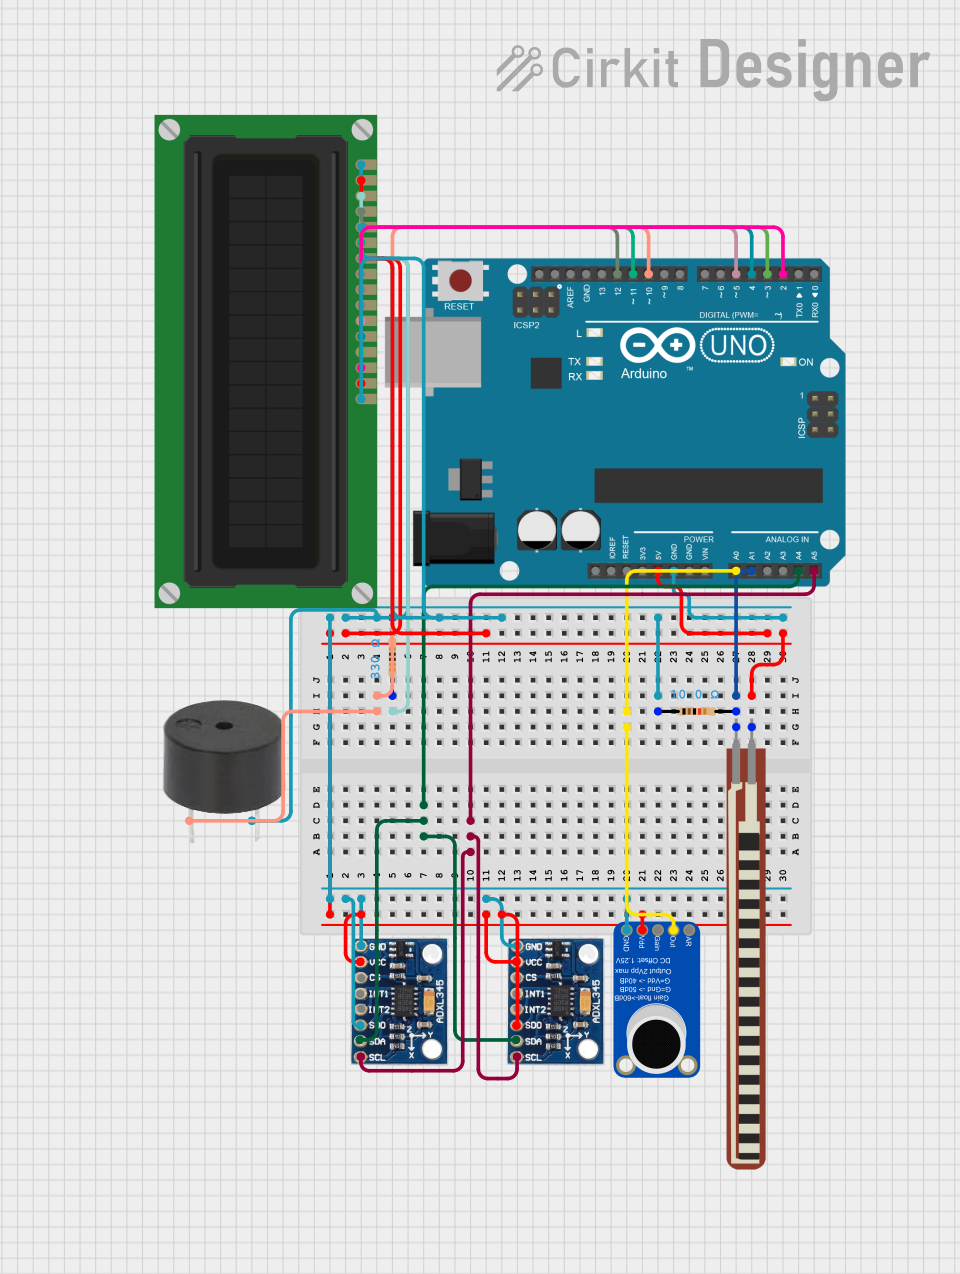
Circuit Documentation
Summary
This circuit involves an Arduino UNO microcontroller interfacing with various sensors and output devices. The components include a buzzer, a flex resistor, an electret microphone amplifier, an accelerometer, and an LCD display. The Arduino UNO reads data from the sensors and controls the output devices accordingly.
Component List
Arduino UNO
- Description: A microcontroller board based on the ATmega328P.
- Pins: UNUSED, IOREF, Reset, 3.3V, 5V, GND, Vin, A0, A1, A2, A3, A4, A5, SCL, SDA, AREF, D13, D12, D11, D10, D9, D8, D7, D6, D5, D4, D3, D2, D1, D0
2.2 inch Basic Flex Resistor
- Description: A flexible resistor that changes resistance when bent.
- Pins: Pin 2, pin 1
Adafruit MAX9814 Electret Microphone Amplifier
- Description: A microphone amplifier with automatic gain control.
- Pins: GND, VDD, GAIN, OUTPUT, A/R
Resistor (10 Ohms)
- Description: A resistor with a resistance of 10 Ohms.
- Pins: pin1, pin2
ADXL345
- Description: A 3-axis accelerometer.
- Pins: GND, VCC, CS, INT1, INT2, SDO, SDA, SCL
Buzzer
- Description: A simple piezoelectric buzzer.
- Pins: PIN, GND
LCD Display (16 pin)
- Description: A 16-pin LCD display.
- Pins: VSS, VDD, VO, RS, R_W, E, DB0, DB1, DB2, DB3, DB4, DB5, DB6, DB7, A, K
Resistor (330 Ohms)
- Description: A resistor with a resistance of 330 Ohms.
- Pins: pin1, pin2
Wiring Details
Arduino UNO
- A0: Connected to OUTPUT of Adafruit MAX9814 Electret Microphone Amplifier
- A1: Connected to pin2 of Resistor (10 Ohms) and pin 1 of 2.2 inch Basic Flex Resistor
- A4: Connected to SDA of both ADXL345 accelerometers
- A5: Connected to SCL of both ADXL345 accelerometers
- D2: Connected to DB7 of LCD Display
- D3: Connected to DB6 of LCD Display
- D4: Connected to DB5 of LCD Display
- D5: Connected to DB4 of LCD Display
- D10: Connected to PIN of Buzzer
- D11: Connected to E of LCD Display
- D12: Connected to RS of LCD Display
- 5V: Connected to VDD and A of LCD Display, VCC of both ADXL345 accelerometers, SDO of one ADXL345 accelerometer, VDD of Adafruit MAX9814 Electret Microphone Amplifier, and Pin 2 of 2.2 inch Basic Flex Resistor
- GND: Connected to VSS, R_W, and K of LCD Display, GND of Buzzer, GND of both ADXL345 accelerometers, SDO of one ADXL345 accelerometer, and GND of Adafruit MAX9814 Electret Microphone Amplifier
2.2 inch Basic Flex Resistor
- pin 1: Connected to pin2 of Resistor (10 Ohms) and A1 of Arduino UNO
- Pin 2: Connected to VDD and A of LCD Display, VCC of both ADXL345 accelerometers, SDO of one ADXL345 accelerometer, VDD of Adafruit MAX9814 Electret Microphone Amplifier, and 5V of Arduino UNO
Adafruit MAX9814 Electret Microphone Amplifier
- GND: Connected to VSS, R_W, and K of LCD Display, GND of Buzzer, GND of both ADXL345 accelerometers, SDO of one ADXL345 accelerometer, and GND of Arduino UNO
- VDD: Connected to VDD and A of LCD Display, VCC of both ADXL345 accelerometers, SDO of one ADXL345 accelerometer, and 5V of Arduino UNO
- OUTPUT: Connected to A0 of Arduino UNO
Resistor (10 Ohms)
- pin1: Connected to pin2 of Resistor (330 Ohms)
- pin2: Connected to pin1 of 2.2 inch Basic Flex Resistor and A1 of Arduino UNO
ADXL345
- GND: Connected to VSS, R_W, and K of LCD Display, GND of Buzzer, GND of Adafruit MAX9814 Electret Microphone Amplifier, and GND of Arduino UNO
- VCC: Connected to VDD and A of LCD Display, SDO of one ADXL345 accelerometer, VDD of Adafruit MAX9814 Electret Microphone Amplifier, and 5V of Arduino UNO
- SDA: Connected to A4 of Arduino UNO
- SCL: Connected to A5 of Arduino UNO
Buzzer
- PIN: Connected to D10 of Arduino UNO
- GND: Connected to VSS, R_W, and K of LCD Display, GND of both ADXL345 accelerometers, SDO of one ADXL345 accelerometer, GND of Adafruit MAX9814 Electret Microphone Amplifier, and GND of Arduino UNO
LCD Display (16 pin)
- VSS: Connected to GND of Arduino UNO, GND of Buzzer, GND of both ADXL345 accelerometers, SDO of one ADXL345 accelerometer, and GND of Adafruit MAX9814 Electret Microphone Amplifier
- VDD: Connected to 5V of Arduino UNO, VCC of both ADXL345 accelerometers, SDO of one ADXL345 accelerometer, VDD of Adafruit MAX9814 Electret Microphone Amplifier, and Pin 2 of 2.2 inch Basic Flex Resistor
- VO: Connected to pin1 of Resistor (330 Ohms)
- RS: Connected to D12 of Arduino UNO
- R_W: Connected to GND of Arduino UNO, GND of Buzzer, GND of both ADXL345 accelerometers, SDO of one ADXL345 accelerometer, and GND of Adafruit MAX9814 Electret Microphone Amplifier
- E: Connected to D11 of Arduino UNO
- DB4: Connected to D5 of Arduino UNO
- DB5: Connected to D4 of Arduino UNO
- DB6: Connected to D3 of Arduino UNO
- DB7: Connected to D2 of Arduino UNO
- A: Connected to 5V of Arduino UNO, VCC of both ADXL345 accelerometers, SDO of one ADXL345 accelerometer, VDD of Adafruit MAX9814 Electret Microphone Amplifier, and Pin 2 of 2.2 inch Basic Flex Resistor
- K: Connected to GND of Arduino UNO, GND of Buzzer, GND of both ADXL345 accelerometers, SDO of one ADXL345 accelerometer, and GND of Adafruit MAX9814 Electret Microphone Amplifier
Resistor (330 Ohms)
- pin1: Connected to pin1 of Resistor (10 Ohms)
- pin2: Connected to VO of LCD Display
Documented Code
Arduino UNO Code
void setup() {
  // put your setup code here, to run once:

}

void loop() {
  // put your main code here, to run repeatedly:

}
This code is a basic template for the Arduino UNO. The setup() function is where you initialize your components and settings, and the loop() function is where the main logic of your program runs repeatedly.