
Wi-Fi Controlled Motion Detection System with ESP8266 and IR Sensor
View and Edit Project In Cirkit Designer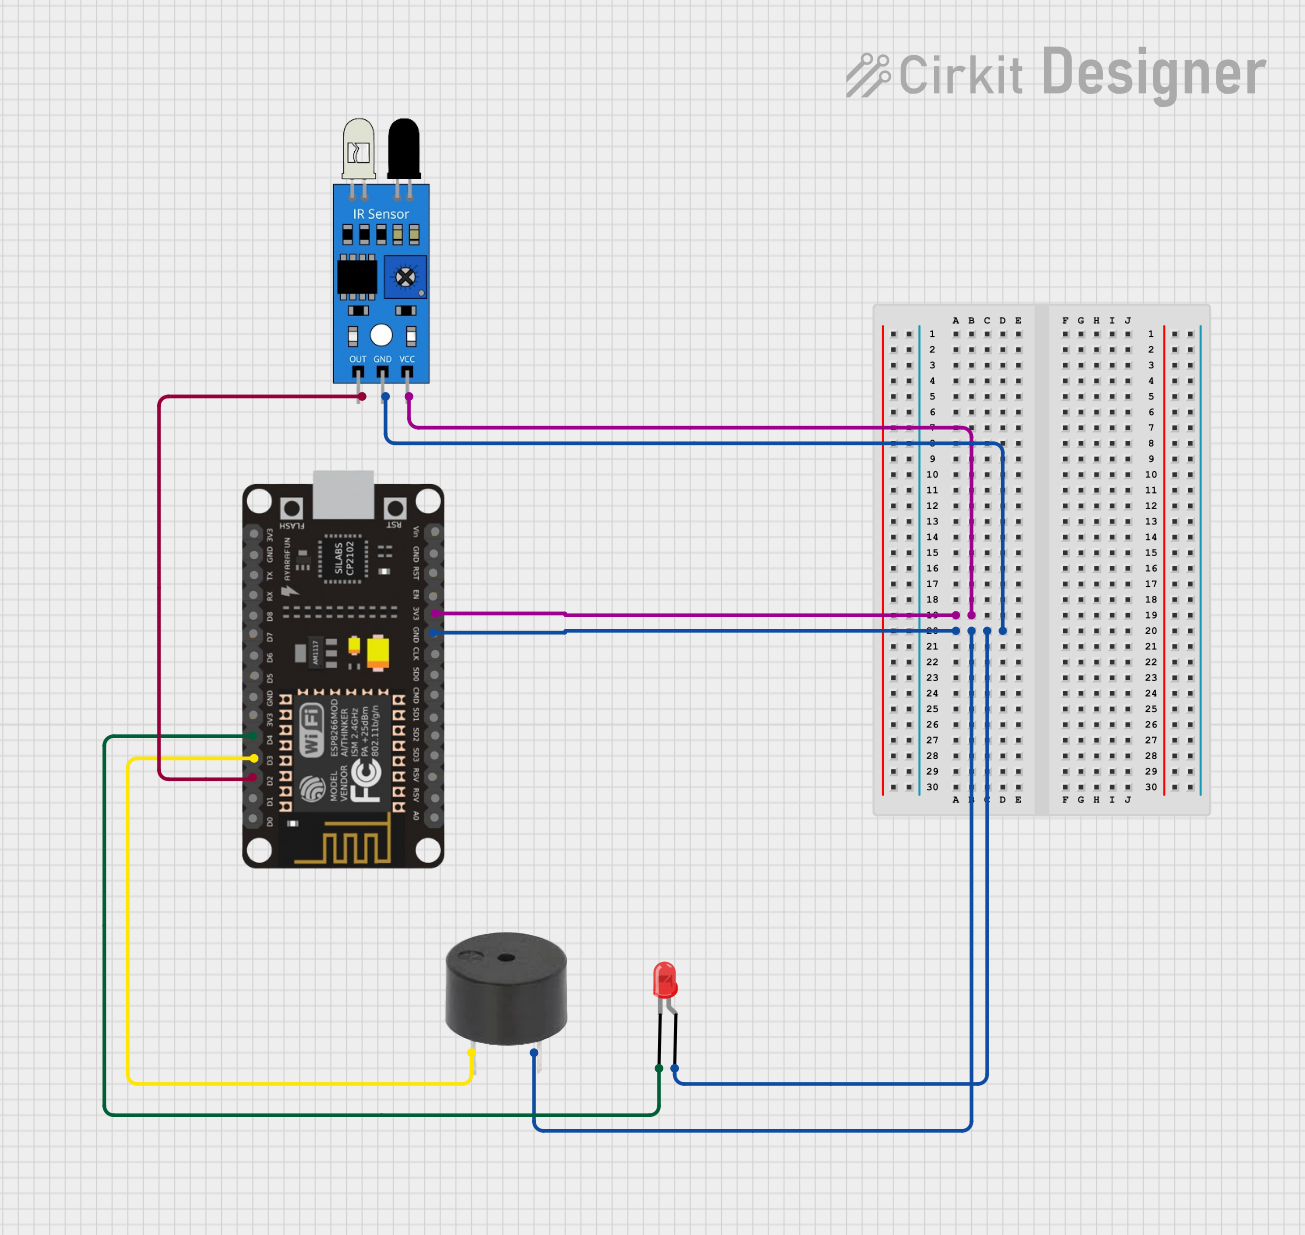
Circuit Documentation
Summary
This document provides a detailed overview of a circuit designed to detect motion using an IR sensor and respond by activating a buzzer and an LED. The circuit is controlled by an ESP8266 NodeMCU microcontroller, which also sends alerts via Telegram when motion is detected.
Component List
LED: Two Pin (red)
- Description: A standard red LED.
- Pins: Cathode, Anode
IR Sensor
- Description: An infrared sensor used to detect motion.
- Pins: Out, GND, VCC
Buzzer
- Description: A piezoelectric buzzer.
- Pins: PIN, GND
ESP8266 NodeMCU
- Description: A Wi-Fi enabled microcontroller.
- Pins: D0, D1, D2, D3, D4, 3V3, GND, D5, D6, D7, D8, RX, TX, A0, RSV, SD3, SD2, SD1, CMD, SD0, CLK, EN, RST, VIN
Wiring Details
LED: Two Pin (red)
- Cathode: Connected to D4 on ESP8266 NodeMCU
- Anode: Connected to GND on ESP8266 NodeMCU
IR Sensor
- VCC: Connected to 3V3 on ESP8266 NodeMCU
- GND: Connected to GND on ESP8266 NodeMCU
- Out: Connected to D2 on ESP8266 NodeMCU
Buzzer
- PIN: Connected to D3 on ESP8266 NodeMCU
- GND: Connected to GND on ESP8266 NodeMCU
ESP8266 NodeMCU
- 3V3: Connected to VCC on IR Sensor
- GND: Connected to GND on IR Sensor, Anode of LED, and GND of Buzzer
- D2: Connected to Out on IR Sensor
- D3: Connected to PIN on Buzzer
- D4: Connected to Cathode of LED
Code Documentation
#include <ESP8266WiFi.h>
#include <WiFiClientSecure.h>
#include <UniversalTelegramBot.h>

const char* ssid = "Kumili(JB Fiber@9911155022)"; // Enter your WIFI SSID
const char* password = "kumili1905"; // Enter your WIFI Password

#define BOTtoken "7721300805:AAFJsFdWP4NZt9I4PmREonvETnCz5seuZV8" // Enter the bottoken you got from botfather
#define CHAT_ID "1375876563" // Enter your chatID you got from chatid bot

X509List cert(TELEGRAM_CERTIFICATE_ROOT);
WiFiClientSecure client;
UniversalTelegramBot bot(BOTtoken, client);

const int irSensorPin = D2; // Replace with the actual IR sensor pin
const int buzzPin = D3;
const int LED1 = D4;

void setup() {
  Serial.begin(115200);
  configTime(0, 0, "pool.ntp.org");
  client.setTrustAnchors(&cert);

  WiFi.mode(WIFI_STA);
  WiFi.begin(ssid, password);

  int a = 0;
  while (WiFi.status() != WL_CONNECTED) {
    Serial.print(".");
    delay(500);
    a++;
  }

  pinMode(irSensorPin, INPUT); // IR sensor is typically connected as input
  pinMode(buzzPin, OUTPUT);
  pinMode(LED1 , OUTPUT);

  Serial.println("");
  Serial.println("WiFi connected");
  Serial.print("IP address: ");
  Serial.println(WiFi.localIP());
  bot.sendMessage(CHAT_ID, "Wifi Connected!", "");
  bot.sendMessage(CHAT_ID, "System has Started with IR sensor!!", "");
}

void loop() {
  int sensorValue = digitalRead(irSensorPin);

  if (sensorValue == LOW) { // Typically IR sensor outputs LOW when detecting motion
    digitalWrite(buzzPin, HIGH);
    digitalWrite(LED1, HIGH);
    bot.sendMessage(CHAT_ID, "ALERT! MOTION DETECTED!!", "");
  } else {
    digitalWrite(buzzPin, LOW);
    digitalWrite(LED1, LOW);
  }
  delay(500); // Adjust delay based on your sensor's response time
}
This code initializes the ESP8266 NodeMCU, connects it to a Wi-Fi network, and sets up a Telegram bot for notifications. The IR sensor is monitored, and when motion is detected, the buzzer and LED are activated, and a notification is sent via Telegram.