
Arduino UNO-Based Smart Fan and Sensor System with OLED Display
View and Edit Project In Cirkit Designer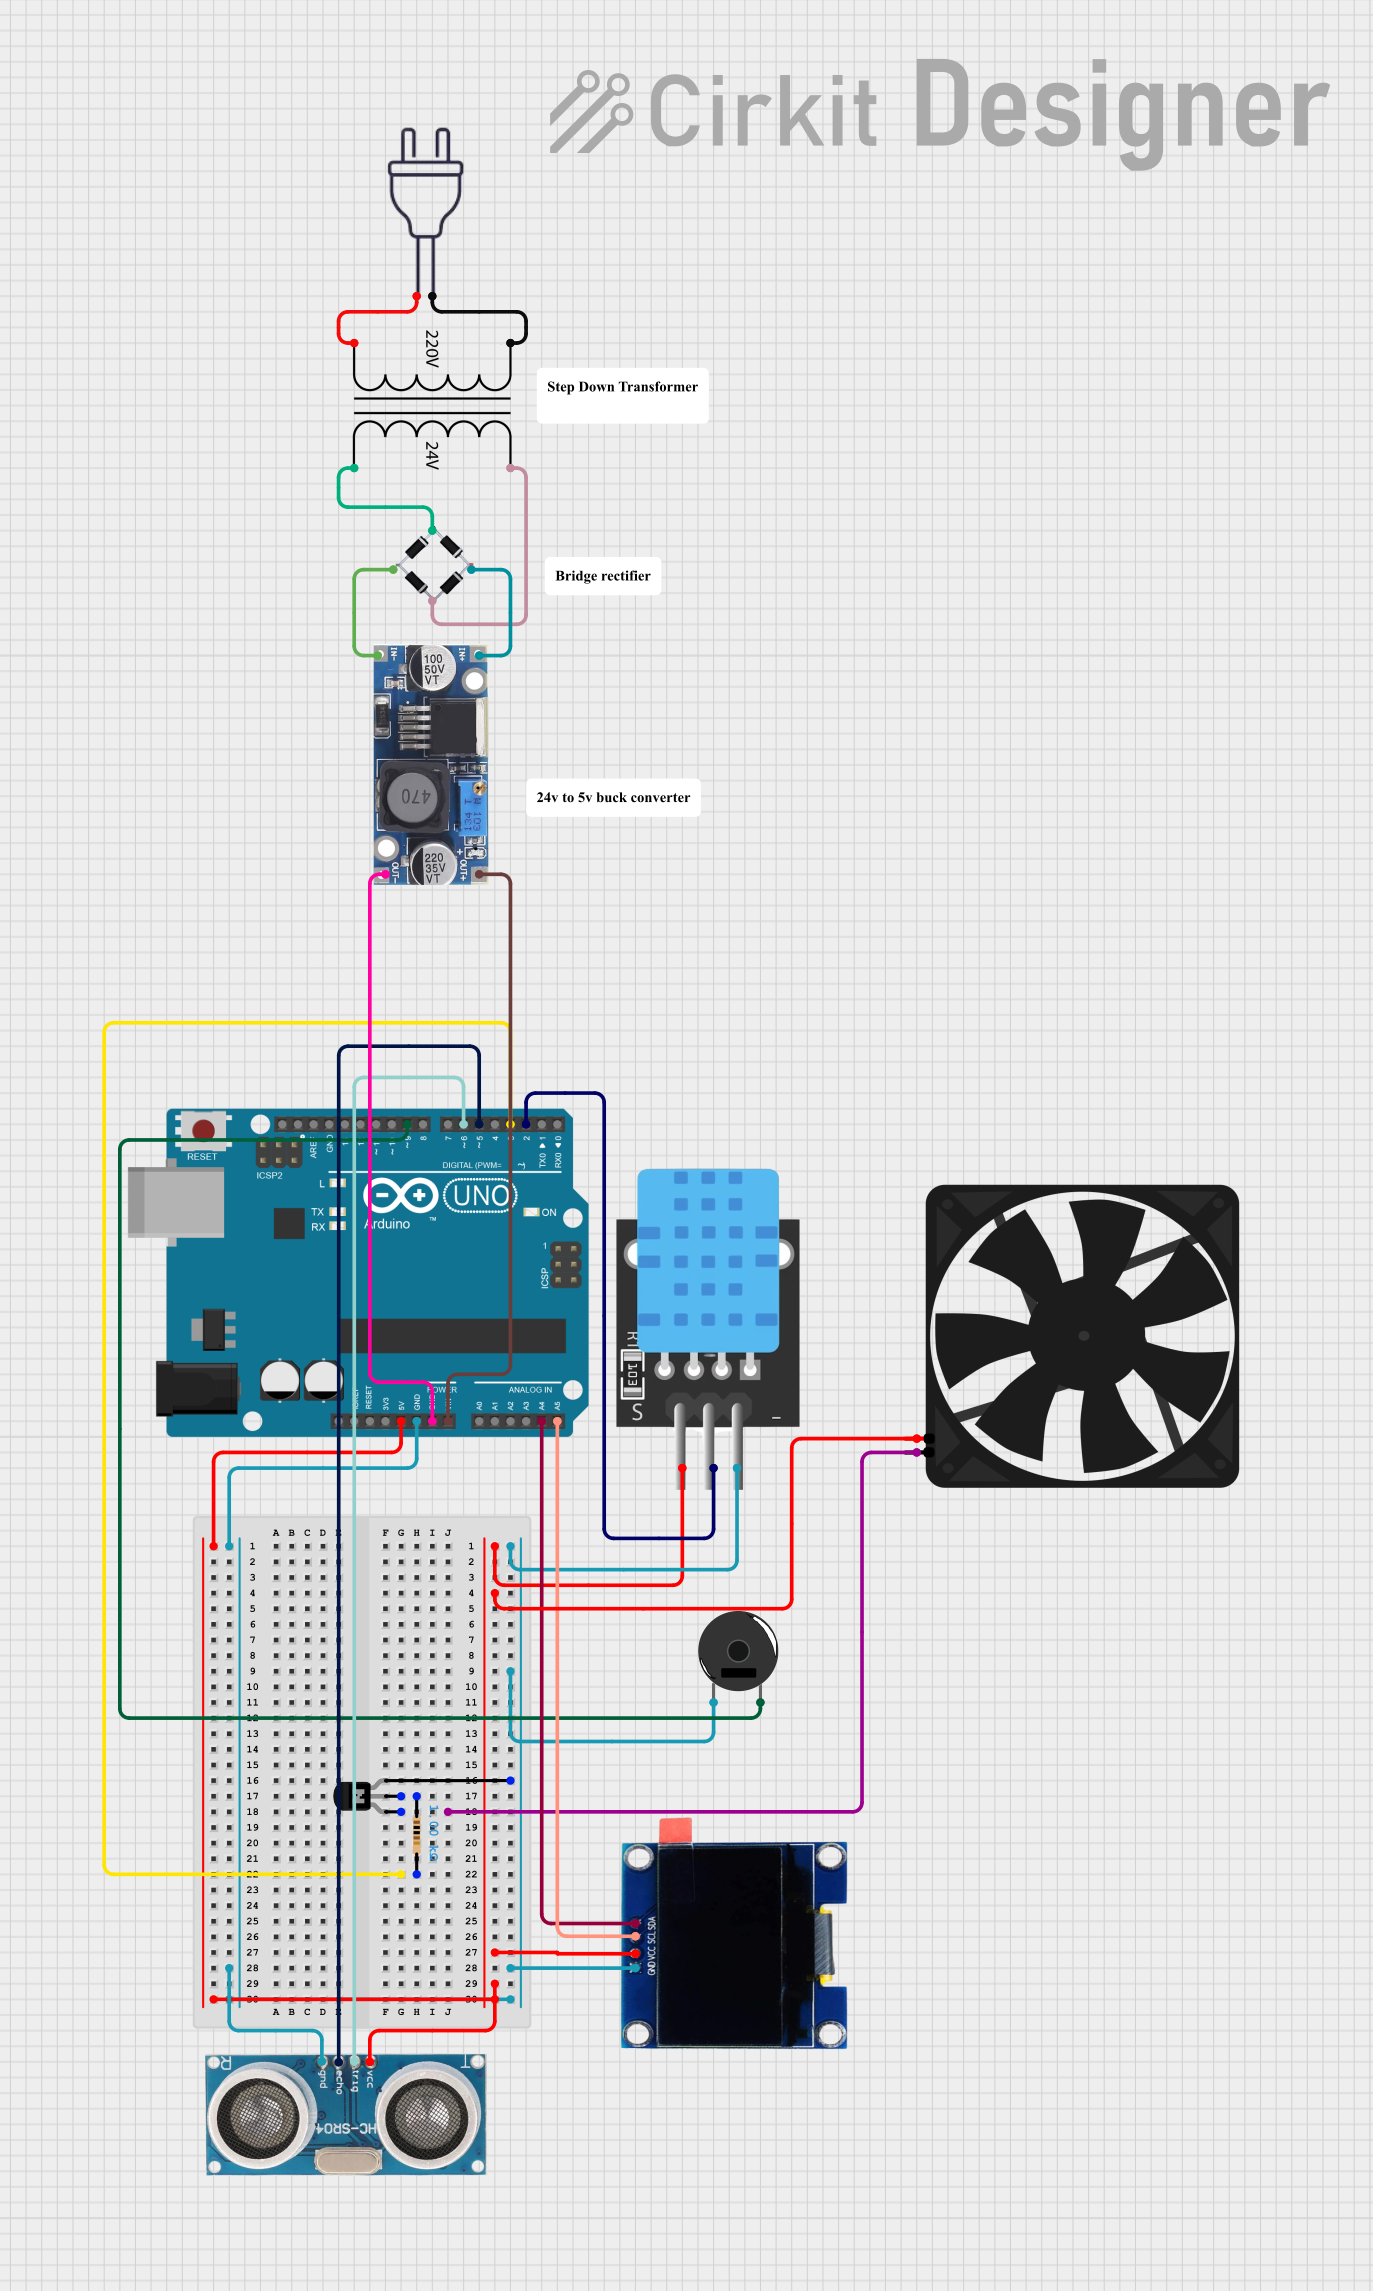
Circuit Documentation
Summary
This circuit involves an Arduino UNO microcontroller interfacing with various components including a piezo buzzer, temperature sensor, NPN transistor, resistor, ultrasonic sensor, OLED display, fan, power transformer, bridge rectifier, and a voltage converter. The circuit is designed to perform multiple functions such as temperature sensing, distance measurement, and displaying information on an OLED screen.
Component List
Arduino UNO
- Description: Microcontroller board based on the ATmega328P.
- Pins: UNUSED, IOREF, Reset, 3.3V, 5V, GND, Vin, A0, A1, A2, A3, A4, A5, SCL, SDA, AREF, D13, D12, D11, D10, D9, D8, D7, D6, D5, D4, D3, D2, D1, D0
Piezo Buzzer
- Description: A small audio signaling device.
- Pins: pin 1, pin 2
TEMP
- Description: Temperature sensor.
- Pins: 5V, D3, GND
NPN Transistor (CBE)
- Description: NPN transistor with collector, base, and emitter pins.
- Pins: collector, base, emitter
Resistor
- Description: Resistor with a resistance of 1000 Ohms.
- Pins: pin1, pin2
Ultrasonic Sensor
- Description: Sensor for measuring distance using ultrasonic waves.
- Pins: +VCC, Trigger, Echo, GND
OLED 1.3"
- Description: 1.3-inch OLED display.
- Pins: GND, VCC, SCL, SDA
Fan
- Description: Small cooling fan.
- Pins: GND, 5V
Power Transformer (220V to 24V)
- Description: Transformer to step down 220V AC to 24V AC.
- Pins: 2 - Primary, 1 - Primary, 3 - Secondary, 4 - Secondary
48v to 5v
- Description: Voltage converter to step down 48V to 5V.
- Pins: out+, out--, in+, in--
Bridge Rectifier
- Description: Converts AC to DC.
- Pins: Source_in-, source_out-, source_out+, source_in+
Power 220v
- Description: 220V AC power source.
- Pins: hot wire, neutral wire
Wiring Details
Arduino UNO
5V connected to:
- TEMP (5V)
- Fan (5V)
- OLED 1.3" (VCC)
- Ultrasonic Sensor (+VCC)
GND connected to:
- Ultrasonic Sensor (GND)
- NPN Transistor (emitter)
- TEMP (GND)
- Piezo Buzzer (pin 1)
- OLED 1.3" (GND)
- 48v to 5v (out--)
Vin connected to:
- 48v to 5v (out+)
A4 connected to:
- OLED 1.3" (SDA)
A5 connected to:
- OLED 1.3" (SCL)
D2 connected to:
- TEMP (D3)
D3 connected to:
- Resistor (pin2)
D5 connected to:
- Ultrasonic Sensor (Echo)
D6 connected to:
- Ultrasonic Sensor (Trigger)
D9 connected to:
- Piezo Buzzer (pin 2)
Piezo Buzzer
pin 1 connected to:
- Arduino UNO (GND)
pin 2 connected to:
- Arduino UNO (D9)
TEMP
5V connected to:
- Arduino UNO (5V)
D3 connected to:
- Arduino UNO (D2)
GND connected to:
- Arduino UNO (GND)
NPN Transistor (CBE)
collector connected to:
- Fan (GND)
base connected to:
- Resistor (pin1)
emitter connected to:
- Arduino UNO (GND)
Resistor
pin1 connected to:
- NPN Transistor (base)
pin2 connected to:
- Arduino UNO (D3)
Ultrasonic Sensor
+VCC connected to:
- Arduino UNO (5V)
Trigger connected to:
- Arduino UNO (D6)
Echo connected to:
- Arduino UNO (D5)
GND connected to:
- Arduino UNO (GND)
OLED 1.3"
GND connected to:
- Arduino UNO (GND)
VCC connected to:
- Arduino UNO (5V)
SCL connected to:
- Arduino UNO (A5)
SDA connected to:
- Arduino UNO (A4)
Fan
GND connected to:
- NPN Transistor (collector)
5V connected to:
- Arduino UNO (5V)
Power Transformer (220V to 24V)
2 - Primary connected to:
- Power 220v (hot wire)
1 - Primary connected to:
- Power 220v (neutral wire)
3 - Secondary connected to:
- Bridge Rectifier (source_in+)
4 - Secondary connected to:
- Bridge Rectifier (Source_in-)
48v to 5v
out+ connected to:
- Arduino UNO (Vin)
out-- connected to:
- Arduino UNO (GND)
in+ connected to:
- Bridge Rectifier (source_out+)
in-- connected to:
- Bridge Rectifier (source_out-)
Bridge Rectifier
source_in+ connected to:
- Power Transformer (3 - Secondary)
Source_in- connected to:
- Power Transformer (4 - Secondary)
source_out+ connected to:
- 48v to 5v (in+)
source_out- connected to:
- 48v to 5v (in--)
Power 220v
hot wire connected to:
- Power Transformer (2 - Primary)
neutral wire connected to:
- Power Transformer (1 - Primary)
Documented Code
Arduino UNO Code
void setup() {
  // put your setup code here, to run once:

}

void loop() {
  // put your main code here, to run repeatedly:

}
This code is a basic template for the Arduino UNO. The setup() function is used to initialize any settings or configurations, and the loop() function contains the main logic that runs repeatedly.